In this tutorial we will learn about Kubernetes StatefulSets using different examples. StatefulSets was introduced in Kubernetes 1.5; it consists of a bond between the pod and the Persistent Volume.
Overview on Kubernetes StatefulSets
We learned about
ReplicaSets
which creates multiple pod replicas from a single pod template. These
replicas don’t differ from each other, apart from their name and IP
address. If the pod template includes a volume, which refers to a
specific PersistentVolumeClaim, all replicas of the ReplicaSet will
use the exact same PersistentVolumeClaim and therefore the same
PersistentVolume bound by the claim
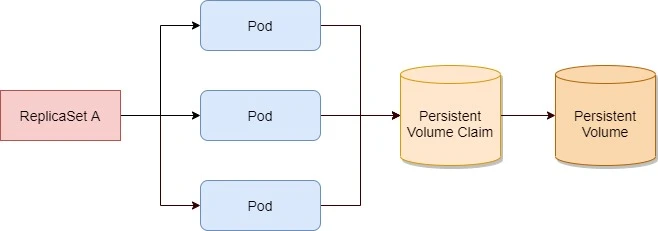
All pods from the same ReplicaSet always use the same PersistentVolumeClaim and PersistentVolume.
Instead of using a ReplicaSet to run these types of pods, we can
create a StatefulSet resource, which is specifically tailored to
applications where instances of the application must be treated as
completely alike individuals, with each one having a stable name and
state.
Each pod created by a StatefulSet is assigned an ordinal index
(zero-based), which is then used to derive the pod’s name and hostname,
and to attach stable storage to the pod. The names of the pods are thus
predictable, because each pod’s name is derived from the StatefulSet’s
name and the ordinal index of the instance. Rather than the pods having
random names, they’re nicely organized,
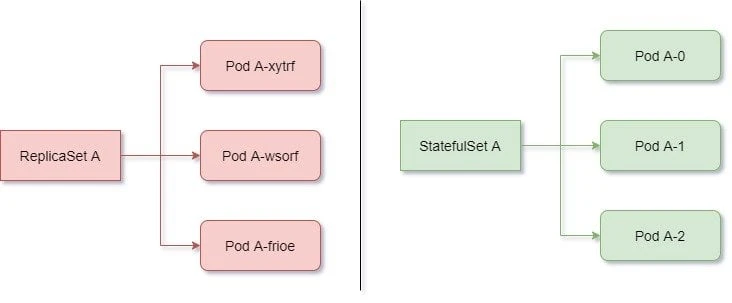
Pods created by a StatefulSet have predictable names (and hostnames), unlike those created by a ReplicaSet
When a pod instance managed by a StatefulSet disappears (because the
node the pod was running on has failed, it was evicted from the node, or
someone deleted the pod object manually), the StatefulSet makes sure
it’s replaced with a new instance—similar to how ReplicaSets do it.
But in contrast to ReplicaSets, the replacement pod gets the same name
and hostname as the pod that has disappeared.
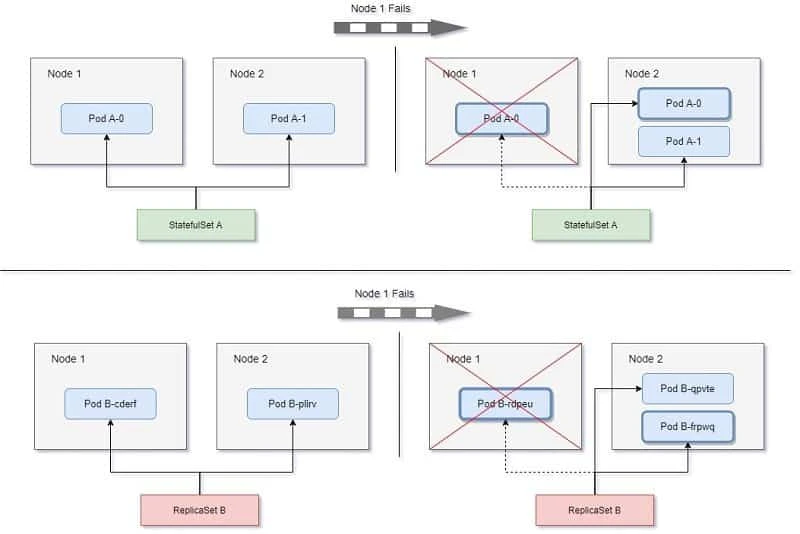
A StatefulSet replaces a lost pod with a new one with the same identity, whereas a ReplicaSet replaces it with a completely new unrelated pod.
To summarise, Kubernetes StatefulSet manages the deployment and scaling of a set of Pods, and provides guarantees about the ordering and uniqueness of these Pods.
Limitations
- The storage for a given Pod must either be provisioned by a PersistentVolume Provisioner based on the requested storage class, or pre-provisioned by an admin.
- Deleting and/or scaling a StatefulSet down will not delete the volumes associated with the StatefulSet. This is done to ensure data safety, which is generally more valuable than an automatic purge of all related StatefulSet resources.
- StatefulSets currently require a Headless Service to be responsible for the network identity of the Pods. You are responsible for creating this Service.
- StatefulSets do not provide any guarantees on the termination of pods when a StatefulSet is deleted. To achieve ordered and graceful termination of the pods in the StatefulSet, it is possible to scale the StatefulSet down to 0 prior to deletion.
- When using Rolling Updates with the default Pod Management Policy (OrderedReady), it’s possible to get into a broken state that requires manual intervention to repair.
Creating a StatefulSet resource
It makes sense to use a dynamic provisioning and storage class with
StatefulSet because without this a cluster administrator to provision
the actual storage up front. Kubernetes can also perform this job
automatically through dynamic provisioning of PersistentVolumes.
Currently (at the time of writing this tutorial) dynamic provisioning is possible only with following providers:
| Cloud Provider | Default StorageClass Name | Default Provisioner |
|---|---|---|
| Amazon Web Services | gp2 | aws-ebs |
| Microsoft Azure | standard | azure-disk |
| Google Cloud Platform | standard | gce-pd |
| OpenStack | standard | cinder |
| VMware vSphere | thin | vsphere-volume |
Configure NFS Server
Since I am using Virtual Machines to demonstrate this tutorial, I will use NFS server as the backend Persistent Volume. The downside is that I must manually create all the PV required for the number of replicas in the StatefulSets. I had already configured my NFS server on the controller node in the previous article while learning about Kubernetes Persistent Volumes.
Following are the shares which I have exported for the 3 replicas which I plan to create with StatefulSets:
[root@controller ~]# exportfs -v
/share1         (sync,wdelay,hide,no_subtree_check,sec=sys,rw,secure,no_root_squash,no_all_squash)
/share2         (sync,wdelay,hide,no_subtree_check,sec=sys,rw,secure,no_root_squash,no_all_squash)
/share3         (sync,wdelay,hide,no_subtree_check,sec=sys,rw,secure,no_root_squash,no_all_squash)
Create Persistent Volume
Next I need to create 3 persistent volumes for respective shares. Again I would like to repeat myself that if you are using dynamic provisioning then you just need to create a storage class and don’t have to worry about creating volumes for the Pods. Here since I am manually creating the Persistent Volumes, the StaefulSets will not be scalable unless I keep extra Persistent Volumes available.
I have assigned a storage size of 1 GB for each of the shares. We have already covered the different sections in this YAML file. Following is a sample YAML file to create PV:
[root@controller ~]# cat nfs-pv-share1.yml
apiVersion: v1
kind: PersistentVolume
metadata:
  name: nfs-pv-share1
spec:
  capacity:
    storage: 1Gi
  volumeMode: Filesystem
  accessModes:
   - ReadWriteMany
  persistentVolumeReclaimPolicy: Recycle
  mountOptions:
    - hard
    - nfsvers=4.1
  nfs:
    path: /share1
    server: controller
Similarly I have 2 more YAML files to create Persistent Volumes for
/share2 and /share3
Let’s create these PV:
[root@controller ~]# kubectl create -f nfs-pv-share1.yml -f nfs-pv-share2.yml -f nfs-pv-share3.yml
persistentvolume/nfs-pv-share1 created
persistentvolume/nfs-pv-share2 created
persistentvolume/nfs-pv-share3 created
Create StatefulSets
I will configure a basic nginx server using StatefulSets just to give you an overview of how statefulsets works. To get the KIND and apiVersion of Stateful sets you can refer api-resources:
[root@controller ~]# kubectl api-resources | grep -iE 'KIND|stateful'
NAME                              SHORTNAMES   APIGROUP                       NAMESPACED   KIND
statefulsets                      sts          apps                           true         StatefulSet
To get the apiVersion:
[root@controller ~]# kubectl explain StatefulSet | head -n 2
KIND:     StatefulSet
VERSION:  apps/v1
Now that we have our KIND and apiVersion, we can create our YAMl file:
[root@controller ~]# cat nfs-stateful.yml
apiVersion: apps/v1
kind: StatefulSet
metadata:
  name: nginx-statefulset
spec:
  selector:
    matchLabels:
      name: nginx-statefulset
  serviceName: nginx-statefulset
  replicas: 3
  template:
    metadata:
      labels:
        name: nginx-statefulset
    spec:
      terminationGracePeriodSeconds: 10
      containers:
      - name: nginx-statefulset
        image: nginx
        ports:
        - containerPort: 80
          name: "web"
        volumeMounts:
        - name: db-data
          mountPath: /var/www
  volumeClaimTemplates:
  - metadata:
      name: db-data
    spec:
      accessModes: [ "ReadWriteMany" ]
      storageClassName: ""
      resources:
        requests:
          storage: 1Gi
Here we plan to create 3 replicas which is why we created 3 Persistent
Volumes earlier. If storageClassName is not specified in the PVC, the default storage class will be used
for provisioning. Since we don’t have a storage class, I have set to
an empty string ("") in the PVC, no storage class will be used. The
StatefulSets will create the Persistent Volume Claim using the values
from volumeClaimTemplates. It is important that accessModes matches
the value from PersistentVolume or else the PVC will not bind to PV.
We are using ReadWriteMany as our accessMode in the PV which is why
the same is mentioned here.
Next lets’ go ahead and create this StatefulSet:
[root@controller ~]# kubectl create -f nfs-stateful.yml
statefulset.apps/nginx-statefulset created
List the available StatefulSets
To get the list of available Kubernetes StatefulSets use:
[root@controller ~]# kubectl get statefulsets
NAME                READY   AGE
nginx-statefulset   0/3     36s
Since we have just create this StatefulSet, there are 0 ready Pods out of total 3. Next look out for available PVC as it is expecte that StatefulSet will create Persistent Volume Claim for all the volumes we created earlier:
[root@controller ~]# kubectl get pvc
NAME                          STATUS   VOLUME          CAPACITY   ACCESS MODES   STORAGECLASS    AGE
db-data-nginx-statefulset-0   Bound    nfs-pv-share1   1Gi        RWX                            4s
Here as you see, we have one PVC created with status as BOUND which
means it has successfully bound to one of the Persistent Volumes which
can be checked under VOLUME i.e. nfs-pv-share-1.
You can also check the list of available PV, here nfs-pv-share1 is
claimed by default/db-data-nginx-statefulset-0
[root@controller ~]# kubectl get pv
NAME            CAPACITY   ACCESS MODES   RECLAIM POLICY   STATUS      CLAIM                                 STORAGECLASS    REASON   AGE
nfs-pv-share1   1Gi        RWX            Recycle          Bound       default/db-data-nginx-statefulset-0                            2m3s
nfs-pv-share2   1Gi        RWX            Recycle          Available                                                                  2m3s
nfs-pv-share3   1Gi        RWX            Recycle          Available                                                                  2m3s
Next we check the status of Pods:
[root@controller ~]# kubectl get pods
NAME                            READY   STATUS              RESTARTS   AGE
nginx-statefulset-0             1/1     Running             0          10s
nginx-statefulset-1             0/1     ContainerCreating   0          1s
Here the first Pod is created and you can check the naming convention, it doesn’t contain any random strings as with Deployments or ReplicaSets. Once the second Pod is created then the third one would be started.
After waiting for some time, we have 2 PVC and Pods up and running and all our Persistent Volumes are claimed:
[root@controller ~]# kubectl get pods
NAME                            READY   STATUS    RESTARTS   AGE
nginx-statefulset-0             1/1     Running   0          98s
nginx-statefulset-1             1/1     Running   0          89s
nginx-statefulset-2             1/1     Running   0          80s

[root@controller ~]# kubectl get pv
NAME            CAPACITY   ACCESS MODES   RECLAIM POLICY   STATUS   CLAIM                                 STORAGECLASS    REASON   AGE
nfs-pv-share1   1Gi        RWX            Recycle          Bound    default/db-data-nginx-statefulset-0                            46m
nfs-pv-share2   1Gi        RWX            Recycle          Bound    default/db-data-nginx-statefulset-1                            46m
nfs-pv-share3   1Gi        RWX            Recycle          Bound    default/db-data-nginx-statefulset-2                            46m

[root@controller ~]# kubectl get pvc
NAME                          STATUS   VOLUME          CAPACITY   ACCESS MODES   STORAGECLASS    AGE
db-data-nginx-statefulset-0   Bound    nfs-pv-share1   1Gi        RWX                            44m
db-data-nginx-statefulset-1   Bound    nfs-pv-share2   1Gi        RWX                            44m
db-data-nginx-statefulset-2   Bound    nfs-pv-share3   1Gi        RWX                            44m
Deleting a Pod
Let us play around with our Pods to make sure what we learned above, actually works. So as per the definition of StatefulSet, the pod’s hostname, IP address, name etc should not change even if a Pod gets deleted.
So to verify this let’s first check the details of our Pods:
[root@controller ~]# kubectl get pods -o wide
NAME                            READY   STATUS    RESTARTS   AGE     IP          NODE                   NOMINATED NODE   READINESS GATES
nginx-statefulset-0             1/1     Running   0          45m     10.36.0.1   worker-1.example.com   <none>           <none>
nginx-statefulset-1             1/1     Running   0          45m     10.44.0.1   worker-2.example.com   <none>           <none>
nginx-statefulset-2             1/1     Running   0          45m     10.36.0.3   worker-1.example.com   <none>           <none>
Next let’s create a dummy file on nginx-statefulset-2 Pod:
[root@controller ~]# kubectl exec -it nginx-statefulset-2 -c nginx-statefulset -- touch /var/www/pod3-file
The same file should appear on our NFS share which is shared with
nginx-statefulset-2
[root@controller ~]# ls -l /share3/
total 0
-rw-r--r-- 1 root root 0 Jan  9 16:44 pod3-file
Next let’s delete this Pod:
[root@controller ~]# kubectl delete pod nginx-statefulset-2
pod "nginx-statefulset-2" deleted
As expected, a new Pod is automatically created with the same IP Address and nodename:
[root@controller ~]# kubectl get pods -o wide
NAME                            READY   STATUS              RESTARTS   AGE     IP          NODE                   NOMINATED NODE   READINESS GATES
nginx-statefulset-0             1/1     Running             0          48m     10.36.0.1   worker-1.example.com   <none>           <none>
nginx-statefulset-1             1/1     Running             0          48m     10.44.0.1   worker-2.example.com   <none>           <none>
nginx-statefulset-2             0/1     ContainerCreating   0          2s      <none>      worker-1.example.com   <none>           <none>
The IP is not yet assigned, so let’s check the status again:
[root@controller ~]# kubectl get pods -o wide
NAME                            READY   STATUS    RESTARTS   AGE     IP          NODE                   NOMINATED NODE   READINESS GATES
nginx-statefulset-0             1/1     Running   0          49m     10.36.0.1   worker-1.example.com   <none>           <none>
nginx-statefulset-1             1/1     Running   0          48m     10.44.0.1   worker-2.example.com   <none>           <none>
nginx-statefulset-2             1/1     Running   0          22s     10.36.0.3   worker-1.example.com   <none>           <none>
Next let’s verify the file if it is still present within the Pod:
[root@controller ~]# kubectl exec -it nginx-statefulset-2 -c nginx-statefulset -- ls -l /var/www/
total 0
-rw-r--r-- 1 root root 0 Jan  9 11:14 pod3-file
So the Pod seems to working as expected. Even if the Pod is deleted then the nodename, hostname and IP will remain same unlike Deployments and ReplicaSets.
Conclusion
In this tutorial we learned about Kubernetes StatefulSets and how it’s comparison with ReplicaSets and Deployments. We learned that like a Deployment, a StatefulSet manages Pods that are based on an identical container spec. Unlike a Deployment, a StatefulSet maintains a sticky identity for each of their Pods. These pods are created from the same spec, but are not interchangeable: each has a persistent identifier that it maintains across any rescheduling.
If you want to use storage volumes to provide persistence for your workload, you can use a StatefulSet as part of the solution. Although individual Pods in a StatefulSet are susceptible to failure, the persistent Pod identifiers make it easier to match existing volumes to the new Pods that replace any that have failed
