In this Kubernetes Tutorial we will explore ReplicaSet and compare it with ReplicationController using different scenarios and examples.
Overview on Replication Controllers
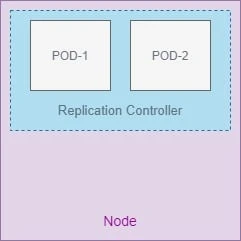
- A ReplicationController is a Kubernetes resource that ensures its pods are always kept running.
- If the pod disappears for any reason, such as in the event of a node
disappearing from the cluster or because the pod was evicted from the
node, the
ReplicationControllernotices the missing pod and creates a replacement pod. - The
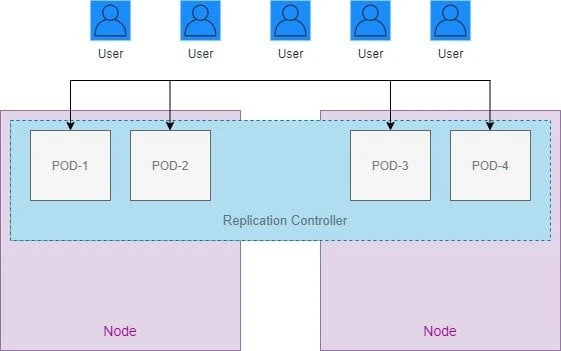
ReplicationControllerin general, are meant to create and manage multiple copies (replicas) of a pod
- It is possible that you Node is out of resources while creating new pods with Replication controllers or replica sets, in such case it will automatically create new pods on another available cluster node
How replication controller works
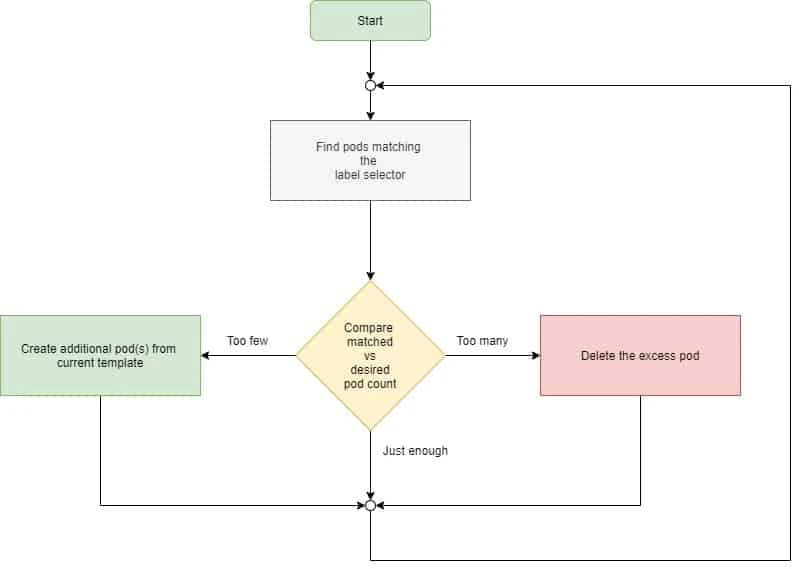
A ReplicationController’s job is to make sure that an exact number of pods always matches its label selector. If it doesn’t, the ReplicationController takes the appropriate action to reconcile the actual with the desired number.
The following flow chart shows the operation of Replication Controller:
A ReplicationController has three essential parts:
- A label selector, which determines what pods are in the ReplicationController’s scope
- A replica count, which specifies the desired number of pods that should be running
- A pod template, which is used when creating new pod replicas
A ReplicationController’s replica count, the label selector, and even the pod template can all be modified at any time, but only changes to the replica count affect existing pods.
Creating a replication controller
To get the kind and apiVersion of replication controller we will check
list of api-resources
[root@controller ~]# kubectl api-resources | grep -iE 'KIND|replication'
NAME                              SHORTNAMES   APIGROUP                       NAMESPACED   KIND
replicationcontrollers            rc                                          true         ReplicationController
So, the kind value would be ReplicationController, now to get the
apiVersion of this kind we will use kubectl explain command:
[root@controller ~]# kubectl explain ReplicationController | head -n 2
KIND:     ReplicationController
VERSION:  v1
Now we have the kind and apiVersion value needed to create our first
replication controller. Similar to pods and other Kubernetes resources,
you create a ReplicationController by posting a JSON or YAML descriptor
to the Kubernetes API server.
[root@controller ~]# cat replication-controller.yml
apiVersion: v1
kind: ReplicationController
metadata:
  name: myapp-rc
  labels:
    app: myapp
    type: dev
spec:
  replicas: 3
  selector:
    app: myapp
  template:
    metadata:
      name: myapp-pod
      labels:
        app: myapp
        type: dev
    spec:
      containers:
      - name: nginx-container
        image: nginx
The highlighted section is the template to create the Pod.
When you post the file to the API server, Kubernetes creates a new
Replication-Controller named myapp-rc, which makes sure three pod
instances always match the label selector app=myapp. When there aren’t
enough pods, new pods will be created from the provided pod template.
To create the ReplicationController, use the kubectl create command:
[root@controller ~]# kubectl create -f replication-controller.yml
replicationcontroller/myapp-rc created
Verify the operation of Replication Controller
Because no pods exist with the app=myapp label, the
ReplicationController should spin up three new pods from the pod
template. List the available pods in the default namespace:
[root@controller ~]# kubectl get pods
NAME                        READY   STATUS              RESTARTS   AGE
init-container-example-1    1/1     Running             0          112m
myapp-rc-b2jtr              0/1     ContainerCreating   0          5s
myapp-rc-c57qm              0/1     ContainerCreating   0          5s
myapp-rc-hmj9g              0/1     ContainerCreating   0          5s
As expected, ReplicationController has started 3 pods in the default namespace, to get the status and list of available replication controllers:
[root@controller ~]# kubectl get rc
NAME       DESIRED   CURRENT   READY   AGE
myapp-rc   3         3         3       71s
Here ‘rc’ is an abbreviation for replication controller.
To make sure RC will create new pods we will delete an existing pod with
label app=myapp:
[root@controller ~]# kubectl delete pod myapp-rc-c57qm
pod "myapp-rc-c57qm" deleted
As expected, the deleted pod is removed from the list of available pods and a new pod is created:
[root@controller ~]# kubectl get pods
NAME                        READY   STATUS    RESTARTS   AGE
init-container-example-1    1/1     Running   0          113m
myapp-rc-2tcgx              1/1     Running   0          15s
myapp-rc-b2jtr              1/1     Running   0          52s
myapp-rc-hmj9g              1/1     Running   0          52s
To check the status of the pods and the worker node where the respective
pod is running you can use -o wide with kubectl get pods command:
[root@controller ~]# kubectl get pods -o wide
NAME                        READY   STATUS    RESTARTS   AGE     IP          NODE                   NOMINATED NODE   READINESS GATES
init-container-example-1    1/1     Running   0          122m    10.36.0.2   worker-1.example.com   <none>           <none>
myapp-rc-2tcgx              1/1     Running   0          9m58s   10.36.0.4   worker-1.example.com   <none>           <none>
myapp-rc-b2jtr              1/1     Running   0          10m     10.36.0.3   worker-1.example.com   <none>           <none>
myapp-rc-hmj9g              1/1     Running   0          10m     10.44.0.4   worker-2.example.com   <none>           <none>
You can see additional information about your ReplicationController
with the kubectl describe command:
[root@controller ~]# kubectl describe rc myapp-rc
Name:         myapp-rc
Namespace:    default
Selector:     app=myapp
Labels:       app=myapp
              type=dev
Annotations:  <none>
Replicas:     3 current / 3 desired
Pods Status:  3 Running / 0 Waiting / 0 Succeeded / 0 Failed
Pod Template:
  Labels:  app=myapp
           type=dev
  Containers:
   nginx-container:
    Image:        nginx
    Port:         <none>
    Host Port:    <none>
    Environment:  <none>
    Mounts:       <none>
  Volumes:        <none>
Events:
  Type    Reason            Age   From                    Message
  ----    ------            ----  ----                    -------
  Normal  SuccessfulCreate  91s   replication-controller  Created pod: myapp-rc-b2jtr
  Normal  SuccessfulCreate  91s   replication-controller  Created pod: myapp-rc-c57qm
  Normal  SuccessfulCreate  91s   replication-controller  Created pod: myapp-rc-hmj9g
  Normal  SuccessfulCreate  54s   replication-controller  Created pod: myapp-rc-2tcgx
The list of events at the bottom shows the actions taken by the Replication-Controller—it has created four pods so far.
Changing the pod template
A ReplicationController’s pod template can be modified at any time. Changing the pod template will only affect the newly created pods and will have no impact on the existing pods which are in running state:
As an exercise I will update the replicas value by editing the pod
template, and the change the value of replicas to 4 and save the
template. This will open the ReplicationController’s YAML definition in
your default text editor:
[root@controller ~]# kubectl edit rc myapp-rc
replicationcontroller/myapp-rc edited
We will now list the pods and verify the replica count, as you can see
now we have 4 pods running using the myapp label:
[root@controller ~]# kubectl get pods
NAME                        READY   STATUS    RESTARTS   AGE
init-container-example-1    1/1     Running   0          130m
myapp-rc-2tcgx              1/1     Running   0          17m
myapp-rc-b2jtr              1/1     Running   0          17m
myapp-rc-hmj9g              1/1     Running   0          17m
myapp-rc-ksx4f              1/1     Running   0          3m7s
You can also check the replication controller status which now shows that it allows 4 replicas:
[root@controller ~]# kubectl get rc
NAME       DESIRED   CURRENT   READY   AGE
myapp-rc   4         4         4       18m
Horizontally scaling pods
You’ve seen how ReplicationControllers make sure a specific number of
pod instances is always running. Because it’s incredibly simple to
change the desired number of replicas, this also means scaling pods
horizontally is trivial.
Assuming you suddenly expect that load on your application is going to increase so you must deploy more pods until the load is reduced, in such case you can easily scale up the number of pods runtime.
For example here I am scaling up the number of replicas to 6:
[root@controller ~]# kubectl scale rc myapp-rc --replicas=6
replicationcontroller/myapp-rc scaled
And then verify the list of pods with myapp label, so two more pods
are started:
[root@controller ~]# kubectl get pods
NAME                        READY   STATUS              RESTARTS   AGE
init-container-example-1    1/1     Running             0          132m
myapp-rc-2tcgx              1/1     Running             0          19m
myapp-rc-b2jtr              1/1     Running             0          20m
myapp-rc-hmj9g              1/1     Running             0          20m
myapp-rc-ksx4f              1/1     Running             0          5m41s
myapp-rc-pvqk2              0/1     ContainerCreating   0          3s
myapp-rc-zp972              0/1     ContainerCreating   0          3s
Similarly once the load is reduced, the replicas can be scaled down as
well, here I have now reduced the number of replicas to 3. All this
command does is modify the spec.replicas field of the
ReplicationController’s definition—like when you changed it through
kubectl edit.:
[root@controller ~]# kubectl scale rc myapp-rc --replicas=3
replicationcontroller/myapp-rc scaled
And after scaling down the replicas you can see that the newly created pods are now terminating:
[root@controller ~]# kubectl get pods
NAME                        READY   STATUS        RESTARTS   AGE
init-container-example-1    1/1     Running       0          134m
myapp-rc-2tcgx              1/1     Running       0          21m
myapp-rc-b2jtr              1/1     Running       0          21m
myapp-rc-hmj9g              1/1     Running       0          21m
myapp-rc-ksx4f              0/1     Terminating   0          7m13s
myapp-rc-pvqk2              0/1     Terminating   0          95s
myapp-rc-zp972              0/1     Terminating   0          95s
Deleting a ReplicationController
When you delete a ReplicationController through kubectl delete, the
pods are also deleted. But because pods created by a
ReplicationController aren’t an integral part of the
ReplicationController, and are only managed by it, you can delete only
the ReplicationController and leave the pods running.
When deleting a ReplicationController with kubectl delete, you can
keep its pods running by passing the --cascade=false option to the
command.
[root@controller ~]# kubectl delete rc myapp-rc --cascade=false
replicationcontroller "myapp-rc" deleted
So the pods created by this replication controller will continue to be in running state (although not managed any more):
[root@controller ~]# kubectl get pods
NAME                        READY   STATUS    RESTARTS   AGE
init-container-example-1    1/1     Running   0          136m
myapp-rc-2tcgx              1/1     Running   0          23m
myapp-rc-b2jtr              1/1     Running   0          24m
myapp-rc-hmj9g              1/1     Running   0          24m
Using replica sets instead of replication controller
Initially, ReplicationControllers were the only Kubernetes component
for replicating pods and rescheduling them when nodes failed. Later, a
similar resource called a ReplicaSet was introduced. It’s a new
generation of ReplicationController and replaces it completely
(ReplicationControllers will eventually be deprecated).
That being said, you should always create ReplicaSets instead of
ReplicationControllers from now on. They’re almost identical, so
you shouldn’t have any trouble using them instead.
Comparing a ReplicaSet to a ReplicationController
- A
ReplicaSetbehaves exactly like aReplicationController, but it has more expressive pod selectors. - Whereas a ReplicationController’s label selector only allows matching pods that include a certain label, a ReplicaSet’s selector also allows matching pods that lack a certain label or pods that include a certain label key, regardless of its value.
- Also, for example, a single ReplicationController can’t match pods
with the label
env=productionand those with the labelenv=develat the same time. It can only match either pods with theenv=productionlabel or pods with theenv=devellabel. But a single ReplicaSet can match both sets of pods and treat them as a single group. - Similarly, a ReplicationController can’t match pods based merely on
the presence of a label key, regardless of its value, whereas a
ReplicaSet can. For example, a
ReplicaSetcan match all pods that include a label with the key env, whatever its actual value is (you can think of it asenv=*).
Example-1: Create replica set using match labels
We will create a new replica set which will now map the orphaned pods
from replication controller. But before that we need to have the KIND
and apiVersion value for replica set.
[root@controller ~]# kubectl api-resources | grep -iE 'KIND|replica'
NAME                              SHORTNAMES   APIGROUP                       NAMESPACED   KIND
replicationcontrollers            rc                                          true         ReplicationController
replicasets                       rs           apps                           true         ReplicaSet
Now we have the KIND value i.e. ReplicaSet, to get the apiVersion
of this kind we will use kubectl explain:
[root@controller ~]# kubectl explain ReplicaSet | head -n 2
KIND:     ReplicaSet
VERSION:  apps/v1
So the apiVersion of ReplicaSet will be apps/v1. We will use the
following YAML file to create our ReplicaSet. The only difference is
in the selector, instead of listing labels the pods need to have
directly under the selector property, you’re specifying them under
selector.matchLabels. This is the simpler (and less expressive) way of
defining label selectors in a ReplicaSet.
[root@controller ~]# cat replica-set.yml
apiVersion: apps/v1
kind: ReplicaSet
metadata:
  name: myapp-replicaset
  labels:
    app: myapp
    type: dev
spec:
  replicas: 3
  selector:
    matchLabels:
      app: myapp
  template:
    metadata:
      name: myapp-pod
      labels:
        app: myapp
        type: dev
    spec:
      containers:
      - name: nginx-container
        image: nginx
Now we will apply this replica set to the existing pods with label
app: myapp so that those orphan pods can now be managed by this
replica set:
[root@controller ~]# kubectl apply -f replica-set.yml
replicaset.apps/myapp-replicaset created
Next verify the list of pods:
[root@controller ~]# kubectl get pods -o wide
NAME                        READY   STATUS    RESTARTS   AGE    IP          NODE                   NOMINATED NODE   READINESS GATES
myapp-rc-6vjv4              1/1     Running   1          12h    10.36.0.4   worker-1.example.com   <none>           <none>
myapp-rc-9fp5l              1/1     Running   1          12h    10.36.0.3   worker-1.example.com   <none>           <none>
myapp-rc-cwwwh              1/1     Running   1          12h    10.44.0.4   worker-2.example.com   <none>           <none>
So no new pods are created, let us check the details of any of these pods:
[root@controller ~]# kubectl describe pods myapp-rc-6vjv4
Name:         myapp-rc-6vjv4
Namespace:    default
Priority:     0
Node:         worker-1.example.com/192.168.43.49
Start Time:   Mon, 30 Nov 2020 00:23:57 +0530
Labels:       app=myapp
              type=dev
Annotations:  <none>
Status:       Running
IP:           10.36.0.4
IPs:
  IP:           10.36.0.4
Controlled By:  ReplicaSet/myapp-replicaset
...
As you see this pod is Controlled By: ReplicaSet/myapp-replicaset.
After that, you can examine the ReplicaSet with kubectl get command:
[root@controller ~]# kubectl get rs
NAME               DESIRED   CURRENT   READY   AGE
myapp-replicaset   3         3         3       46s
To get more details on this replica set:
[root@controller ~]# kubectl describe rs myapp-replicaset
Name:         myapp-replicaset
Namespace:    default
Selector:     app=myapp
Labels:       app=myapp
              type=dev
Annotations:  <none>
Replicas:     3 current / 3 desired
Pods Status:  3 Running / 0 Waiting / 0 Succeeded / 0 Failed
Pod Template:
  Labels:  app=myapp
           type=dev
  Containers:
   nginx-container:
    Image:        nginx
    Port:         <none>
    Host Port:    <none>
    Environment:  <none>
    Mounts:       <none>
  Volumes:        <none>
Events:           <none>
Example-2: Create replica set using match expressions
The main improvements of ReplicaSets over ReplicationControllers are
their more expressive label selectors. You intentionally used the
simpler matchLabels selector in the first ReplicaSet example to see
that ReplicaSets are no different from Replication-Controllers.
Now, we will rewrite the selector to use the more powerful
matchExpressions property:
[root@controller ~]# cat replica-set.yml
apiVersion: apps/v1
kind: ReplicaSet
metadata:
  name: myapp-replicaset
  labels:
    app: myapp
    type: dev
spec:
  replicas: 3
  selector:
    matchExpressions:
    - key: app
      operator: In
      values:
      - myapp
  template:
    metadata:
      name: myapp-pod
      labels:
        app: myapp
        type: dev
    spec:
      containers:
      - name: nginx-container
        image: nginx
Here, this selector requires the pod to contain a label with the
“app” key and the label’s value must be “myapp”.
You can add additional expressions to the selector. As in the example, each expression must contain a key, an operator, and possibly (depending on the operator) a list of values. You’ll see four valid operators:
- In: Label’s value must match one of the specified values.
- NotIn: Label’s value must not match any of the specified values.
- Exists: Pod must include a label with the specified key (the value isn’t important). When using this operator, you shouldn’t specify the values field.
- DoesNotExist: Pod must not include a label with the specified key. The values property must not be specified.
If you specify multiple expressions, all those expressions must evaluate to true for the selector to match a pod. If you specify both matchLabels and matchExpressions, all the labels must match and all the expressions must evaluate to true for the pod to match the selector.
I will delete my existing replica set, (I can also update the existing one but to demonstrate this properly I will delete the existing replicaset)
[root@controller ~]# kubectl delete rs myapp-replicaset
replicaset.apps "myapp-replicaset" deleted
Now we will create replica set with new matchExpressions value:
[root@controller ~]# kubectl apply -f replica-set.yml
replicaset.apps/myapp-replicaset created
Verify the list of pods (no new pods are created by this replica set as we already had pods running with the required label):
[root@controller ~]# kubectl get pods
NAME                        READY   STATUS    RESTARTS   AGE
myapp-rc-s4ndd              1/1     Running   0          11m
myapp-rc-svqcd              1/1     Running   0          11m
myapp-rc-xr4bs              1/1     Running   0          11m
To make sure the pod is managed by our replica set, we can use
kubectl describe command:
[root@controller ~]# kubectl describe pods myapp-rc-s4ndd
Name:         myapp-rc-s4ndd
Namespace:    default
Priority:     0
Node:         worker-1.example.com/192.168.43.49
Start Time:   Mon, 30 Nov 2020 14:18:24 +0530
Labels:       app=myapp
              type=dev
Annotations:  <none>
Status:       Running
IP:           10.36.0.2
IPs:
  IP:           10.36.0.2
Controlled By:  ReplicaSet/myapp-replicaset
...
So as expected, the existing pods with label app: myapp is now mapped
with our ReplicaSet.
Horizontally scaling Pod
Now similar to replication controller, we can also scale replica set pods. In this example we will scale up the number of pods to 6:
[root@controller ~]# kubectl scale rs myapp-replicaset --replicas=6
replicaset.apps/myapp-replicaset scaled
Now verify the list of pods:
[root@controller ~]# kubectl get pods -o wide
NAME                        READY   STATUS              RESTARTS   AGE    IP          NODE                   NOMINATED NODE   READINESS GATES
myapp-rc-6vjv4              1/1     Running             1          12h    10.36.0.4   worker-1.example.com   <none>           <none>
myapp-rc-9fp5l              1/1     Running             1          12h    10.36.0.3   worker-1.example.com   <none>           <none>
myapp-rc-cwwwh              1/1     Running             1          12h    10.44.0.4   worker-2.example.com   <none>           <none>
myapp-replicaset-8r6kx      0/1     ContainerCreating   0          6s     <none>      worker-2.example.com   <none>           <none>
myapp-replicaset-kp78z      0/1     ContainerCreating   0          6s     <none>      worker-1.example.com   <none>           <none>
myapp-replicaset-svm45      0/1     ContainerCreating   0          6s     <none>      worker-1.example.com   <none>           <none>
As you can see the new vms are now started by the new name as per our template, now we will scale down our number of pods:
[root@controller ~]# kubectl scale rs myapp-replicaset --replicas=3
replicaset.apps/myapp-replicaset scaled
So the newly created pods are now terminating:
[root@controller ~]# kubectl get pods
NAME                        READY   STATUS        RESTARTS   AGE
myapp-rc-6vjv4              1/1     Running       1          12h
myapp-rc-9fp5l              1/1     Running       1          12h
myapp-rc-cwwwh              1/1     Running       1          12h
myapp-replicaset-8r6kx      0/1     Terminating   0          11m
myapp-replicaset-kp78z      0/1     Terminating   0          11m
myapp-replicaset-svm45      0/1     Terminating   0          11m
Delete replica set
This was a quick introduction to ReplicaSets as an alternative to ReplicationControllers. Remember, always use them instead of ReplicationControllers, but you may still find ReplicationControllers in other people’s deployments.
Now, delete the ReplicaSet to clean up your cluster a little. You can
delete the ReplicaSet the same way you’d delete a
ReplicationController:
[root@controller ~]# kubectl delete rs myapp-replicaset
replicaset.apps "myapp-replicaset" deleted
This will also delete all the pods which were part of this replica set.
But you can use --cascade=false along with this command to retain
all the pods part of replica set.
Conclusion
In this Kubernetes Tutorial we did a comparison between Replication Controller and Replica Set. Summary of what we learned:
- ReplicationControllers always keep the desired number of pod replicas running.
- Scaling pods horizontally is as easy as changing the desired replica count on a ReplicationController.
- Pods aren’t owned by the ReplicationControllers and can be moved between them if necessary.
- A ReplicationController creates new pods from a pod template. Changing the template has no effect on existing pods.
- ReplicationControllers should be replaced with ReplicaSets and Deployments, which provide the same functionality, but with additional powerful features.
