
In this Kubernetes tutorial we will explore all about helm charts. These days there is tremendous pressure on developers to make their application lightweight and scalable. Most importantly the applications must be highly available. With Kubernetes we can almost achieve this but then it comes with it’s own sets of challenges. To manage large applications with multiple deployment pods, services, ingress, storage etc can be overwhelming. This is where Helm steps in to manage the life cycle of Kubernetes applications.
1. Overview on Helm
- Helm is an open source tool also referred as “Kubernetes Package Manager”
- You may be some other package managers such as YUM, DNF, APT etc which are used to simplify the process of managing rpms in bulk such as install, remove, revert, update etc.
- Now these package managers operates on RPM package while Helm works with charts.
- A Helm chart can be thought of as a Kubernetes package. Charts contain the declarative Kubernetes resource files required to deploy an application. Similar to an RPM, it can also declare one or more dependencies that the application needs in order to run.
- Similar to DNF/YUM which rely on repository to download the RPM packages, Helm relies on repositories to provide widespread access to charts
- Helm v3 is based on a client-only architecture. It connects to the
Kubernetes API the same way as
kubectldoes, by using akubeconfigfile containing the Kubernetes cluster connection settings.
2. Download and Install Helm
Helm provides a single command-line client that is capable of performing all of the main Helm tasks. The helm client is written in a programming language called Go. Unlike Python, JavaScript, or Ruby, Go is a compiled language. Once a Go program is compiled, you do not need any of the Go tools to run or otherwise work with the binary.
You can download the helm binary package from
Helm release page based on your distribution. Since
we are using Linux, so we will download Linux amd64 package.
On Linux, the download will be in a gzipped tar archive (.tar.gz) that
can be extracted with the tar -zxf command.
[root@controller ~]# tar -xzvf helm-v3.5.2-linux-amd64.tar.gz
linux-amd64/
linux-amd64/helm
linux-amd64/LICENSE
linux-amd64/README.md
We will place the linux-amd64/helm binary inside /usr/local/bin so
that we don’t have to provide the path of the binary every time we use
helm command. Alternatively we could have also added
linux-amd64/helm to our PATH variable but the previous option is
easier without modifying system variables.
[root@controller ~]# cp linux-amd64/helm /usr/local/bin/
Check the helm version
[root@controller ~]# helm version
version.BuildInfo{Version:"v3.5.2", GitCommit:"167aac70832d3a384f65f9745335e9fb40169dc2", GitTreeState:"dirty", GoVersion:"go1.15.7"}
To get the short version we can use --short flag in the above command:

3. Helm commands cheatsheet
You can get all available Helm CLI commands with helm –h. Let’s list
the most used ones, along with their descriptions:
| Command | Description |
|---|---|
helm repo add |
Adds a Helm chart repository to the local cache list, after which we can reference it to pull charts from the repository |
helm repo update |
Gets the latest information about chart repositories; the information is stored locally. |
helm search repo |
Searches for charts in the given repositories. |
helm pull |
Downloads a given chart from the chart repository. |
helm upgrade -i |
If there is no release then install it, otherwise upgrade the release. |
helm ls |
Lists releases in the current namespace. If the-Aflag is provided, it will list all the namespaces. |
helm history |
Prints historical revisions for a given release. |
helm rollback |
Rolls back a release to a previous revision. |
helm template |
Renders chart templates locally and displays the output. |
helm create |
Creates a chart |
helm lint |
Validates a chart |
helm plugin |
Installs, lists, updates, and uninstalls Helm plugins. |
4. Adding a chart repository
A Helm chart repository is simply a set of files, reachable over the network, that conforms to the Helm specification for indexing packages. There are thousands of helm chart repositories on the internet. The easiest way to find the popular repositories is to use your web browser to navigate to the Artifact Hub. There you will find thousands of Helm charts, each hosted on an appropriate repository.
For demonstration we will install the popular Drupal CMS. This makes a good example chart because it creates different types of Kubernetes resources such as Deployments, Services, Ingress and ConfigMaps.
4.1 Adding a repo
Adding a Helm chart is done with the helm repo add command:
[root@controller ~]# helm repo add bitnami https://charts.bitnami.com/bitnami
"bitnami" has been added to your repositories
The helm repo add command will add a repository named bitnami that
points to the URL
https://charts.bitnami.com/bitnami. Once we have
added a repository, its index will be locally cached until we next
update it.
4.2 Searching a Chart repository
We can run a query inside the repo to look out for any specific chart.
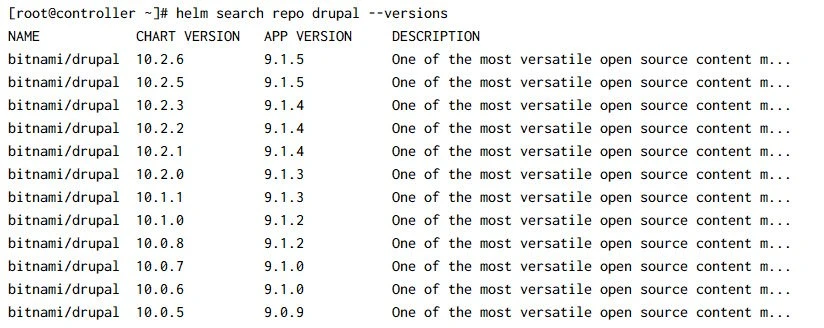
[root@controller ~]# helm search repo drupal
NAME            CHART VERSION   APP VERSION     DESCRIPTION
bitnami/drupal  10.2.6          9.1.5           One of the most versatile open source content m...
We did a simple search for the term drupal. Helm will search not just
the package names, but also other fields like labels and descriptions.

While Drupal is the first result, note that there are a variety of other
charts that contain the word content somewhere in the descriptive
text.
By default, Helm tries to install the latest stable release of a chart, but you can override this behavior and install a specific verison of a chart. Thus it is often useful to see not just the summary info for a chart, but exactly which versions exist for a chart:
4.3 Installing a Package (Chart)
At very minimum, installing a chart in Helm requires just two pieces of information: the name of the installation and the chart you want to install. The general syntax to install a chart is:
helm install <RELEASE NAME> <CHART NAME>
To install the drupal chart we will use:
[root@controller ~]# helm install mysite bitnami/drupal
NAME: mysite
LAST DEPLOYED: Wed Mar 10 03:36:29 2021
NAMESPACE: default
STATUS: deployed
REVISION: 1
TEST SUITE: None
NOTES:
*******************************************************************
*** PLEASE BE PATIENT: Drupal may take a few minutes to install ***
*******************************************************************

1. Get the Drupal URL:

  NOTE: It may take a few minutes for the LoadBalancer IP to be available.
        Watch the status with: 'kubectl get svc --namespace default -w mysite-drupal'

  export SERVICE_IP=$(kubectl get svc --namespace default mysite-drupal --template "{{ range (index .status.loadBalancer.ingress 0) }}{{.}}{{ end }}")
  echo "Drupal URL: http://$SERVICE_IP/"

2. Get your Drupal login credentials by running:

  echo Username: user
  echo Password: $(kubectl get secret --namespace default mysite-drupal -o jsonpath="{.data.drupal-password}" | base64 --decode)
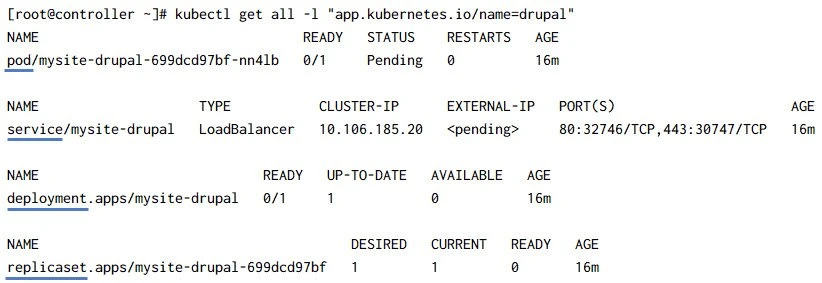
4.4 Listing installed charts
The helm list command is a simple tool to help you see installations
and learn about those installations:
[root@controller ~]# helm list
NAME    NAMESPACE       REVISION        UPDATED                                 STATUS          CHART           APP VERSION
mysite  default         1               2021-03-10 03:36:29.001757599 +0530 IST deployed        drupal-10.2.6   9.1.5
To list all the resources deployed by this chart we can use
kubectl get all -l "app.kubernetes.io/name=drupal":
5. Create your first helm chart
A Helm chart is an individual package that can be installed into your Kubernetes cluster. It is a collection of template files that describe Kubernetes resources. During chart development, you will often just work with a chart that is stored on your local filesystem. It uses templating to create Kubernetes manifests.
5.1 Create a new chart
I will create all my charts under
[root@controller ~]# mkdir -p /k8s/helm-examples
Create a chart called mychart:
[root@controller helm-examples]# helm create mychart
Creating mychart
This command will create the entire directory structure with all the
files required to deploy nginx.
helm create can utilize to provide a different starting point to
generate a chart from.
[root@controller helm-examples]# tree  mychart/
mychart/
├── charts
├── Chart.yaml
├── templates
│ ├── deployment.yaml
│ ├── _helpers.tpl
│ ├── hpa.yaml
│ ├── ingress.yaml
│ ├── NOTES.txt
│ ├── serviceaccount.yaml
│ ├── service.yaml
│ └── tests
│     └── test-connection.yaml
└── values.yaml
5.2 Understanding helm chart’s structure
As you can see in the above snippet, the deployment.yaml file, Horizontal Pod Autoscaler (HPA), ingress, service, and service account resource templates have been created, all of which provide a good base to start from.
The preceding command also created the test-connection.yaml file so we
can run a test with helm test against the installed nginx chart.
Here,
- Chart.yaml: The
Chart.yamlfile contains metadata and some functionality controls for the chart. - charts: The folder where dependent sub-charts get stored.
- templates: Templates used to generate Kubernetes manifests are stored in the templates directory.
- NOTES.txt: This file is a special template. When a chart is
installed, the
NOTES.txttemplate is rendered and displayed rather than being installed into a cluster. - tests: Templates can include tests that are not installed as part of the install or upgrade commands. This chart includes a test that is used by the helm test command.
- values.yaml: Default values passed to the templates when Helm is
rendering the manifests are in the
values.yamlfile. When you instantiate a chart, these values can be overridden.
5.3 Modifying the chart’s values
We will make some minor modifications to the default chart templates and values.
Under mychart/values.yaml we will modify pullPolicy to Always.
The default value i.e. IfNotPresent means the pod will avoid pulling
an image if it already exists. This we change to Always to pull the
image every time a pod is deployed.
FROM:
image:
  repository: nginx
  pullPolicy: IfNotPresent
  # Overrides the image tag whose default is the chart appVersion.
  tag: ""
TO:
image:
  repository: nginx
  pullPolicy: Always
  # Overrides the image tag whose default is the chart appVersion.
  tag: ""
Under mychart/values.yaml we will use NodePort service to access the
nginx server instead of ClusterIP from external network.
FROM:
service:
  type: ClusterIP
  port: 80
TO:
service:
  type: NodePort
  port: 80
5.4 Modifying the chart’s deployment file
Under mychart/templates/deployment.yaml we will use the latest
available nginx image instead of the default app version i.e. 1.16
collected from Charts.yaml
FROM:
      containers:
        - name: {{ .Chart.Name }}
          securityContext:
            {{- toYaml .Values.securityContext | nindent 12 }}
          image: "{{ .Values.image.repository }}:{{ .Values.image.tag | default .Chart.AppVersion }}"
          imagePullPolicy: {{ .Values.image.pullPolicy }}
TO:
      containers:
        - name: {{ .Chart.Name }}
          securityContext:
            {{- toYaml .Values.securityContext | nindent 12 }}
          image: "{{ .Values.image.repository }}"
          imagePullPolicy: {{ .Values.image.pullPolicy }}
5.5 Linting the helm chart
We can utilise helm’s linting feature to check the chart for possible
issues and errors. For that, we can use the helm lint <CHART NAME>
command, which will check the Helm chart content by running a series of
tests to verify the chart integrity.
Let’s lint the mychart we have created:
[root@controller helm-examples]# helm lint mychart
==> Linting mychart
[INFO] Chart.yaml: icon is recommended

1 chart(s) linted, 0 chart(s) failed
As you can see in the preceding screenshot, our chart has no issues and
can be installed safely. The [INFO] message is just the warning that
the chart’s icon is missing, which can be safely ignored.
5.6 Installing the helm chart
It is always recommended to test your application before install and
upgrade using --dry-run with helm command. With this, Helm will
validate the templates against the Kubernetes cluster. The general
syntax to install a chart is:
helm install <RELEASE NAME> <CHART NAME>
Here,<CHART NAME> is the local folder, so note that you can install
the chart from remote Helm repositories and also from local folders,
both with the same command. Bust we will first execute this command with
--dry-run argument:
[root@controller helm-examples]# helm install --dry-run nginx mychart/
NAME: nginx
LAST DEPLOYED: Wed Mar 10 00:50:04 2021
NAMESPACE: default
STATUS: pending-install
REVISION: 1
HOOKS:
---
# Source: mychart/templates/tests/test-connection.yaml
apiVersion: v1
kind: Pod
metadata:
  name: "nginx-mychart-test-connection"
  labels:
    helm.sh/chart: mychart-0.1.0
    app.kubernetes.io/name: mychart
    app.kubernetes.io/instance: nginx
    app.kubernetes.io/version: "1.16.0"
    app.kubernetes.io/managed-by: Helm
  annotations:
    "helm.sh/hook": test
spec:
  containers:
    - name: wget
      image: busybox
      command: ['wget']
      args: ['nginx-mychart:80']
  restartPolicy: Never
MANIFEST:
---
# Source: mychart/templates/serviceaccount.yaml
apiVersion: v1
kind: ServiceAccount
metadata:
  name: nginx-mychart
  labels:
    helm.sh/chart: mychart-0.1.0
    app.kubernetes.io/name: mychart
    app.kubernetes.io/instance: nginx
    app.kubernetes.io/version: "1.16.0"
    app.kubernetes.io/managed-by: Helm
---
# Source: mychart/templates/service.yaml
apiVersion: v1
kind: Service
metadata:
  name: nginx-mychart
  labels:
    helm.sh/chart: mychart-0.1.0
    app.kubernetes.io/name: mychart
    app.kubernetes.io/instance: nginx
    app.kubernetes.io/version: "1.16.0"
    app.kubernetes.io/managed-by: Helm
spec:
  type: NodePort
  ports:
    - port: 80
      targetPort: http
      protocol: TCP
      name: http
  selector:
    app.kubernetes.io/name: mychart
    app.kubernetes.io/instance: nginx
---
# Source: mychart/templates/deployment.yaml
apiVersion: apps/v1
kind: Deployment
metadata:
  name: nginx-mychart
  labels:
    helm.sh/chart: mychart-0.1.0
    app.kubernetes.io/name: mychart
    app.kubernetes.io/instance: nginx
    app.kubernetes.io/version: "1.16.0"
    app.kubernetes.io/managed-by: Helm
spec:
  replicas: 1
  selector:
    matchLabels:
      app.kubernetes.io/name: mychart
      app.kubernetes.io/instance: nginx
  template:
    metadata:
      labels:
        app.kubernetes.io/name: mychart
        app.kubernetes.io/instance: nginx
    spec:
      serviceAccountName: nginx-mychart
      securityContext:
        {}
      containers:
        - name: mychart
          securityContext:
            {}
          image: "nginx"
          imagePullPolicy: Always
          ports:
            - name: http
              containerPort: 80
              protocol: TCP
          livenessProbe:
            httpGet:
              path: /
              port: http
          readinessProbe:
            httpGet:
              path: /
              port: http
          resources:
            {}

NOTES:
1. Get the application URL by running these commands:
  export NODE_PORT=$(kubectl get --namespace default -o jsonpath="{.spec.ports[0].nodePort}" services nginx-mychart)
  export NODE_IP=$(kubectl get nodes --namespace default -o jsonpath="{.items[0].status.addresses[0].address}")
  echo http://$NODE_IP:$NODE_PORT
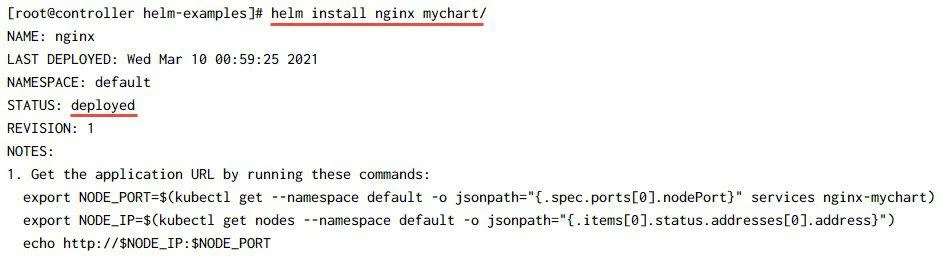
So the --dry-run was successfully able to trigger the deploy hence it
is safe to install the chart. Next we will actually install the chart
without using --dry-run. We will name our chart as nginx:
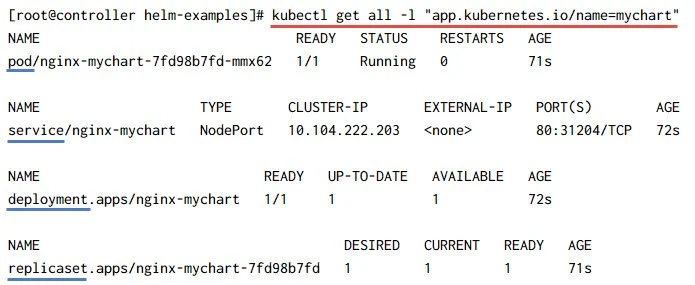
5.7 List all the resources deployed by chart
Now we can check the --dry-run output to get the list of resources
which will be deployed by our chart, but we can also use the following
command. It expects the Release Name of the chart. This command
helped us to show the resources deployed by the chart.
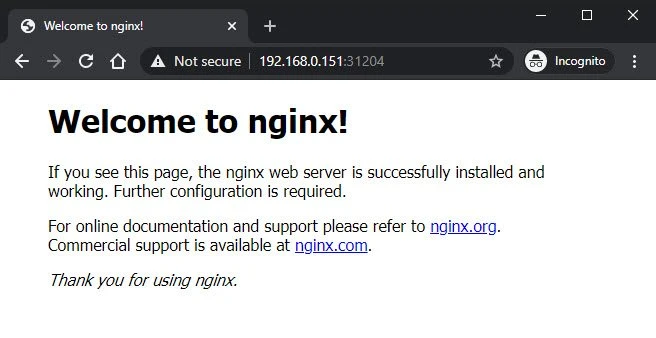
5.8 Accessing the nginx server
Since we had defined a Service with NodePort so we can use the same to
access the nginx server using external network. You can read
Kubernetes
Services for more details on different types of services and
examples.
List the available services:
[root@controller helm-examples]# kubectl get svc
NAME            TYPE        CLUSTER-IP       EXTERNAL-IP   PORT(S)        AGE
kubernetes      ClusterIP   10.96.0.1        <none>        443/TCP        37h
nginx-mychart   NodePort    10.104.222.203   <none>        80:31204/TCP   4m11s
Check the worker node on which our deployment pod is running on:
[root@controller helm-examples]# kubectl get pods -o wide
NAME                            READY   STATUS    RESTARTS   AGE     IP          NODE                   NOMINATED NODE   READINESS GATES
nginx-mychart-7fd98b7fd-mmx62   1/1     Running   0          5m31s   10.44.0.1   worker-1.example.com   <none>           <none>
So we can use the worker-1.example IP with 31204 port from PORT(S)
section of kubernetes service output to access the nginx server from
nginx-mychart-7fd98b7fd-mmx62:
6. Debugging Helm Chart Templates
It can be really tricky to debug a helm chart template to identify the cause of failure. Following are some of the commands which can come handy in debugging helm chart templates:
<strong>helm lint</strong>is your go-to tool for verifying that your chart follows best practices<strong>helm install --dry-run --debug</strong>or<strong>helm template --debug</strong>: We’ve seen this trick already. It’s a great way to have the server render your templates, then return the resulting manifest file.<strong>helm get manifest</strong>: This is a good way to see what templates are installed on the server.
Here is a sample output for helm get manifest which populates all the
variables used in the templates and you can make sure that all the
values are properly populated for each resource.
[root@controller ~]# helm get manifest nginx
---
# Source: mychart/templates/serviceaccount.yaml
apiVersion: v1
kind: ServiceAccount
metadata:
  name: nginx-mychart
  labels:
    helm.sh/chart: mychart-0.1.0
    app.kubernetes.io/name: mychart
    app.kubernetes.io/instance: nginx
    app.kubernetes.io/version: "1.16.0"
    app.kubernetes.io/managed-by: Helm
---
# Source: mychart/templates/service.yaml
apiVersion: v1
kind: Service
metadata:
  name: nginx-mychart
  labels:
    helm.sh/chart: mychart-0.1.0
    app.kubernetes.io/name: mychart
    app.kubernetes.io/instance: nginx
    app.kubernetes.io/version: "1.16.0"
    app.kubernetes.io/managed-by: Helm
spec:
  type: NodePort
  ports:
    - port: 80
      targetPort: http
      protocol: TCP
      name: http
  selector:
    app.kubernetes.io/name: mychart
    app.kubernetes.io/instance: nginx
---
# Source: mychart/templates/deployment.yaml
apiVersion: apps/v1
kind: Deployment
metadata:
  name: nginx-mychart
  labels:
    helm.sh/chart: mychart-0.1.0
    app.kubernetes.io/name: mychart
    app.kubernetes.io/instance: nginx
    app.kubernetes.io/version: "1.16.0"
    app.kubernetes.io/managed-by: Helm
spec:
  replicas: 1
  selector:
    matchLabels:
      app.kubernetes.io/name: mychart
      app.kubernetes.io/instance: nginx
  template:
    metadata:
      labels:
        app.kubernetes.io/name: mychart
        app.kubernetes.io/instance: nginx
    spec:
      serviceAccountName: nginx-mychart
      securityContext:
        {}
      containers:
        - name: mychart
          securityContext:
            {}
          image: "nginx"
          imagePullPolicy: Always
          ports:
            - name: http
              containerPort: 80
              protocol: TCP
          livenessProbe:
            httpGet:
              path: /
              port: http
          readinessProbe:
            httpGet:
              path: /
              port: http
          resources:
            {}
7. Deleting/Un-installing a chart
To remove a Helm installation, use the helm uninstall command. This
command does not need a chart name or any configuration files. It simply
needs the name of the installation
[root@controller ~]# helm uninstall mysite
release "mysite" uninstalled
Summary
Creating a simple chart for your application is straightforward when you
use the helm create command. Even when your applications are more
complicated, the structure of charts is able to accommodate them, and
the helm create command can help you. We already performed some minor
modifications in this article, but you can further modify it and see the
custom application running in your cluster. You can use this same flow
to create your own charts.
