
Kubernetes Authentication and authorization play a very vital role in securing applications. These two terms are often used interchangeably but are very different. Authentication validates the identity of a user. Once the identity is validated, authorization is used to check whether the user has the privileges to perform the desired action. Authentication uses something the user knows to verify their identity; in the simplest form, this is a username and password. Once the application verifies the user’s identity, it checks what resources the user has access to. In most cases, this is a variation of an access control list. Access control lists for the user are compared with the request attributes to allow or deny an action.
Kubernetes Authentication
In the following figure you can see how the API server conceptually performs authentication by using one of the available strategies represented by the authentication plug-ins:
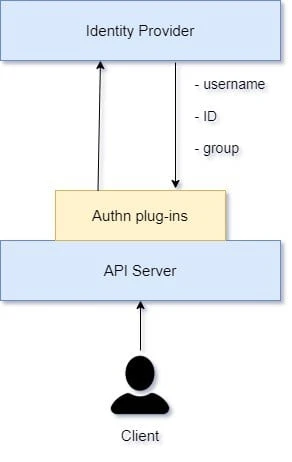
Authentication concepts
The flow Kubernetes uses to authenticate a client’s request is as follows:
- The client presents its credentials to the API server.
- The API server uses one of the configured authentication plug-ins (you can enable multiple) to establish the identity with an identity provider.
- The identity provider verifies the request information, including username and group membership.
- If the credentials are in order, the API server moves on to check permissions as described in Chapter 4. Otherwise, it returns an HTTP 401 Unauthorized client error status response code, and with that the request fails.
Authentication Strategies
A couple of authentication strategies are available in Kubernetes, represented by authentication plug-ins. Depending on the size of the deployment, the target users (human versus processes), and organizational policies, you as a cluster admin can choose one or more of the following:
Client certificates
Using X509 Certificate Authority (CA) certificates is the most common
authentication strategy in Kubernetes. It can be enabled by passing
--client-ca-file=file_path to the server. The file passed to the API
server has a list of CAs, which creates and validates client
certificates in the cluster.
Static tokens
The API server uses a static file to read the bearer tokens. This static
file is passed to the API server using --token-auth-file=<path>. The
token file is a comma-separated file consisting of secret, user, uid,
group1, and group2.
The token is passed as an HTTP header in the request:
Authorization: Bearer 66e6a781-09cb-4e7e-8e13-34d78cb0dab6
The tokens persist indefinitely, and the API server needs to be restarted to update the tokens.
Basic authentication
The API server uses a static file to read the bearer tokens. This static
file is passed to the API server using --token-auth-file=<path>. The
token file is a comma-separated file consisting of secret, user, uid,
group1, and group2.
The username and password are passed as an authentication header in the request:
Authentication: Basic base64(user:password)
Similar to static tokens, basic authentication passwords cannot be changed without restarting the API server.
Bootstrap tokens
These are an improvisation over the static tokens and are the default
authentication method used in Kubernetes. They are dynamically managed
and stored as secrets in kube-system. To enable bootstrap tokens use
--enable-bootstrap-token-auth in the API server.
Service account tokens
The service
account authenticator is automatically enabled. It verifies signed
bearer tokens. The signing key is specified using
--service-account-key-file. Service accounts are created by the
kube-apiserver and are associated with the pods.
Authentication proxy
kube-apiserver can be configured to identify users using the X-Remote request header. You can enable this method by adding the following arguments to the API server:
--requestheader-username-headers=X-Remote-User--requestheader-group-headers=X-Remote-Group--requestheader-extra-headers-prefix=X-Remote-Extra
Webhook tokens
In webhook mode, Kubernetes makes a call to a
REST API
outside the cluster to determine the user’s identity. Webhook mode for
authentication can be enabled by passing
--authorization-webhook-config-file=<path> to the API server.
Example - Using client certificates
The kubectl command uses the certificates that are stored in
~/.kube/config or /etc/kubernetes/admin.conf. When
using curl for
direct API access then these certificates must be used.
For example here we try to access our API server i.e.
[root@controller ~]# kubectl config view | grep server
    server: https://192.168.43.48:6443
using the curl command without using any certificates:
[root@controller ~]# curl https://192.168.43.48:6443
curl: (60) SSL certificate problem: unable to get local issuer certificate
More details here: https://curl.haxx.se/docs/sslcerts.html

curl failed to verify the legitimacy of the server and therefore could not
establish a secure connection to it. To learn more about this situation and
how to fix it, please visit the web page mentioned above.
As expected it failed because curl couldn’t find the certificates required to connect to the API server.
Let’s manually use the content of ~/.kube/config or
/etc/kubernetes/admin.conf to create the certificates required to
access the API server manually:
Here I have exported different certificates into respective variables
[root@controller ~]# export client=$(grep client-cert /etc/kubernetes/admin.conf | cut -d " " -f 6)
[root@controller ~]# export key=$(grep client-key-data /etc/kubernetes/admin.conf | cut -d " " -f 6)
[root@controller ~]# export auth=$(grep certificate-authority-data /etc/kubernetes/admin.conf | cut -d " " -f 6)
Later we will convert these certificates using base64 and create new certificate file:
[root@controller ~]# echo $client | base64 -d - > client.pem
[root@controller ~]# echo $key | base64 -d - > client-key.pem
[root@controller ~]# echo $auth | base64 -d - > ca.pem
Now we can access our Kubernetes API server using curl with these certificates:
[root@controller ~]# curl --cert client.pem --key client-key.pem --cacert ca.pem  https://192.168.43.48:6443
{
  "paths": [
    "/api",
    "/api/v1",
    "/apis",
    "/apis/",
    "/apis/admissionregistration.k8s.io",
    "/apis/admissionregistration.k8s.io/v1",
    "/apis/admissionregistration.k8s.io/v1beta1",
    "/apis/apiextensions.k8s.io",
    "/apis/apiextensions.k8s.io/v1",
    "/apis/apiextensions.k8s.io/v1beta1",
    "/apis/apiregistration.k8s.io",
    "/apis/apiregistration.k8s.io/v1",
    "/apis/apiregistration.k8s.io/v1beta1",
    "/apis/apps",
    "/apis/apps/v1",
....
    "/readyz/poststarthook/start-apiextensions-informers",
    "/readyz/poststarthook/start-cluster-authentication-info-controller",
    "/readyz/poststarthook/start-kube-aggregator-informers",
    "/readyz/poststarthook/start-kube-apiserver-admission-initializer",
    "/readyz/shutdown",
    "/version"
  ]
}
Kubernetes Authorization
Authorization in Kubernetes verifies whether a certain action (such as “list pods” or “create a secret”) is allowed by a certain user or application, and if it is allowed, performs that action or otherwise rejects it and potentially logs the attempt.
Kubernetes authorizes API requests by using the API server, evaluating the request attributes against the policies and subsequently allowing or denying the request. By default, permissions are denied, unless explicitly allowed by a policy.
Following diagram explains how Kubernetes Authorization works:
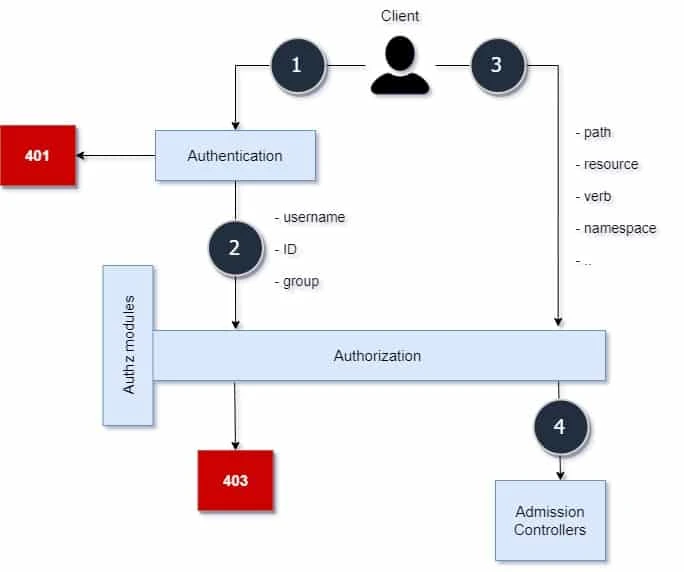
Authorization concepts
The authorization flow is as follows:
- The client’s request is authenticated
- If the authentication was successful, the credentials are taken as one input of the authorization module.
- The second input to the authorization module is a vector containing the request path, resource, verb, and namespace (and other secondary attributes).
- If the user or application is permitted to execute a certain action on a certain resource, the request is passed on further to the next component in the chain, the admission controller. If not, the authorization module returns an HTTP 403 Forbidden client error status response code, and with that the request fails.
Authorization Modes
Kubernetes offers multiple ways to enforce permissions, represented by various authorization modes and modules:
Node
Node authorization mode grants permissions to kubelets to access
services, endpoints, nodes, pods, secrets, and
persistent volumes for a
node. The kubelet is identified as part of the system:nodes group
with a username of system:node:<name> to be authorized by the node
authorizer. This mode is enabled by default in Kubernetes.
ABAC
With ABAC, requests are allowed by validating policies against the
attributes of the request. ABAC authorization mode can be enabled by
using --authorization-policy-file=<path> and
--authorization-mode=ABAC with the API server. The API server uses
the--authorization-mode=Nodeflag to use the node authorization
module:
The policies include a JSON object per line. Each policy consists of the following:
- Version: The API version for the policy format.
- Kind: The Policy string is used for policies.
- Spec: This includes the user, group, and resource properties, such as apiGroup, namespace, and nonResourcePath (such as /version, /apis, readonly) to allow requests that don’t modify the resource.
RBAC
With RBAC, access to
resources is regulated using
roles assigned to users. RBAC is enabled by default in many clusters
since v1.8. To enable RBAC, start the API server with
--authorization-mode=RBAC
Webhooks
Similar to webhook mode for authentication, webhook mode for
authorization uses a remote API server to check user permissions.
Webhook mode can be enabled by using
--authorization-webhook-config-file=<path>
Conclusion
In this tutorial we learned about the importance of authentication and
authorization in Kubernetes. We discussed the different modules
available for authentication and authorization. I also shared an example
of client certificate based authentication used to access the API
server. The API calls generated by kubectl can actually be monitored by
specifying a verbosity level such as kubectl get pods -v10 which is
giving you a lot of information about the call commands that are
happening in the background. Alternatively, the kubectl proxy command
can be used to run a proxy that takes care of passing authenticated
requests to the kube-apiserver.
