
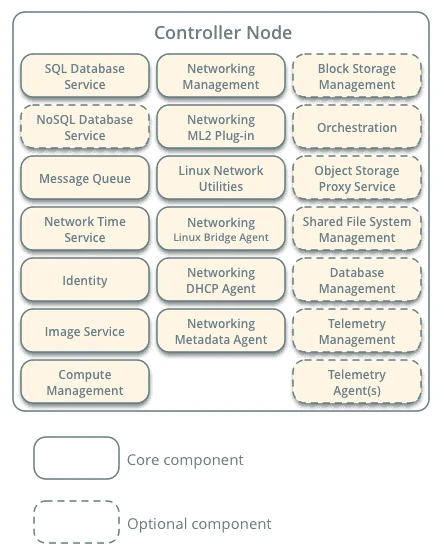
This is the first part of two part tutorial to manually install and configure controller node in Openstack. The controller node runs the Identity service, Image service, management portions of Compute, management portion of Networking, various Networking agents, and the Dashboard. It also includes supporting services such as an SQL database, message queue, and Network Time Protocol (NTP).
Optionally, the controller node runs portions of the Block Storage, Object Storage, Orchestration, and Telemetry services.

Below are the core and optional component of the Controller Node. From docs.openstack.org
Steps to Install and Configure controller node in OpenStack
To install and configure controller node and entire setup of Openstack will be time taking process if done manually so there are alternate ways to automate the configuration and deployment using tools like packstack, devstack and tripleo. I have already shared step by step guide to set up your openstack deployment on virtual machines using packstack and tripleO i.e. Openstack on Openstack.
For this article I will use “Queens” release of Openstack. In this article I will cover the below topics
- Configure Networking
- Configure NTP
- Enable OpenStack Repository
- Install the OpenStack Client
- Install and configure MariaDB database
- Secure MariaDB database
- Install RabbitMQ service
- Configure Memcached
- OpenStack keystone service
- Update Keystone configuration
- Create Project or Tenant
- Create environment files
Here my setup is running on a Oracle Virtual Box hosted on a Windows 10 host. Below is my setup config
| Configuration | Value |
|---|---|
| Disk | 10 GB |
| Memory | 4 GB |
| vCPU | 2 |
| OS | CentOS 7.4 |
| NIC1 | 10.0.2.10 |
| NIC2 | DHCP |
Configure Networking
My controller IP is "10.0.2.10"
[root@controller ~]# ip a
1: lo: <LOOPBACK,UP,LOWER_UP> mtu 65536 qdisc noqueue state UNKNOWN qlen 1
    link/loopback 00:00:00:00:00:00 brd 00:00:00:00:00:00
    inet 127.0.0.1/8 scope host lo
       valid_lft forever preferred_lft forever
    inet6 ::1/128 scope host
       valid_lft forever preferred_lft forever
2: enp0s3: <BROADCAST,MULTICAST,UP,LOWER_UP> mtu 1500 qdisc pfifo_fast state UP qlen 1000
    link/ether 08:00:27:df:87:41 brd ff:ff:ff:ff:ff:ff
    inet 10.0.2.10/24 brd 10.0.2.255 scope global enp0s3
       valid_lft forever preferred_lft forever
    inet6 fe80::a00:27ff:fedf:8741/64 scope link
       valid_lft forever preferred_lft forever
3: eth0: <BROADCAST,MULTICAST,UP,LOWER_UP> mtu 1500 qdisc pfifo_fast state UP qlen 1000
    link/ether 08:00:27:95:c3:cd brd ff:ff:ff:ff:ff:ff
    inet 10.0.3.15/24 brd 10.0.3.255 scope global dynamic eth0
       valid_lft 69907sec preferred_lft 69907sec
    inet6 fe80::a00:27ff:fe95:c3cd/64 scope link
       valid_lft forever preferred_lft forever
Here 10.0.3.15 is my external network which is used to connect to
Internet for
downloading the required packages
I have mapped my hostname, FQDN with IP address for my setup in the hosts file of the controller node. We will do the same on the other nodes once we start working on them
[root@controller ~]# cat /etc/hosts
127.0.0.1   localhost localhost.localdomain localhost4 localhost4.localdomain4
::1         localhost localhost.localdomain localhost6 localhost6.localdomain6
10.0.2.10       controller.example.com controller
10.0.2.11       compute.example.com compute
10.0.2.12       network.example.com network
10.0.2.13       storage.example.com storage
For our demo setup we will stop the firewall services
[root@controller ~]# systemctl stop firewalld
[root@controller ~]# systemctl disable firewalld
Removed symlink /etc/systemd/system/multi-user.target.wants/firewalld.service.
Removed symlink /etc/systemd/system/dbus-org.fedoraproject.FirewallD1.service.
OpenStack networking currently does not work on systems that have the
Network Manager (NetworkManager) service enabled. The Network Manager
service is currently enabled by default on RHEL / CentOS 7. So disable
and stop the NetworkManager service.
[root@controller ~]# systemctl disable NetworkManager
Removed symlink /etc/systemd/system/multi-user.target.wants/NetworkManager.service.
Removed symlink /etc/systemd/system/dbus-org.freedesktop.NetworkManager.service.
Removed symlink /etc/systemd/system/dbus-org.freedesktop.nm-dispatcher.service.

[root@controller ~]# systemctl stop NetworkManager
Configure NTP
Install the required ntp daemon if not already available
[root@controller ~]# yum -y install ntp
Place you NTP server pools in your ntp.conf
server 0.asia.pool.ntp.org
server 1.asia.pool.ntp.org
server 2.asia.pool.ntp.org
server 3.asia.pool.ntp.org
Next restart your ntpd service
[root@controller ~]# systemctl restart ntpd
Check the ntpd daemon status
[root@controller ~]# systemctl status ntpd
● ntpd.service - Network Time Service
   Loaded: loaded (/usr/lib/systemd/system/ntpd.service; disabled; vendor preset: disabled)
   Active: active (running) since Thu 2018-11-01 21:18:12 IST; 4s ago
  Process: 15456 ExecStart=/usr/sbin/ntpd -u ntp:ntp $OPTIONS (code=exited, status=0/SUCCESS)
 Main PID: 15457 (ntpd)
   CGroup: /system.slice/ntpd.service
           └─15457 /usr/sbin/ntpd -u ntp:ntp -g

Nov 01 21:18:12 controller.example.com ntpd[15457]: Listen and drop on 1 v6wildcard :: UDP 123
Nov 01 21:18:12 controller.example.com ntpd[15457]: Listen normally on 2 lo 127.0.0.1 UDP 123
Nov 01 21:18:12 controller.example.com ntpd[15457]: Listen normally on 3 enp0s3 10.0.2.10 UDP 123
Nov 01 21:18:12 controller.example.com ntpd[15457]: Listen normally on 4 eth0 10.0.3.15 UDP 123
Nov 01 21:18:12 controller.example.com ntpd[15457]: Listen normally on 5 lo ::1 UDP 123
Nov 01 21:18:12 controller.example.com ntpd[15457]: Listen normally on 6 enp0s3 fe80::a00:27ff:fedf:8741 UDP 123
Nov 01 21:18:12 controller.example.com ntpd[15457]: Listen normally on 7 eth0 fe80::a00:27ff:fe95:c3cd UDP 123
Nov 01 21:18:12 controller.example.com ntpd[15457]: Listening on routing socket on fd #24 for interface updates
Nov 01 21:18:13 controller.example.com ntpd[15457]: 0.0.0.0 c016 06 restart
Nov 01 21:18:13 controller.example.com ntpd[15457]: 0.0.0.0 c012 02 freq_set kernel 8.476 PPM
Next check if your NTP service is able to connect to it’s peers
[root@controller ~]# ntpq -p
     remote           refid      st t when poll reach   delay   offset  jitter
==============================================================================
 ns-vultr.nono.i 218.73.139.35    2 u   14   64    1  304.210  5213983   0.000
 hkg1.m-d.net    133.243.238.163  2 u   16   64    1  317.870  5213989   0.000
 ntp.sg.eria.one 10.84.87.146     2 u   18   64    1  208.213  5213990   0.000
 203.95.213.129  193.62.22.74     3 u   19   64    1  601.558  5214001   0.000
Enable OpenStack repository
On CentOS, the extras repository provides the RPM that enables the OpenStack repository. CentOS includes the extras repository by default, so you can simply install the package to enable the OpenStack repository.
[root@controller ~]# yum install centos-release-openstack-queens -y
Download and install the RDO repository RPM to enable the OpenStack repository.
[root@controller ~]# yum install -y https://repos.fedorapeople.org/repos/openstack/openstack-queens/rdo-release-queens-1.noarch.rpm
Lastly our final list of repository required to install and configure controller node in OpenStack are below
[root@controller ~]# yum repolist
Loaded plugins: fastestmirror, langpacks
Repository rdo-trunk-queens-tested is listed more than once in the configuration
Loading mirror speeds from cached hostfile
 * base: centos.excellmedia.net
 * extras: centos.excellmedia.net
 * updates: centos.excellmedia.net
repo id                                                             repo name                                                      status
!base/7/x86_64                                                      CentOS-7 - Base                                                  9,911
!centos-ceph-luminous/7/x86_64                                      CentOS-7 - Ceph Luminous                                           184
!centos-openstack-queens/7/x86_64                                   CentOS-7 - OpenStack queens                                    2,447+2
!centos-qemu-ev/7/x86_64                                            CentOS-7 - QEMU EV                                                  63
!extras/7/x86_64                                                    CentOS-7 - Extras                                                  432
!openstack-queens/x86_64                                            OpenStack Queens Repository                                      2,449
!rdo-qemu-ev/x86_64                                                 RDO CentOS-7 - QEMU EV                                              63
!updates/7/x86_64                                                   CentOS-7 - Updates                                               1,614
repolist: 17,163
Install the OpenStack client
The "openstackclisent" aka "OSC" is a command line client for
openstack which brings the command set for compute, identity, image,
object storage and block storage APIs together in a single shell with a
uniform command structure. This tool is required to install and
configure controller node in OpenStack.
[root@controller ~]# yum install python-openstackclient -y
Install and Configure MariaDB database
Openstack is quite flexible in the database selection, OpenStack supports SQL database engines like MariaDB, MySQL and postgresql. The database service runs on the controller node. For this demo we will use MariaDB so let us go ahead and install MariaDB packages. Along with that we should also install python client libraries for MySQL.
[root@controller ~]# yum install mariadb mariadb-server python2-PyMySQL
Let us create a new file openstack.cnf inside /etc/my.cnf.d with
below content.
[root@controller ~]# cat /etc/my.cnf.d/openstack.cnf
[mysqld]
bind-address = 10.0.2.10
default-storage-engine = innodb
innodb_file_per_table
collation-server = utf8_general_ci
character-set-server = utf8
Create a [mysqld] section, and set the bind-address key to the
management IP address of the controller node to enable access by other
nodes via the management network. Set additional keys to enable useful
options and the UTF-8 character set:
Start the database service and configure it to start when the system boots:
[root@controller ~]# systemctl enable mariadb
Created symlink from /etc/systemd/system/multi-user.target.wants/mariadb.service to /usr/lib/systemd/system/mariadb.service.

[root@controller ~]# systemctl start mariadb
Check the status
[root@controller ~]# systemctl status mariadb
● mariadb.service - MariaDB 10.1 database server
   Loaded: loaded (/usr/lib/systemd/system/mariadb.service; enabled; vendor preset: disabled)
   Active: active (running) since Thu 2018-11-01 17:23:26 IST; 18h ago
 Main PID: 3364 (mysqld)
   Status: "Taking your SQL requests now..."
   CGroup: /system.slice/mariadb.service
           └─3364 /usr/libexec/mysqld --basedir=/usr

Nov 01 17:23:26 controller.example.com systemd[1]: Starting MariaDB 10.1 database server...
Nov 01 17:23:26 controller.example.com mysql-prepare-db-dir[3327]: Database MariaDB is probably initialized in /var/lib/mysql alre...done.
Nov 01 17:23:26 controller.example.com mysqld[3364]: 2018-11-01 17:23:26 139821793515712 [Note] /usr/libexec/mysqld (mysqld 10.1....64 ...
Nov 01 17:23:26 controller.example.com systemd[1]: Started MariaDB 10.1 database server.
Hint: Some lines were ellipsized, use -l to show in full.
Secure MariaDB Database
Execute the below command to set security for your MySQL or MariaDB
database in multiple ways like setting root user password, remove root
accounts that are accessible from outside the localhost remove anonymous
accounts which by default can be accessed by anyone in your account
(also anonymous), and privileges that allows anyone to access database
with names "test_"
Let us start our script
[root@controller ~]# mysql_secure_installation

NOTE: RUNNING ALL PARTS OF THIS SCRIPT IS RECOMMENDED FOR ALL MariaDB
      SERVERS IN PRODUCTION USE!  PLEASE READ EACH STEP CAREFULLY!

In order to log into MariaDB to secure it, we'll need the current
password for the root user.  If you've just installed MariaDB, and
you haven't set the root password yet, the password will be blank,
so you should just press enter here.

Enter current password for root (enter for none):
OK, successfully used password, moving on...

Setting the root password ensures that nobody can log into the MariaDB
root user without the proper authorisation.

Set root password? [Y/n] Y
New password:
Re-enter new password:
Password updated successfully!
Reloading privilege tables..
 ... Success!

By default, a MariaDB installation has an anonymous user, allowing anyone
to log into MariaDB without having to have a user account created for
them.  This is intended only for testing, and to make the installation
go a bit smoother.  You should remove them before moving into a
production environment.

Remove anonymous users? [Y/n] Y
 ... Success!

Normally, root should only be allowed to connect from 'localhost'.  This
ensures that someone cannot guess at the root password from the network.

Disallow root login remotely? [Y/n] Y
 ... Success!

By default, MariaDB comes with a database named 'test' that anyone can
access.  This is also intended only for testing, and should be removed
before moving into a production environment.

Remove test database and access to it? [Y/n] Y
 - Dropping test database...
 ... Success!
 - Removing privileges on test database...
 ... Success!

Reloading the privilege tables will ensure that all changes made so far
will take effect immediately.

Reload privilege tables now? [Y/n] Y
 ... Success!

Cleaning up...

All done!  If you've completed all of the above steps, your MariaDB
installation should now be secure.

Thanks for using MariaDB!
Install RabbitMQ Service
OpenStack uses a message queue to coordinate operations and status information among services. The message queue service typically runs on the controller node.
[root@controller ~]# yum install rabbitmq-server -y
Start the message queue service and configure it to start when the system boots:
[root@controller ~]# systemctl enable rabbitmq-server.service
Created symlink from /etc/systemd/system/multi-user.target.wants/rabbitmq-server.service to /usr/lib/systemd/system/rabbitmq-server.service.

[root@controller ~]# systemctl start rabbitmq-server.service
Add the openstack user with redhat as the password
[root@controller ~]# rabbitmqctl add_user openstack redhat
Creating user "openstack" ...
Permit configuration, write, and read access for the openstack user:
[root@controller ~]# rabbitmqctl set_permissions openstack ".*" ".*" ".*"
Setting permissions for user "openstack" in vhost "/" ...
Configure Memcached
The Identity service authentication mechanism for services uses
Memcached to cache tokens. The memcached service typically runs on
the controller node.
Install the packages:
[root@controller ~]# yum install memcached python-memcached -y
Configure the service to use the management IP address of the controller node. This is to enable access by other nodes via the management network:
[root@controller ~]# cat /etc/sysconfig/memcached
PORT="11211"
USER="memcached"
MAXCONN="1024"
CACHESIZE="64"
OPTIONS="-l 127.0.0.1,::1,controller"
Start the Memcached service and configure it to start when the system boots:
[root@controller ~]# systemctl enable memcached.service
[root@controller ~]# systemctl start memcached.service
Openstack keystone Service
The OpenStack Identity service provides a single point of integration for managing authentication, authorization, and a catalog of services.
The Identity service is typically the first service a user interacts with. Once authenticated, an end user can use their identity to access other OpenStack services. Likewise, other OpenStack services leverage the Identity service to ensure users are who they say they are and discover where other services are within the deployment. The Identity service can also integrate with some external user management systems (such as LDAP).
Use the database access client to connect to the database server as the root user:
[root@controller ~]# mysql -u root -p
Enter password:
Welcome to the MariaDB monitor.  Commands end with ; or g.
Your MariaDB connection id is 10
Server version: 10.1.20-MariaDB MariaDB Server

Copyright (c) 2000, 2016, Oracle, MariaDB Corporation Ab and others.

Type 'help;' or 'h' for help. Type 'c' to clear the current input statement.
Create the keystone database:
MariaDB [(none)]> CREATE DATABASE keystone;
Query OK, 1 row affected (0.00 sec)
Grant proper access to the keystone database:
MariaDB [(none)]> GRANT ALL PRIVILEGES ON keystone.* TO 'keystone'@'localhost' IDENTIFIED BY 'KEYSTONE_DBPASS';
Query OK, 0 rows affected (0.00 sec)
MariaDB [(none)]> GRANT ALL PRIVILEGES ON keystone.* TO 'keystone'@'%' IDENTIFIED BY 'KEYSTONE_DBPASS';
Query OK, 0 rows affected (0.00 sec)
KEYSTONE_DBPASS with your password. For this example my
password will be openstack
Exit from the database
MariaDB [(none)]> quit
Bye
Update Keystone Configuration
Run the following command to install the packages:
[root@controller ~]# yum install openstack-keystone openstack-utils httpd mod_wsgi -y
Next configure your keystone configuration file
KEYSTONE_DBPASS with your password. For this example my
password will be openstack
[root@controller ~]# openstack-config --set /etc/keystone/keystone.conf DEFAULT admin_token b6648ecb74bbcb5d388d
[root@controller ~]# openstack-config --set /etc/keystone/keystone.conf database connection mysql+pymysql://keystone:KEYSTONE_DBPASS@controller/keystone
[root@controller ~]# openstack-config --set /etc/keystone/keystone.conf token provider fernet
Synchronize keystone database
[root@controller ~]# su -s /bin/sh -c "keystone-manage db_sync" keystone
Token provider configuration
[root@controller ~]# keystone-manage fernet_setup --keystone-user keystone --keystone-group keystone
[root@controller ~]# keystone-manage credential_setup --keystone-user keystone --keystone-group keystone

[root@controller ~]# keystone-manage bootstrap --bootstrap-password redhat --bootstrap-admin-url http://controller:5000/v3/ --bootstrap-internal-url http://controller:5000/v3/ --bootstrap-public-url http://controller:5000/v3/ --bootstrap-region-id RegionOne
Configure Apache HTTP Service
[root@controller ~]# vim /etc/httpd/conf/httpd.conf
ServerName controller
Create a link to the /usr/share/keystone/wsgi-keystone.conf file:
[root@controller ~]# ln -s /usr/share/keystone/wsgi-keystone.conf /etc/httpd/conf.d/

[root@controller ~]# systemctl enable httpd.service
[root@controller ~]# systemctl start httpd.service
[root@controller ~]# systemctl status httpd.service
Create keystone service entity
[root@controller ~]# openstack service create --name keystone --description "Openstack Identity" identity
+-------------+----------------------------------+
| Field       | Value                            |
+-------------+----------------------------------+
| description | Openstack Identity               |
| enabled     | True                             |
| id          | 329a0fb8b2a7421fb24c8b7baeefee39 |
| name        | keystone                         |
| type        | identity                         |
+-------------+----------------------------------+
Create keystone service endpoint
[root@controller ~]# openstack endpoint create --region RegionOne identity public http://controller:5000/v3
+--------------+----------------------------------+
| Field        | Value                            |
+--------------+----------------------------------+
| enabled      | True                             |
| id           | 42cb3d82acbc47db8e0473b00517bc29 |
| interface    | public                           |
| region       | RegionOne                        |
| region_id    | RegionOne                        |
| service_id   | 329a0fb8b2a7421fb24c8b7baeefee39 |
| service_name | keystone                         |
| service_type | identity                         |
| url          | http://controller:5000/v3        |
+--------------+----------------------------------+

[root@controller ~]# openstack endpoint create --region RegionOne identity internal http://controller:5000/v3
+--------------+----------------------------------+
| Field        | Value                            |
+--------------+----------------------------------+
| enabled      | True                             |
| id           | 30daf6142c2e4a8abe011b16c5bc0c3c |
| interface    | internal                         |
| region       | RegionOne                        |
| region_id    | RegionOne                        |
| service_id   | 329a0fb8b2a7421fb24c8b7baeefee39 |
| service_name | keystone                         |
| service_type | identity                         |
| url          | http://controller:5000/v3        |
+--------------+----------------------------------+

[root@controller ~]# openstack endpoint create --region RegionOne identity admin http://controller:35357/v3
+--------------+----------------------------------+
| Field        | Value                            |
+--------------+----------------------------------+
| enabled      | True                             |
| id           | 0270117e53c04d958e79b33fc247b7a0 |
| interface    | admin                            |
| region       | RegionOne                        |
| region_id    | RegionOne                        |
| service_id   | 329a0fb8b2a7421fb24c8b7baeefee39 |
| service_name | keystone                         |
| service_type | identity                         |
| url          | http://controller:35357/v3       |
+--------------+----------------------------------+

[root@controller ~]# openstack domain create --description "Default Domain" default
+-------------+----------------------------------+
| Field       | Value                            |
+-------------+----------------------------------+
| description | Default Domain                   |
| enabled     | True                             |
| id          | 0267824b7d934264aa9d560e7650681b |
| name        | default                          |
| tags        | []                               |
+-------------+----------------------------------+
Create Project or Tenant
[root@controller ~]# openstack project create --domain default --description "Admin Project" admin
+-------------+----------------------------------+
| Field       | Value                            |
+-------------+----------------------------------+
| description | Admin Project                    |
| domain_id   | 0267824b7d934264aa9d560e7650681b |
| enabled     | True                             |
| id          | 8bb9c0b1fa7947778a4f914ea0752cfc |
| is_domain   | False                            |
| name        | admin                            |
| parent_id   | 0267824b7d934264aa9d560e7650681b |
| tags        | []                               |
+-------------+----------------------------------+
Create admin user
[root@controller ~]# openstack user create --domain default --password-prompt admin
User Password:
Repeat User Password:
+---------------------+----------------------------------+
| Field               | Value                            |
+---------------------+----------------------------------+
| domain_id           | 0267824b7d934264aa9d560e7650681b |
| enabled             | True                             |
| id                  | 1774158c0048410ea8114a35b7e2db7e |
| name                | admin                            |
| options             | {}                               |
| password_expires_at | None                             |
+---------------------+----------------------------------+
Create admin role
[root@controller ~]# openstack role create admin
+-----------+----------------------------------+
| Field     | Value                            |
+-----------+----------------------------------+
| domain_id | None                             |
| id        | 9c24032c58984e3ea6605b30cb2506c4 |
| name      | admin                            |
+-----------+----------------------------------+
Assign admin user to admin role
[root@controller ~]# openstack role add --project admin --user admin admin
Create a service project
[root@controller ~]# openstack project create --domain default --description "Service Project" service
+-------------+----------------------------------+
| Field       | Value                            |
+-------------+----------------------------------+
| description | Service Project                  |
| domain_id   | 0267824b7d934264aa9d560e7650681b |
| enabled     | True                             |
| id          | 28f0fa2db8c1400db3fa514f5c926cc0 |
| is_domain   | False                            |
| name        | service                          |
| parent_id   | 0267824b7d934264aa9d560e7650681b |
| tags        | []                               |
+-------------+----------------------------------+
Create demo project
[root@controller ~]# openstack project create --domain default --description "Demo Project" demo
+-------------+----------------------------------+
| Field       | Value                            |
+-------------+----------------------------------+
| description | Demo Project                     |
| domain_id   | 0267824b7d934264aa9d560e7650681b |
| enabled     | True                             |
| id          | c651c6b38d6849099dd6ea754a288e39 |
| is_domain   | False                            |
| name        | demo                             |
| parent_id   | 0267824b7d934264aa9d560e7650681b |
| tags        | []                               |
+-------------+----------------------------------+
Create demo user
[root@controller ~]# openstack user create --domain default --password-prompt demo
User Password:
Repeat User Password:
+---------------------+----------------------------------+
| Field               | Value                            |
+---------------------+----------------------------------+
| domain_id           | 0267824b7d934264aa9d560e7650681b |
| enabled             | True                             |
| id                  | c9c4f121493144be98097c67ad9feeb0 |
| name                | demo                             |
| options             | {}                               |
| password_expires_at | None                             |
+---------------------+----------------------------------+
Create the user role:
[root@controller ~]# openstack role create user
+-----------+----------------------------------+
| Field     | Value                            |
+-----------+----------------------------------+
| domain_id | None                             |
| id        | 8b2c75041b7149d5a122f9308d71a773 |
| name      | user                             |
+-----------+----------------------------------+
Add the user role to the demo project and user:
[root@controller ~]# openstack role add --project demo --user demo user
Create environment files
Create client environment scripts for the admin and demo projects
and users. Future portions of this guide reference these scripts to load
appropriate credentials for client operations.
Below is my adminrc file. Replace the OS_PASSWORD value with your
admin password
[root@controller ~]# cat adminrc
export OS_PROJECT_DOMAIN_NAME=default
export OS_USER_DOMAIN_NAME=default
export OS_PROJECT_NAME=admin
export OS_USERNAME=admin
export OS_PASSWORD=redhat
export OS_AUTH_URL=http://controller:35357/v3
export OS_IDENTITY_API_VERSION=3
export OS_IMAGE_API_VERSION=2
Load the adminrc file to populate environment
variables with the location of the Identity service and the admin
project and user credentials:
[root@controller ~]# source adminrc
Request an authentication token:
[root@controller ~]# openstack token issue
+------------+-----------------------------------------------------------------------------------------------------------------------------------------------------------------------------------------+
| Field      | Value                                                                                                                                                                                   |
+------------+-----------------------------------------------------------------------------------------------------------------------------------------------------------------------------------------+
| expires    | 2018-10-25T17:03:34+0000                                                                                                                                                                |
| id         | gAAAAABb0elWkG4Q6UZ_NCXqazQAEubroEpeHelbD3UrOAdZsHtcdDJ1n7Fnb2xuGZfBLc74UZznZVA4lOT304SF9N7ZlFlXr39ZHmdlqB6iD1hbARkCkJt2rXARRretqw5vyLK07RXGrVtjFgN5wccU0PiZRgVRFyqkDdHMrcLcicDo1GrQlbg |
| project_id | 8bb9c0b1fa7947778a4f914ea0752cfc                                                                                                                                                        |
| user_id    | 1774158c0048410ea8114a35b7e2db7e                                                                                                                                                        |
+------------+-----------------------------------------------------------------------------------------------------------------------------------------------------------------------------------------+
Similarly below is my demorc file
[root@controller ~]# cat demorc
export OS_PROJECT_DOMAIN_NAME=default
export OS_USER_DOMAIN_NAME=default
export OS_PROJECT_NAME=demo
export OS_USERNAME=demo
export OS_PASSWORD=redhat
export OS_AUTH_URL=http://controller:5000/v3
export OS_IDENTITY_API_VERSION=3
export OS_IMAGE_API_VERSION=2
Load the demorc file to populate environment variables with the
location of the Identity service and the demo project and user
credentials:
[root@controller ~]# source demorc
Request an authentication token:
[root@controller ~]# openstack token issue
+------------+-----------------------------------------------------------------------------------------------------------------------------------------------------------------------------------------+
| Field      | Value                                                                                                                                                                                   |
+------------+-----------------------------------------------------------------------------------------------------------------------------------------------------------------------------------------+
| expires    | 2018-10-25T17:08:07+0000                                                                                                                                                                |
| id         | gAAAAABb0epn7oHBEcsoApMqFT3bQ9aMtE-n4lJ_rnRmFuuAlPuQ4Pgel2QfsVEywwTgSxEzeBFT3NVkBJ3Y2pD8VhJPSSn_EjrNudGa9M9UQlRaXLJmT30hokWHwD2Xz5LfuTAdjuaW0KWK-mS1L8X0jja-d-iECmNR9JY74YVIcTuDWaYMh2M |
| project_id | c651c6b38d6849099dd6ea754a288e39                                                                                                                                                        |
| user_id    | c9c4f121493144be98097c67ad9feeb0                                                                                                                                                        |
+------------+-----------------------------------------------------------------------------------------------------------------------------------------------------------------------------------------+
In the next article I will continue the steps to Install and Configure Controller node in OpenStack where I will share the steps to configure rest of the mandatory services on controller node.
