
Laravel is a widely used PHP web application framework that is known for its flexibility and robustness. One of the key aspects of any web application is access control, which is where Laravel’s roles and permissions come in. Roles and permissions allow you to control access to different parts of your application, ensuring that users can only access the functionality that they are authorized to.
One popular tool for implementing roles and permissions in Laravel is the Spatie Laravel Permission package. This package provides a simple and flexible way to manage roles and permissions in your Laravel application, allowing you to easily define roles, assign permissions to those roles, and then assign roles to users.
With the Spatie Laravel Permission package, you can quickly and easily implement a robust access control system in your Laravel application, without having to spend hours writing custom code. In this article, we’ll explore how to use the Spatie Laravel Permission package to manage roles and permissions in your Laravel application, including how to assign roles to users and how to check a user’s permissions in your code.
You could implement the Laravel role and permission system from scratch or use libraries like Spatie, as shown below.
Install Spatie Permission Package
These commands are used in Laravel to install and configure the Spatie
Laravel Permission package. The composer require command installs the
package, while php artisan vendor:publish publishes the configuration
file of the package to your application. Finally,
php artisan optimize:clear clears the cached bootstrap files of your
Laravel application. These commands together provide a simple and
efficient way to install, configure, and optimize the Spatie Laravel
Permission package, which allows you to manage roles and permissions in
your Laravel application.
// install the Spatie Permission package in your Laravel application
composer require spatie/laravel-permission

// publish the configuration file of the Spatie Laravel Permission package to the Laravel application
php artisan vendor:publish --provider="Spatie\Permission\PermissionServiceProvider"

//  clear the cached bootstrap files of your Laravel application
php artisan optimize:clear
We install the library using composer. Next, we publish the migration and the config file with the default role and permission tables (explained in the configuration section). Lastly, we clear the config cache as the library requires us to.
Configuration
The config/permission.php file should be configured with the following
tables:
roles: Holds the roles’ names.permissions: Holds the permissions’ names.model_has_permissions: Holds the User model’s permissions.model_has_roles: Holds the User model’s roles.role_has_permissions: Holds each role’s permissions.
Now you can update the Model with HasRoles trait.
app/Models/User.php
The use statement at the top of the file imports the HasRoles trait
from the Spatie package. The HasRoles trait adds methods and
attributes to the User model that allow you to check whether a user
has a particular role, assign a role to a user, and revoke a role from a
user.
<?php
...
use Spatie\Permission\Traits\HasRoles;

class User extends Authenticatable
{
    use HasApiTokens, HasFactory, Notifiable, HasRoles;
  ...
}
The HasRoles trait simplifies interacting with the Role and Permission
models with eloquent. The respective (Role and Permission) classes are
eloquent models. You create their instances using an associative array
with a key called name and value of your choice.
First, you need to import the models into the current file.
use Spatie\Permission\Models\Role;
use Spatie\Permission\Models\Permission;
before using them.
$adminRole = Role::create(['name' => 'Admin']);
$permissions = Permission::all();
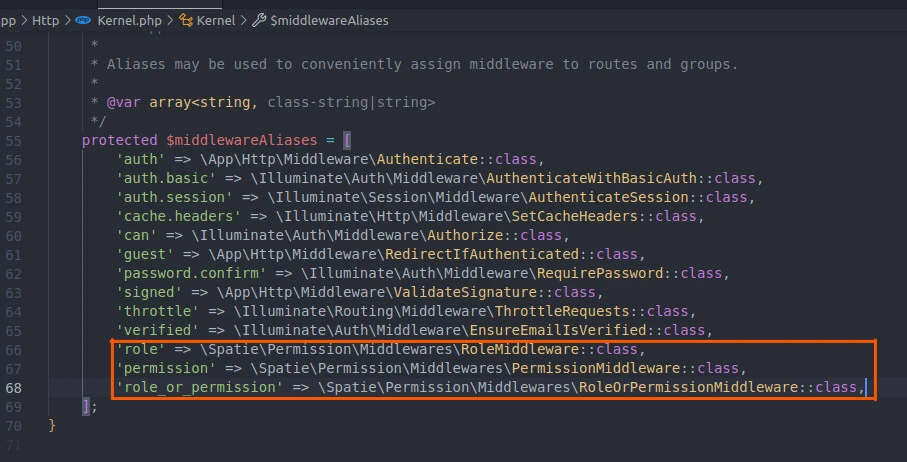
You can also configure the middleware and use it, as follows.
configure
// app/Http/Kernel.php (Laravel 10)
<?php
...
class Kernel extends HttpKernel
{
   ...
    protected $middlewareAliases = [
        ...
        'role' => \Spatie\Permission\Middlewares\RoleMiddleware::class,
        'permission' => \Spatie\Permission\Middlewares\PermissionMiddleware::class,
        'role_or_permission' => \Spatie\Permission\Middlewares\RoleOrPermissionMiddleware::class,
    ];
}
This code defines a Laravel route that is accessed when the URL /admin
is requested using the HTTP GET method.
The route returns the admin.index view when accessed.
The middleware method is used to define middleware that should be
applied to this route. In this case, three middleware are applied:
auth, verified, and role:Admin.
The auth middleware ensures that only authenticated users can access
this route, while the verified middleware checks whether the user’s
email has been verified. Finally, the role:Admin middleware checks
whether the authenticated user has the Admin role.
Route::get('/admin', function () {
    return view('admin.index');
})->middleware(['auth', 'verified', 'role:Admin'])->name('admin.index');
The role:admin middleware from
'role' => \Spatie\Permission\Middlewares\RoleMiddleware::class permits
only users with Admin role to access the 'admin.index' view via the
/admin route.
You can create the roles in the codebase or let the application users do it. Similarly, you can create default roles like admin using database seeders.
Here is an example.
Creating and assigning Laravel role and permission
Let’s create some roles and permissions using database seeders.
php artisan make:seeder RolePermissionSeeder
We create a database seeder called RolePermissionSeeder. Next, open
the database/seeders/RolePermissionSeeder.php file and create the
permissions and roles.
This code demonstrates how to use the Spatie Laravel Permission package
to seed the database with roles and permissions in a Laravel
application.In the run() method, several permissions are created for
actions such as creating, editing, and deleting users and posts. These
permissions are then assigned to an Admin role using the
givePermissionTo() method.
<?php

...
use Spatie\Permission\Models\Permission;
use Spatie\Permission\Models\Role;

class RolePermissionSeeder extends Seeder
{
    public function run(): void
    {
        // permission
            // on users
        Permission::create(['name' => 'create-users']);
        Permission::create(['name' => 'edit-users']);
        Permission::create(['name' => 'delete-users']);
            // on posts
        Permission::create(['name' => 'create-posts']);
        Permission::create(['name' => 'edit-posts']);
        Permission::create(['name' => 'delete-posts']);

        // role
        $adminRole = Role::create(['name' => 'Admin']);

        $adminRole->givePermissionTo([
            'create-users',
            'delete-users',
            'create-posts',
            'edit-posts',
            'delete-posts',
        ]);
    }
}
database/seeders/DatabaseSeeder.php
The run() method in the class calls two methods to create and populate
data in the database. The first method uses the User model’s factory
method to create 10 sample users and insert them into the database. The
factory() method is a convenient way to generate fake data for testing
purposes.
The second method in the run() method calls the RolePermissionSeeder
class, which seeds the database with roles and permissions. This is
typically used in applications that use role-based access control to
restrict user access to certain parts of the application.
<?php
...
class DatabaseSeeder extends Seeder
{
    public function run(): void
    {
        \App\Models\User::factory(10)->create();
        $this->call(RolePermissionSeeder::class);
    }
}
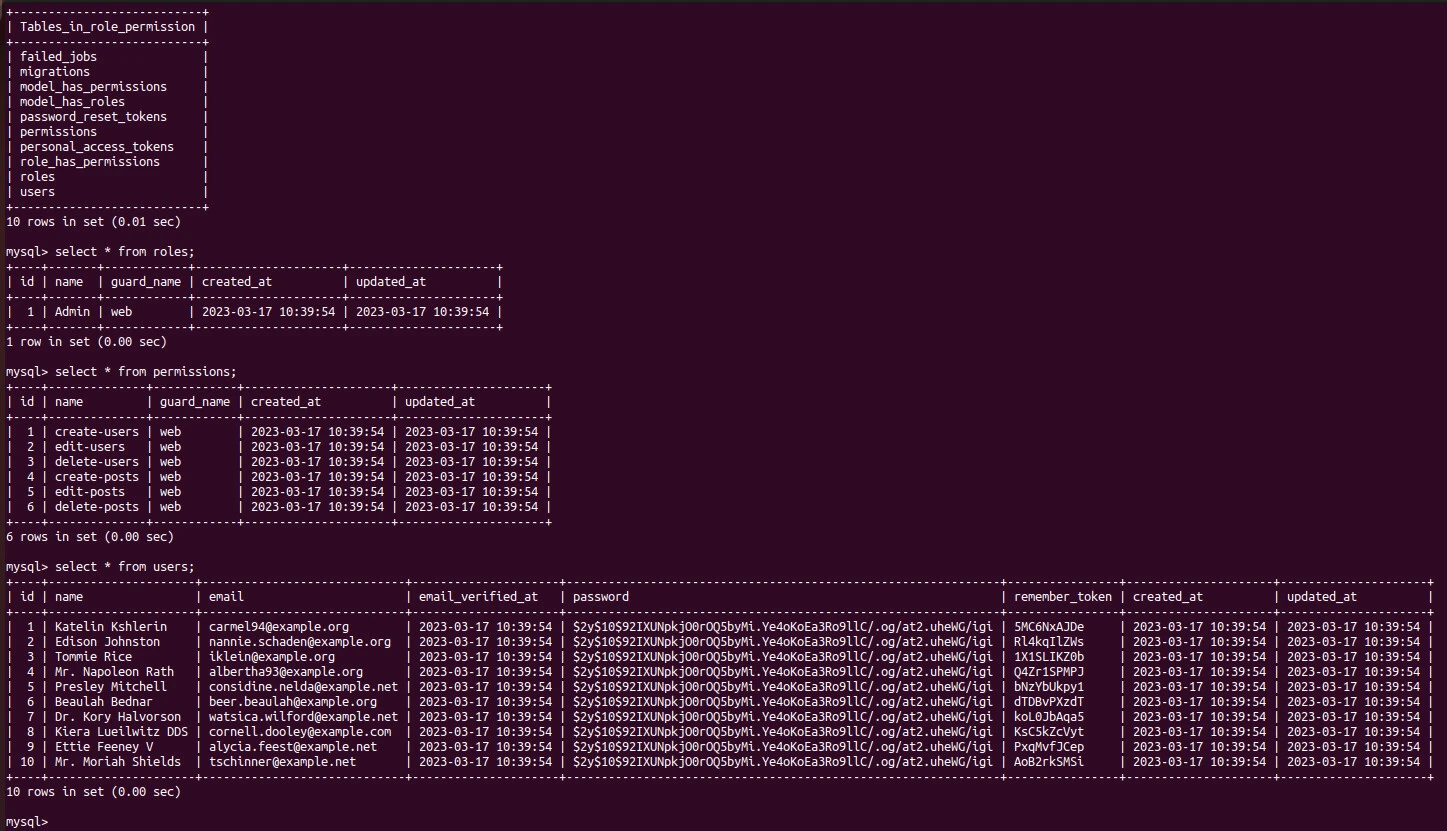
Apart from 10 users, we have configured the database to create the
permissions and Admin role in the respective tables. Let’s seed the
database with changes.
php artisan migrate --seed
Now we can retrieve users and assign them permissions.
routes/web.php
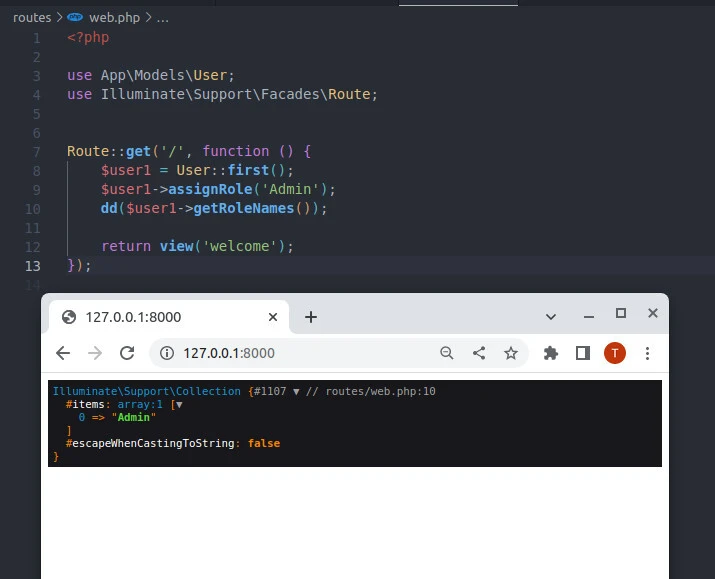
This code assigns the “Admin” role to the first user in the database and
then dumps the role names assigned to that user using the dd()
function, which stands for “dump and die”.
The assignRole() method is provided by the HasRoles trait of the
User model, which is included at the top of the code snippet. It
accepts a role name as a parameter and assigns that role to the user. In
this case, the “Admin” role is assigned.
The getRoleNames() method is also provided by the HasRoles trait and
returns an array of the names of all the roles assigned to the user. The
dd() function is used to dump this array to the browser and then
terminate the script execution, allowing you to see the output.
<?php
use App\Models\User;
use Illuminate\Support\Facades\Route;

Route::get('/', function () {
    $user1 = User::first();
    $user1->assignRole('Admin');
    dd($user1->getRoleNames());

    return view('welcome');
});
We get the first database user and make him an admin. That means s(he)
can create and delete users or create, edit and delete posts as defined
in the RolePermissionSeeder.php file.
 $adminRole->givePermissionTo([
   'create-users',
   'delete-users',
   'create-posts',
   'edit-posts',
   'delete-posts',
 ]);
getRoleNames is one of the methods to read or assign
permissions and roles to users. For example, we can permit the
Admin to edit users.
$role = Role::findByName('Admin');
$role->givePermissionTo('edit-users');
We can also remove a role or revoke permission. The first part of the
code removes the Admin role from the first user in the database, and
the second part of the code revokes the edit-users permission from the
Admin role. By using these methods, you can control access to
different parts of your application and manage the roles and permissions
of your users, ensuring that they only have access to the functionality
that they are authorized to.
# role
$user1 = User::first();
$user1->removeRole('Admin');
# permission
$role = Role::findByName('Admin');
$role->revokePermissionTo('edit-users');
Display resources depending on Laravel role and permission
Depending on the set roles and permissions, you can hide or show a part
of a view. For example, you can display a button in
Blade
using the @role or @can directives if the logged-in user has the
matching role or permission.
The @role directive checks if the user has the Admin role and
displays an Admin button if they do. The @can directive checks if
the user has the edit-users permission and displays an Edit button
if they do. By using these directives, the code provides a simple way to
control access to different parts of your application based on a user’s
role or permissions.
<!-- role --->
@role('Admin')
    <button><a href="{{ route('admin.index', $user->id) }}">Admin</a></button>
@endrole
<!-- permission --->
@can('edit-users')
    <button><a href="{{ route('/edit', $user->id) }}">Edit</a></button>
@endcan
The user will only see theAdminand Edit buttons if they have the
Admin role and 'edit-users' permission.
Conclusion
In summary, Spatie Laravel Permission is a popular package for adding role-based access control to Laravel applications. By using this package, you can define roles and permissions for different parts of your application, and assign those roles and permissions to users. This allows you to control access to different parts of your application based on the user’s role, improving the security and usability of your application.
To use the Spatie Laravel Permission package, you can install it via
Composer and run database migrations to set up the necessary tables. You
can then define roles and permissions in your application’s code and
assign them to users. Laravel’s middleware feature can be used to
restrict access to certain routes based on the user’s role. By using the
HasRoles trait in the User model, you can easily check whether a
user has a particular role, assign a role to a user, and revoke a role
from a user.