This tutorial will guide you through setting up and utilizing Laravel Task Scheduler, covering task creation, scheduling frequencies, preventing overlaps, running tasks on one server, and practical examples to streamline your application’s automated tasks.
Laravel Task Scheduler is a powerful feature of the Laravel framework, enabling developers to schedule time-based tasks with ease. This system simplifies automating tasks like sending emails, cleaning databases, and generating reports without the need for creating complicated Cron jobs. With Laravel Task Scheduler, you can define tasks directly within your application’s code, specify execution intervals ranging from every minute to yearly, and manage task overlaps and server execution, enhancing your application’s efficiency and reliability.
How Laravel Task Scheduler Works?
Here is a step by step guide to understand how Laravel Task Scheduler will schedule any provided task in the provided order:
- Cron Job Initialization: A single Cron job is set up on the
server to execute
php artisan schedule:runcommand every minute. This is the heart of Laravel’s scheduler, enabling it to check and run tasks as needed. - Defining Tasks in Laravel: Developers define their scheduled
tasks within the
schedulemethod of theapp/Console/Kernel.phpfile. Here, you can specify various tasks, such as running Artisan commands, executing custom PHP functions, or even queuing jobs and their execution frequency. - Scheduling Frequency: Laravel offers a wide array of scheduling
frequencies (
hourly,daily,weekly, etc.). When you specify a frequency for a task, Laravel calculates the next execution time based on this schedule. - Execution Time Check: Every minute, when the Cron job runs the
schedule:runcommand, Laravel checks the current time against the next scheduled execution times of all defined tasks. - Task Execution: If the current time matches or surpasses a task’s scheduled execution time, Laravel runs the task. Once completed, it calculates and stores the next execution time for the task.
- Preventing Overlaps: If a task is marked with
withoutOverlapping(), Laravel ensures that the task does not run again if it’s already in progress. This is managed by setting a lock in the application cache, which is checked before the task is run. - Server-Specific Execution: For applications running in a
load-balanced environment,
onOneServer()ensures that a scheduled task runs on only one server. This relies on Laravel’s cache system to set a server-wide lock. - Hooks for Additional Logic:
before()andafter()hooks allow for the execution of custom logic before and after a scheduled task runs, providing flexibility for complex scheduling needs. - Monitoring and Management: Developers can monitor and manage
scheduled tasks using commands like
php artisan schedule:list(available in Laravel 8.x and above) to view all scheduled tasks and their next execution times. - Manual Task Execution: For testing or manual execution,
php artisan schedule:runcan be run from the command line. This will execute any tasks that are due at the current time, based on their defined schedules.
php artisan schedule:run command is called by the Cron
job every minute Laravel is designed to manage task execution based on
the schedules as provided in app/Console/Kernel.php. Laravel does this
by keeping track of the last execution time of each scheduled task
internally, ensuring that tasks run at their specified frequencies and
not more often than they should.
Steps to implement and validate Laravel Task Scheduler with Example
1. Setup Environment
If you already have an environment to setup your scheduler then you can skip this section. I am documenting these steps for anyone who are starting fresh and are planning to learn this feature:
I already have a setup with
Laravel installed. So I will
directly proceed and create a new project laravelSchedulerProject to
demonstrate the functioning of Laravel Task Scheduler.
composer create-project --prefer-dist laravel/laravel laravelSchedulerProject
Navigate inside the project:
cd laravelSchedulerProject/
I will update .env file with the database details which I have already
created when I had installed Laravel:
DB_CONNECTION=mysql
DB_HOST=127.0.0.1
DB_PORT=3306
DB_DATABASE=my_laravel_db
DB_USERNAME=user1
DB_PASSWORD=Passw0rd
I will generate a migration for the users table and include a
verified boolean column:

In the generated migration file located in
database/migrations/2024_02_19_072928_create_users_table.php, add:
Schema::create('users', function (Blueprint $table) {
    $table->id();
    $table->string('name');
    $table->string('email')->unique();
    $table->boolean('verified')->default(false);
    $table->timestamps();
});
Run the migration:
php artisan migrate

Create a User model if it doesn’t already exist:
php artisan make:model User
2. Create a Custom Command for Cleanup
Generate a new Artisan command for cleaning up unverified users:
php artisan make:command CleanUpUnverifiedUsers

Edit the generated app/Console/Commands/CleanUpUnverifiedUsers.php
file. In the handle() method, add logic to delete unverified users who
were created more than 48 hours ago:
<?php

namespace App\Console\Commands;

use Illuminate\Console\Command;

class CleanUpUnverifiedUsers extends Command
{
    /**
     * The name and signature of the console command.
     *
     * @var string
     */
    protected $signature = 'cleanup:unverifiedusers';

    /**
     * The console command description.
     *
     * @var string
     */
    protected $description = 'Cleans up unverified users';

    /**
     * Execute the console command.
     */
    public function handle()
    {
            $count = \App\Models\User::where('verified', false)
                             ->where('created_at', '<', now()->subDays(2))
                             ->delete();

            $this->info("$count unverified users cleaned up.");
    }
}
protected $signature: This property defines the name and signature of the console command. It’s how we will call the command from the terminal. In our case, the signature is'cleanup:unverifiedusers'. So, we would run this command via the terminal asphp artisan cleanup:unverifiedusers.protected $description: This property provides a description for the console command. This description is displayed when we runphp artisan listor when we request help for the command usingphp artisan help cleanup:unverifiedusers. It’s meant to give users a quick overview of what the command does.public function handle(): Thehandle()method contains the logic that is executed when the command is called. This is where we define what the command actually does. When we run the command, Laravel automatically calls this method.
3. Schedule the Cleanup Command
In app/Console/Kernel.php, schedule the cleanup command to run daily:
<?php

namespace App\Console;

use Illuminate\Console\Scheduling\Schedule;
use Illuminate\Foundation\Console\Kernel as ConsoleKernel;

class Kernel extends ConsoleKernel
{
    /**
     * Define the application's command schedule.
     */
    protected function schedule(Schedule $schedule): void
    {
        // $schedule->command('inspire')->hourly();
        $schedule->command('cleanup:unverifiedusers')->everyMinute();
    }

    /**
     * Register the commands for the application.
     */
    protected function commands(): void
    {
        $this->load(__DIR__.'/Commands');

        require base_path('routes/console.php');
    }
}
$signature in the custom Artisan command class
and the command string we pass to the $schedule->command() method in
the schedule function of app/Console/Kernel.php should be the same.
For testing purpose as I want to test this scheduler immediately so I have configured it to run every minute but you can modify it as per your requirement.
Laravel provides a wide range of scheduling options to run tasks at various intervals:
- Every Minute: Use
->everyMinute();for tasks that should run as frequently as possible. - Hourly: Use
->hourly();to run tasks once every hour. - Daily: The
->daily();method schedules tasks to run once a day at midnight. - Monthly:
->monthlyOn(1, '15:00');schedules a task to run on the first day of every month at 3 PM.
4. Create Dummy Users (Optional)
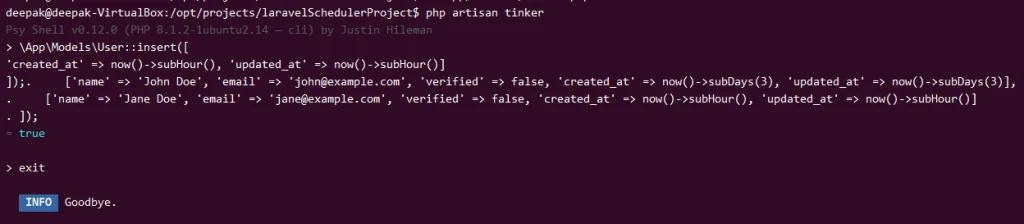
To test the scheduler, first, create some dummy unverified users with a mix of timestamps. Use Tinker to insert these users:
\App\Models\User::insert([
    ['name' => 'John Doe', 'email' => 'john@example.com', 'verified' => false, 'created_at' => now()->subDays(3), 'updated_at' => now()->subDays(3)],
    ['name' => 'Jane Doe', 'email' => 'jane@example.com', 'verified' => false, 'created_at' => now()->subHour(), 'updated_at' => now()->subHour()]
]);
5. Testing Scheduled Tasks
Manually trigger the scheduler to see the cleanup command in action:
php artisan schedule:run

Check your database to see if the unverified user created more than 48 hours ago has been removed.
To test a specific scheduled task, you might want to run it immediately without waiting for its scheduled time. You can manually trigger this command for testing purposes with:
php artisan cleanup:unverifiedusers

6. Set Up Cron Job
For local manual tests, running php artisan schedule:run directly is
fine, but for actual automated scheduling, ensure your system’s Cron is
set up to call this command every minute:
crontab -e
Next add the following rule in your crontab. You can modify the rule based on your project name.
* * * * * cd /opt/projects/laravelSchedulerProject && php artisan schedule:run >> /dev/null 2>&1
7. Listing Scheduled Tasks
As of Laravel 8.x, a useful command schedule:list is available to list
all scheduled tasks configured in your application. This command gives
you a quick overview of what tasks are scheduled and their frequency.
php artisan schedule:list

Additional Options supported with Laravel Task Scheduler
1. Preventing Task Overlaps
In Laravel’s Task Scheduler, preventing task overlaps is crucial for long-running tasks to avoid multiple instances of the same task running simultaneously. This can be especially important for tasks that may take longer to complete than their scheduled frequency.
When you chain the withoutOverlapping() method to a task’s definition
in app/Console/Kernel.php, Laravel ensures that the task will not run
if it is already running. This is achieved by setting a lock in the
cache that lasts for the duration of the task’s execution. If the next
scheduled run of the task occurs before the previous run has completed,
Laravel will skip the new run.
$schedule->command('cleanup:unverifiedusers')->daily()->withoutOverlapping();
2. Running Tasks on One Server
In environments where your Laravel application is deployed across multiple servers behind a load balancer, ensuring that scheduled tasks run on only one server is necessary to prevent duplicate executions.
This feature requires the use of Laravel’s cache driver that supports
atomic locks, such as Redis or Memcached. By chaining the
onOneServer() method to your task’s scheduling, Laravel uses the cache
to set a lock that is respected across all servers. This ensures that
only the first server to acquire the lock can run the task, while other
servers will skip the execution.
$schedule->command('cleanup:unverifiedusers')->daily()->onOneServer();
3. Using Task Hooks: Before and After
Task hooks allow you to execute custom code before and after a scheduled task runs. This is useful for preparing the application for a task or cleaning up after a task has completed.
before(Closure $callback): Executes the provided callback before the scheduled task runs. This can be used for logging, sending notifications, or any preparatory actions.after(Closure $callback): Executes the provided callback after the scheduled task has run. This is useful for cleanup operations, logging, or post-task notifications.
$schedule->command('cleanup:unverifiedusers')->daily()
    ->before(function () {
        Log::info('Starting cleanup of unverified users.');
    })
    ->after(function () {
        Log::info('Cleanup of unverified users complete.');
    });
4. Running Tasks in the Background
For long-running tasks, you may want to execute them in the background to prevent blocking other tasks or the scheduler itself. Laravel allows you to run scheduled tasks in the background.
To run a command in the background, use the runInBackground() method:
$schedule->command('send:reminders')->hourly()->runInBackground();
This is particularly useful for tasks that take a significant amount of time to complete, ensuring they don’t interfere with the execution of other scheduled tasks.
5. Capture Scheduler Task’s Output and Errors to Log File
For more comprehensive monitoring, especially in production, you might
need to log the output of scheduled tasks or even monitor their
execution and failures. You can log the output of a task to a file by
chaining the sendOutputTo() method.
$schedule->command('database:backup')->daily()->sendOutputTo(storage_path('logs/database_backup.log'));
This method is useful for debugging and monitoring the task’s output without manually checking the system each time.
To log both the output and any errors generated by a scheduled task, you
can use the sendOutputTo() method for the output and
appendOutputTo() for appending both standard output and error output
to the same file or handle errors more explicitly.
$schedule->command('cleanup:unverifiedusers')
         ->daily()
         ->sendOutputTo(storage_path('logs/cleanup_run.log'))
         ->appendOutputTo(storage_path('logs/cleanup_run_error.log'));
This setup directs the command output to cleanup_run.log and appends
error output to clanup_run_error.log.
However, if you want both standard output and errors in the same file,
you can direct stderr to stdout in the command definition itself,
assuming your command might generate error output that is different from
Laravel’s application log:
$schedule->exec('cleanup:unverifiedusers 2>&1')
         ->daily()
         ->sendOutputTo(storage_path('logs/cleanup_run_combined.log'));
Here, 2>&1 redirects the standard error (stderr, file descriptor 2)
to the standard output (stdout, file descriptor 1), ensuring that all
output, including errors, is captured in the same log file.
Frequently Asked Questions on Laravel Scheduling
Why is my scheduled task not running?
The most common reason a scheduled task isn’t running is due to the
server’s Cron job not being correctly set up. Laravel’s scheduler relies
on a Cron job that executes php artisan schedule:run every minute. If
this isn’t configured, or there’s an error in your Cron setup, Laravel
won’t be able to trigger any scheduled tasks. Additionally, ensure your
tasks are correctly defined in app/Console/Kernel.php with the correct
syntax and scheduling expressions. The php artisan schedule:list can
be used to check for any configuration or PHP parse errors.
Environmental configuration differences or discrepancies in the expected
environment (like differences in .env file settings) can also affect
task execution.
How can I debug a scheduled task?
To debug a scheduled task, you can manually list schuled task using
php artisan schedule:list or try to run the task using the Artisan
command line tool with its specific signature
php artisan cleanup:unverifiedusers, which allows you to see any
immediate errors or output. You can also use the ->sendOutputTo()
method to log the task’s output to a file for later inspection. Checking
Laravel’s log files and ensuring your task is correctly defined in
app/Console/Kernel.php are also key steps in debugging scheduled
tasks.
My task runs manually but not when scheduled. What could be wrong?
If your task runs manually but not when scheduled, check the task’s
schedule frequency and timing in app/Console/Kernel.php. Tasks
scheduled for specific times won’t run if php artisan schedule:run is
executed at a different time. Ensure your server’s timezone matches the
application’s timezone configuration in config/app.php. Also, review
the server’s Cron job setup to ensure it’s running
php artisan schedule:run every minute as required.
How do I prevent task overlaps?
To prevent task overlaps, use the ->withoutOverlapping() method when
defining your task in app/Console/Kernel.php. This method prevents a
new instance of the task from starting if the previous instance is still
running, by leveraging Laravel’s cache system to set a lock.
Can I schedule tasks to run at random times?
Laravel does not support scheduling tasks at completely random times directly. However, you can achieve a degree of randomness by scheduling a task to run more frequently (e.g., every minute) and incorporating conditional logic within the task to randomly determine whether to proceed with the task’s execution.
How do I ensure a task runs only on one server in a load-balanced setup?
To ensure a task runs on only one server in a load-balanced environment,
use the ->onOneServer() method when scheduling your task. This method
requires your application to use a cache driver that supports atomic
locks, such as Redis or Memcached, to maintain a lock ensuring that only
one server can run the task at a time.
What happens if a scheduled task fails?
If a scheduled task fails, Laravel does not automatically retry the
task. It’s recommended to log any failures, either by capturing the
output of the task using ->sendOutputTo() or by implementing error
handling within the task itself to log exceptions or errors to Laravel’s
log files. For critical tasks, consider manually implementing retry
logic or leveraging Laravel’s queue system for automatic retries with
built-in failure handling.
Summary
Laravel’s Task Scheduler enables efficient automation of repetitive
tasks through a simple Cron job setup that triggers
php artisan schedule:run every minute. It’s essential to ensure
correct Cron configuration, accurate task scheduling in
app/Console/Kernel.php, and alignment of environment settings for
tasks to run as expected. Debugging involves manual execution, logging
outputs, and checking configurations. Preventing overlaps, ensuring
single-server execution in load-balanced setups, and managing random
execution timings require specific method usages like
withoutOverlapping(), onOneServer(), and conditional logic. Task
failures don’t automatically retry, highlighting the importance of
logging and custom error handling strategies for maintaining robust task
scheduling.