![Send mails in Laravel 10.x with Example [100% Working]](/send-mails-in-laravel/laravel-sending-mail.jpg)
This guidance will walk you through the process of setting up and sending emails in Laravel. There are a few steps to this, but fear not: we’ll cover everything from environmental setup to integrating third-party services, with many things in between. On top of that, we’ll address security concerns and answer frequently asked questions. By the end of it all, you’ll be able to troubleshoot any issues you have on your own. Don’t worry; we’ve got your back!
Laravel Mail makes it easy to send emails from your web applications. You can keep users informed and engaged using the simple, elegant service Laravel boasts. In this article we will show you how to set up the email driver, create a mailable object and send mails in Laravel.
The process is pretty simple, yes. All you need to do is configure the email driver — which is an elegant way to keep users informed and engaged through their web apps, by the way— create a mailable object and send some mails in Laravel. This walk-through article will show you just that!
1. Simple steps to send mails in Laravel
1.1 Setup Laravel Project
First, ensure you have Composer installed on your system. Then, create the Laravel project:
sudo mkdir -p /opt/projects
sudo chmod 777 /opt/projects
cd /opt/projects
composer create-project --prefer-dist laravel/laravel EmailerApp
cd EmailerApp
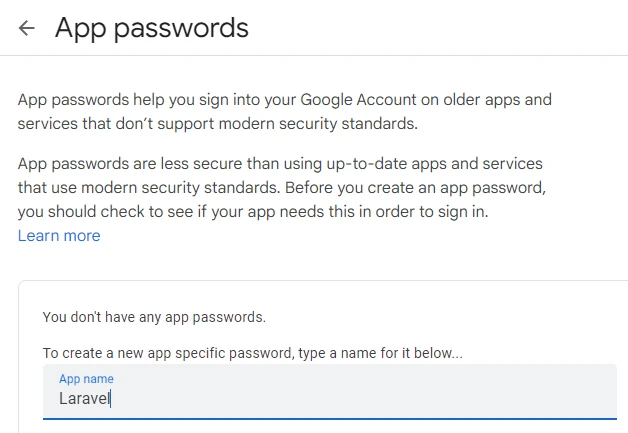
1.2 Generate App Password from Gmail
It is recommended to use App password from Gmail for using Gmail SMTP Server with Laravel as it adds extra layer of security.
Activate 2-Step Verification
- Sign in to your Google Account.
- Click the tab to the left that says “Security”.
- Locate the section titled “Signing in to Google” and select “2-Step Verification”. You may have to sign into your account again.
- Tap on “Get started”, then follow along with the prompts to set up 2-step verification.
Generate App Password
After enabling 2-step verification, you can create an app password:
- Return to Security Settings: If you aren’t there already, go back over to your Google Account’s “Security” section.
- App Passwords: Scroll down a bit more until you see “Signing in to Google” again. Look for “App passwords”. Click it and sign in if needed.
- Pick Your App: Select Mail from the dropdown list after clicking “Select app”.
- Choose Your Device: In “Select device”, pick the password’s device type. On a server for Laravel integration, choose Other (Custom name) and enter a descriptive name like Laravel SMTP.
- Make It Happen!: Give Generate a tap. After a moment, Google will show you a 16-character app password.
- Record the App Password: Make sure to copy this password and store it securely; you won’t be able to see it again. This is what we’ll use below for MAIL_PASSWORD, not your Gmail account password.
1.3 Configure Laravel Environment for SMTP
Open the .env file and configure it to use Gmail’s SMTP server for
sending emails. Replace placeholders with your actual Gmail account
details:
MAIL_MAILER=smtp
MAIL_HOST=smtp.gmail.com
MAIL_PORT=587
MAIL_USERNAME=xxxxxxxx@gmail.com
MAIL_PASSWORD=jijvixxxxxxxgmbpdz
MAIL_ENCRYPTION=tls
MAIL_FROM_ADDRESS="xxxxxxxxx@gmail.com"
MAIL_FROM_NAME="${APP_NAME}"
MAIL_ENCRYPTION=ssl. On the other hand, 587 is used to submit emails
for delivery. This connection starts as plaintext but then upgrades to
SSL/TLS encryption when both the client and server support it by using
the STARTTLS command . This port is recommended for sending email due to
its ability to handle both encrypted and un-encrypted connections. Use
this port with MAIL_ENCRYPTION=tls
1.4 Configure Database (Optional)
The process of sending emails in Laravel is easy, and can be done without a database. You don’t need to directly interact with it. You can send email using the Mail facade that Laravel provides you, and configure your SMTP servers as needed.
However, there are situations where you might want to integrate or use a database for your application’s email functionality:
- Log sent emails: Storing details of the sent email (recipients, subject, status) may be beneficial for tracking and auditing purposes.
- Dynamic recipient list: If you’re sending an email to users stored in your database, then you’ll have to query them from there.
- Email templates from the database: Content of an email might change frequently without changing code. Storing these templates in your database helps keep things dynamic.
- Scheduled emails / notifications: Some applications send out emails based on certain events or schedules which are kept in the database.
- User preferences: Managing user preferences for email notifications such as opt-in or opt-out settings could be better if they were stored within a database.
Since we already have installed and setup MariaDB database so I will integrate the same with our EmailerApp:
DB_CONNECTION=mysql
DB_HOST=127.0.0.1
DB_PORT=3306
DB_DATABASE=my_laravel_db
DB_USERNAME=user1
DB_PASSWORD=Passw0rd
1.5 Creating a Mailable Class
Generate a mailable class named SampleEmail:
php artisan make:mail SampleEmail

This command will create a new class at app/Mail/SampleEmail.php. Open
this file and the build method. We’ll specify the email’s subject and
view there.
- The
envelope()method allows you to define the email’s envelope, which includes its subject. - The
content()method specifies which view should be used as the email’s body. The example currently points to ‘view.name’, but you should replace that with your actual path for the email Blade template. Since we’re making a sample email view, switch out ‘view.name’ with ‘emails.sample’. This is based on what we know so far: You should create a file atresources/views/emails/sample.blade.php.
Here is my app/Mail/SampleEmail.php:
<?php

namespace App\Mail;

use Illuminate\Bus\Queueable;
use Illuminate\Contracts\Queue\ShouldQueue;
use Illuminate\Mail\Mailable;
use Illuminate\Mail\Mailables\Content;
use Illuminate\Mail\Mailables\Envelope;
use Illuminate\Queue\SerializesModels;

class SampleEmail extends Mailable
{
    use Queueable, SerializesModels;

    /**
     * Create a new message instance.
     */
    public function __construct()
    {
        //
    }

    /**
     * Get the message envelope.
     */
    public function envelope(): Envelope
    {
        return new Envelope(
            subject: 'Sample Email Subject',
        );
    }

    /**
     * Get the message content definition.
     */
    public function content(): Content
    {
        return new Content(
            view: 'emails.sample',
        );
    }

    /**
     * Get the attachments for the message.
     *
     * @return array<int, \Illuminate\Mail\Mailables\Attachment>
     */
    public function attachments(): array
    {
        return [];
    }
}
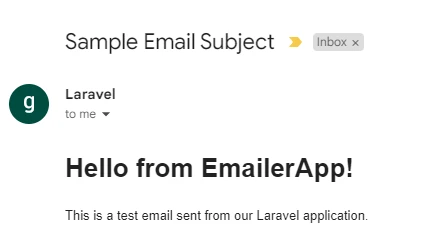
1.6 Crafting the Email View
Create a new Blade template for the email under
resources/views/emails/sample.blade.php. Add your email HTML content
here:
<!DOCTYPE html>
<html>
<head>
    <title>Welcome to EmailerApp</title>
</head>
<body>
    <h1>Hello from EmailerApp!</h1>
    <p>This is a test email sent from our Laravel application.</p>
</body>
</html>
1.7 Sending the Email
To send an email, you can use the Mail facade in a route. Open the
routes/web.php file and add a new route that sends an email using the
SampleEmail mailable class:
use Illuminate\Support\Facades\Route;
use Illuminate\Support\Facades\Mail;
use App\Mail\SampleEmail;
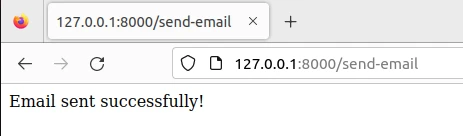
Route::get('/send-email', function () {
Mail::to('recipient@example.com')->send(new SampleEmail());
return "Email sent successfully!";
});
This code sends an email to recipient@example.com using the
SampleEmail mailable class. Replace recipient@example.com with the
actual recipient’s email address.
1.8 Serve the Application
Finally, start the Laravel development server:
php artisan serve
Now, visit http://localhost:8000/send-email in your browser to send
the test email.
Here is the email received in my inbox:
2. Implement Send Email Method in the Controller
For development and testing, putting email sending logic directly into the routes/web.php file is fine. It’s a quick way to see if your emails are getting sent without using a full controller or user interface. But when it comes to more structured apps or moving to production, you should put business logic (including email sending) in controllers or event listeners.
First, create the controller that will hold your email sending logic. Generate an EmailController within app/Http/Controllers using following artisan command:
php artisan make:controller EmailController

Open your newly created EmailController located at app/Http/Controllers and place your email sending logic within a method there.
namespace App\Http\Controllers;
use Illuminate\Http\Request;
use Illuminate\Support\Facades\Mail;
use App\Mail\SampleEmail;
class EmailController extends Controller
{
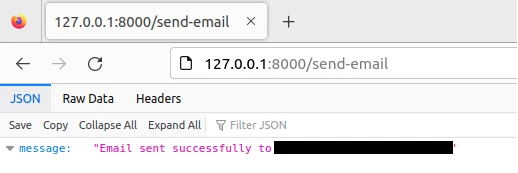
public function sendEmail() {
$recipient = 'recipient@example.com'; // Change to the recipient's email address
$data = ['name' => 'John Doe']; // Data to pass to the email view
Mail::to($recipient)->send(new SampleEmail($data));
return response()->json(['message' => 'Email sent successfully to ' . $recipient]);
}
}
Next, create a route in routes/web.php. Tell that route to point to
the sendEmail function from the EmailController. This endpoint can
be reached by entering the specified URL into your browser or through an
HTTP client so you can test if it works.
use App\Http\Controllers\EmailController;

Route::get('/send-email', [EmailController::class, 'sendEmail']);
To test the email retention, begin running your Laravel Development Server (if it has not been started yet).
php artisan serve
Open up your web browser and enter this into its search bar:
http://localhost:8000/send-email. By doing this, you will activate the
sendEmail method which is found within your EmailController. That
method sends an email to a specific recipient.
If the email does not send for some reason, read through your log files
in storage/logs/. You need to be on the lookout for any error messages
that may indicate what went wrong so you have some idea of how to fix
it.
3. Writing Dynamic Email Views (HTML and PLAIN)
Email views in Laravel are mostly just Blade templates. You can make both HTML and plain-text content for your emails using them. Don’t forget you also have the option to use dynamic data as well.
3.1 Create or Update the HTML Email View
Open up resources/views/emails then create a new Blade file there.
I’ll name mine welcome.blade.php but you can call yours whatever you
like. Here’s a simple example of a Blade view with some dynamic content:
<!DOCTYPE html>
<html>
<head>
    <title>Welcome to Our Application</title>
</head>
<body>
    <h1>Hello, {{ $name }} ({{ $username }})!</h1>
    <p>{{ $welcomeMessage }}</p>
    <a href="{{ $startLink }}">Click here to get started</a>
</body>
</html>
For sending plain text emails, you might create a separate Blade view
(e.g., welcome_text.blade.php) without HTML tags, or Laravel allows
specifying a text version alongside the HTML view directly in the
Mailable class.
3.2 Update Mailable Class
Next, I want to show how we can add multiple pieces of dynamic data to
our mailables. In order to do that, let’s modify the constructor of
SampleEmail to accept an array or specific parameters. After we do
this we need to set them as public properties so they can be accessed in
the view.
Go ahead and update app/Mail/SampleEmail.php:
    public function __construct($name, $username, $welcomeMessage, $startLink)
    {
        $this->name = $name;
        $this->username = $username;
        $this->welcomeMessage = $welcomeMessage;
        $this->startLink = $startLink;
    }
Let’s also adjust our content method to ensure the data is explicitly
passed to the view:
public function content(): Content
{
    return new Content(
        view: 'emails.welcome', // Make sure this matches your actual Blade file name without the .blade.php extension
        with: [
            'name' => $this->name,
            'username' => $this->username,
            'welcomeMessage' => $this->welcomeMessage,
            'startLink' => $this->startLink
        ],
    );
}
3.3 Modify the controller to send dynamic data
Make sure to modify your controller method
app/Http/Controllers/EmailController.php so that you can pass along
additional dynamic data when creating an instance of the mailable
SampleEmail.
<?php

namespace App\Http\Controllers;

use Illuminate\Http\Request;
use Illuminate\Support\Facades\Mail;
use App\Mail\SampleEmail;

class EmailController extends Controller
{
public function sendEmail() {
        $recipient = 'xxxxxx@gmail.com'; // Change to the recipient's email address
        $data = [
            'name' => 'Deepak Prasad',
            'username' => 'deeepak_pd',
            'welcomeMessage' => 'Thank you for joining our platform! We’re excited to have you with us.',
            'startLink' => 'https://example.com/get-started'
        ];

        Mail::to($recipient)->send(new SampleEmail($data['name'], $data['username'], $data['welcomeMessage'], $data['startLink']));

        return response()->json(['message' => 'Email sent successfully to ' . $recipient]);
    }
}
3.4 Send Test Mail
Remember to run these Artisan commands to clear Laravel’s cache, as sometimes it may serve cached content:
php artisan config:clear // Configuration Cache
php artisan cache:clear // View Cache
php artisan view:clear // Route Cache
php artisan queue:restart // If you're using queues to send emails, restart the queue workers
To access your application and give the email sending functionality a test run, use Laravel’s built-in development server (if you’re not running it already):
php artisan serve
By doing so, this will trigger the sendEmail method in your
EmailController which will then allow the email to be sent out to the
specified recipient.
Verify the email received:
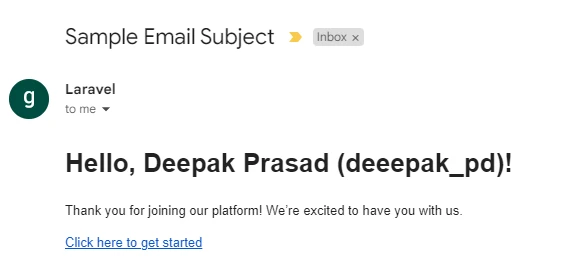
4. Sending Email to Multiple Recipients
In order for us to update our mail sending functionality so that
multiple recipients (To, CC, BCC) and also a reply-to address can be
handled while passing individual pieces of data to our constructor of
SampleEmail. Apply this structured approach and it should ensure that
all necessary data is received properly by our mailable SampleEmail in
addition to making sure all emails are sent based on how they’re
supposed to be.
Here is how you can modify app/Http/Controllers/EmailController.php
$recipient = ['user1@example.com', 'user2@example.com']; // Recipients array
$cc = 'another@example.com';
$bcc = 'hidden@example.com';
$replyToEmail = 'no-reply@example.com';
$replyToName = 'No Reply';

$data = [
    'name' => 'John Doe',
    'username' => 'john.doe',
    'welcomeMessage' => 'Welcome to our platform! We’re thrilled to have you join us.',
    'startLink' => 'https://example.com/get-started'
];

Mail::to($recipient)
    ->cc($cc)
    ->bcc($bcc)
    ->replyTo($replyToEmail, $replyToName)
    ->send(new SampleEmail($data['name'], $data['username'], $data['welcomeMessage'], $data['startLink']));
You can use conditionals to dynamically add recipients, CCs, or BCCs
based on certain conditions. You could build up the message using
conditionals before the send() method.
$email = Mail::to($recipient);

if (conditionForCC) {
    $email->cc($cc);
}

if (conditionForBCC) {
    $email->bcc($bcc);
}

$email->replyTo($replyToEmail, $replyToName)
      ->send(new SampleEmail($data['name'], $data['username'], $data['welcomeMessage'], $data['startLink']));
This way you have full control over modifying parts of the email before sending it.
5. Sending Email with Attachment
In Laravel 10.x’s latest version, Mailable class’s build function was
replaced with methods like envelope, content and attachments to
configure various aspects of an email such as sender details, view
templates and attach files respectively. For attaching files you may use
methods like Attachment::fromPath, Attachment::fromStorage or
Attachment::fromData.
I have a file available at /home/deepak/Desktop/file.txt which I will
send as an attachment. To achieve this update your
app/Mail/SampleEmail.php mailable class:
public function attachments(): array
{
    return [
        Attachment::fromPath('/home/deepak/Desktop/file.txt')->as('file.txt')->withMime('text/plain'),
    ];
}
Attachment::fromPath() helps to provide the path to the file you want
to attach in our case /home/deepak/Desktop/file.txt , you can specify
the file name as it would appear on recipient mail address using as(),
and Mime type declaration is done using withMime().
Laravel’s Mailable class has a method called withMime that allows you
to specify the MIME type of an attachment when including it in your
email. The supported values for MIME types correspond to common file
types such as application/pdf for PDFs, image/jpeg for JPEG images,
text/plain for plain text files etc.
My app/Http/Controllers/EmailController.php already contains recipient
email address data from previous steps so no action required here:
class EmailController extends Controller
{
public function sendEmail() {
        $recipient = 'xxxxxx@gmail.com'; // Change to the recipient's email address
        $data = [
            'name' => 'Deepak Prasad',
            'username' => 'deepak_pd',
            'welcomeMessage' => 'Thank you for joining our platform! We’re excited to have you with us.',
            'startLink' => 'https://example.com/get-started'
        ];

        Mail::to($recipient)->send(new SampleEmail($data['name'], $data['username'], $data['welcomeMessage'], $data['startLink']));

        return response()->json(['message' => 'Email sent successfully to ' . $recipient]);
    }
}
Let us now attempt to send the mail:
Now verify the recipient email address:
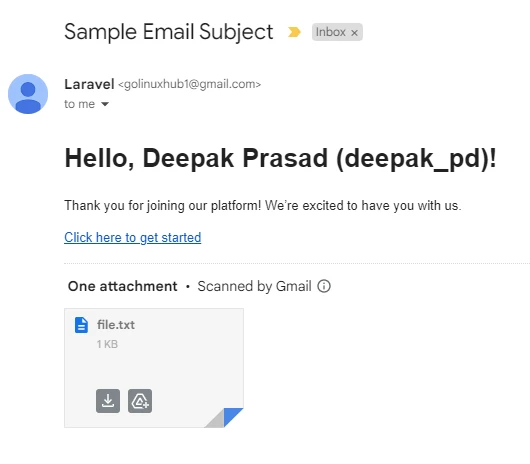
So the mail with attachment has been successfully sent and received via Laravel.
Similarly you can send multiple attachment using:
public function attachments(): array
{
    return [
        Attachment::fromPath('/home/deepak/Desktop/file1.txt')->as('file1.txt')->withMime('text/plain'),
        Attachment::fromPath('/home/deepak/Desktop/file2.pdf')->as('file2.pdf')->withMime('application/pdf'),
        // Add more files as needed
    ];
}
Finally, to cap off this article, here’s a recap of what we covered:
- Making Laravel send emails and configuring it.
- Building unique Mailable classes for all sorts of email content
- Sending plain text emails and more extravagant view-based ones
- Attaching files using Laravel’s built-in methods
- And finally, testing email-sending features in a Laravel application.
You can read more atMail - Laravel 8.x - The PHP Framework For Web Artisans