
With earlier RHEL/CentOS releases we used package-cleanup to remove old
kernel packages. But with recent release of RHEL/CentOS 8,
package-cleanup cannot be used to remove old kernels. Now we have
installonly_limit and oldinstallonly which is used for this purpose.
In this tutorial we will analyse this option with different examples.
Previously I had shared a tutorial with best practices to update a kernel with the list of Dos and Donts. Now let me do the same for deleting old kernels from the server.
Best practices to remove old kernels
- Before removing the kernel always check the currently active kernel and the kernel which will get activated post reboot to make sure you don’t remove in-correct kernel.
- It is recommended that both currently active kernel and kernel version to be activated post reboot should be same. Although this is not a strict dependency and should be followed case to case basis
- Never use YUM or DNF to remove old kernel packages without specifying the kernel version. We always need at least one kernel package installed on the server while yum/dnf may remove all the installed kernels if you don’t specify the version.
- You can use
rpm -e <kernel-version>to remove the kernel but you have to make sure you also remove the mapping dependencies. This may be hard for every user to check so you can useyum remove kernel-<version>to remove specific version of the kernel and all it’s dependencies - It is always recommended to keep minimum two kernel installed on the setup for fallback support in production environment.
package-cleanup not working with CentOS/RHEL 8
With the introduction of RHEL/CentOS 8, package-cleanup has been
modified and it cannot be used any more to remove old kernels. You can
check the difference in the list of supported arguments from their man
page in RHEL/CentOS 8 and earlier releases
Now we get this message
# package-cleanup --oldkernels --count=2
package-cleanup has to be executed with one of the options: --dupes, --leaves, --orphans, --problems or --cleandupes
Using installonly_limit with oldinstallonly
Now we can use dnf with installonly_limit and --oldinstallonly to
remove old kernel rpms and to define the list of installed kernel rpms.
As per the man page of dnf.conf
installonly_limit: number ofinstallonlypackages allowed to be installed concurrently. Defaults to 3. The minimal number ofinstallonlypackages is 2. Value 0 or 1 means unlimited number ofinstallonlypackages.oldinstallonly: Removes oldinstallonlypackages, keeping onlyinstallonly_limitlatest versions.
By default installonly_limit is set to 3 in /etc/dnf/dnf.conf
# grep limit /etc/dnf/dnf.conf
installonly_limit=3
So if you try to install more than 3 kernel packages, the oldest one will be automatically removed.
Removing old kernels with dnf
Example-1: When latest kernel is active
Now let me show you some case study on using dnf to automatically
remove old kernel packages. For the sake of demonstration I installed 4
kernels (by modifying installonly_limit in dnf.conf)

At this stage currently my Linux server is active with latest kernel version
# uname -r
4.18.0-193.13.2.el8_2.x86_64
In this command we leave the last 2 kernel installed on the system and
remove the remaining old kernels. I have explicitly defined
installonly_limit=2 using --setopt to overwrite the default value
from /etc/dnf/dnf.conf. If you don’t provide this then by default dnf
will consider the value of installonly_limit from dnf.conf
# dnf remove --oldinstallonly --setopt installonly_limit=2 kernel
Below is a snippet from my server:
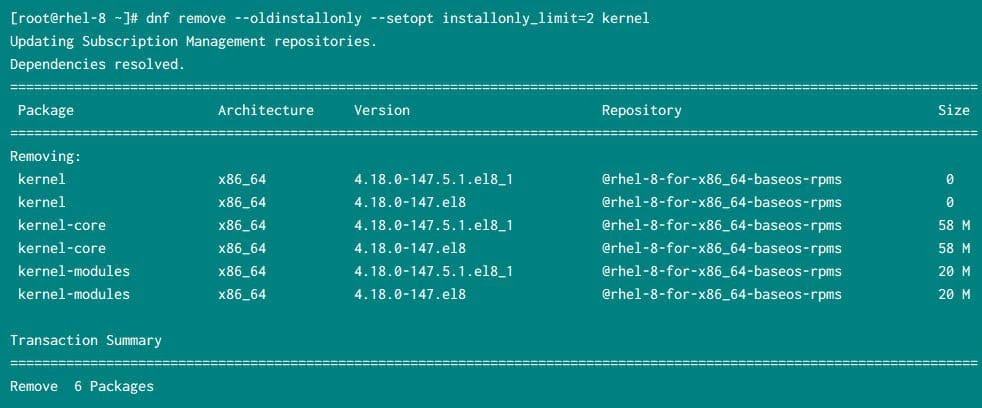
So as you see, this command has initiated the removal of 2 old kernels which is working as expected
Example-2: When older kernel is active
Now in this case, I have switched the active kernel version to older one
# grubby --set-default "/boot/vmlinuz-4.18.0-147.5.1.el8_1.x86_64"
The default is /boot/loader/entries/d88fa2c7ff574ae782ec8c4288de4e85-4.18.0-147.5.1.el8_1.x86_64.conf with index 2 and kernel /boot/vmlinuz-4.18.0-147.5.1.el8_1.x86_64
Next reboot the server and check the active kernel version
# uname -r
4.18.0-147.5.1.el8_1.x86_64
List of available kernels:
So even though I have 193.3.2 release installed, my active kernel is
older one i.e. 5.1
Now at this stage if I use the same command to remove older kernels
# dnf remove --oldinstallonly --setopt installonly_limit=2 kernel
Updating Subscription Management repositories.
Error:
 Problem: The operation would result in removing the following protected packages: kernel-core
(try to add '--skip-broken' to skip uninstallable packages or '--nobest' to use not only best candidate packages)
The command fails because it assumes that below kernel versions are latest
kernel-4.18.0-147.8.1.el8_1.x86_64
kernel-4.18.0-193.13.2.el8_2.x86_64
So it tries to remove
kernel-4.18.0-147.5.1.el8_1.x86_64
kernel-4.18.0-147.el8.x86_64
But then kernel-4.18.0-147.5.1.el8_1.x86_64 is the active kernel.
Now I am not sure if this is by design or a BUG. Hopefully it should be by design because the man page clearly says, “Removes old installonly packages” which in our case is the active kernel.
So make sure you check your active kernel before you go ahead and try to remove old kernels
What’s Next
I hope you are aware with RHEL/CentOS 8 kernel package contains no files and is there only for backward compatibility. Now instead we have kernel-core, kernel modules to replace the legacy kernel rpm
What is kernel-core and best practices to update them in RHEL/CentOS 8
Conclusion
In this tutorial I shared the best practices with dos and dont’s to remove kernels from RHEL/CentOS 8 Linux server. It is important that you are very cautious while removing old kernels or else you may leave your server in broken state. We work with security HF in our production environment which is also responsible for removing kernels, so we rely on LVM snapshots for fallback. So I hope you follow similar practice in your environment.
