
SSH public key authentication. ssh authorized_keys. ssh with key. ssh key login. linux enable ssh public key authentication. generate ssh key and add ssh key to server. ssh login with private key without password using authorized_keys. add public key to server. how to ssh with private key. Linux login without password. create ssh key. ssh add key. ssh keygen. login to linux server using ssh key. where are ssh keys stored. ssh use public key centos. rhel ssh public key authentication. rhel ssh key exchange. login to linux server without password centos.

PSSH is a utility to perform SSH from one server to multiple client nodes in parallel and perform certain task as defined.By default PSSH has -A argument using which the tool will prompt for password which will be used to connect to all the target host.
But we can also configure PSSH to use SSH public key authentication. You can login to multiple Linux server using SSH Key, either with passphrase or password less (without password).
-A
--askpass
         Prompt for a password and pass it to ssh.  The password may be used for either to unlock a key or  for  password
         authentication.   The  password  is transferred in a fairly secure manner (e.g., it will not show up in argument
         lists).  However, be aware that a root user on your system could potentially intercept the password.
How login to Linux server works without password?
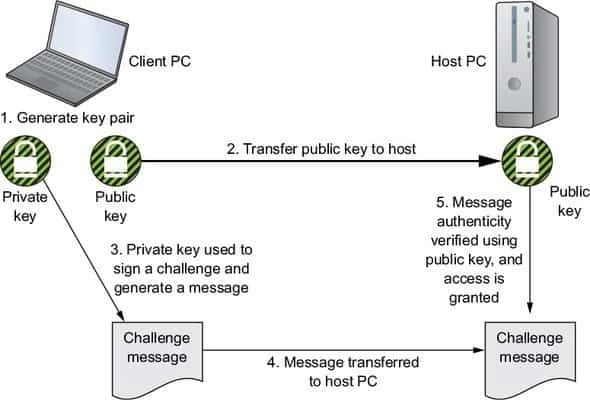
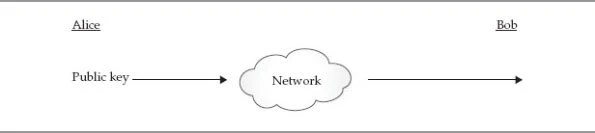
Secure Shell relies on a technology called public-key cryptography. It works similarly to a safe deposit box at the bank: You need two keys to open the box or at least multiple layers of security/checks have to be crossed. In the case of public-key cryptography, you need two mathematical keys: a public one and a private one.
The actual process of encrypting data and sending it from one person to the next requires several steps. We’ll use the popular “Alice and Bob” analogy and go through the process one step at a time as they both try to communicate in a secure manner with one another.
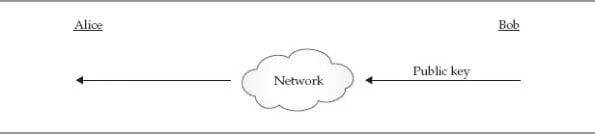
Alice fetches Bob’s public key
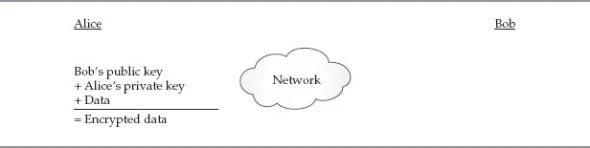
Alice uses Bob’s public key, along with her private key, to encrypt and sign the data, respectively.
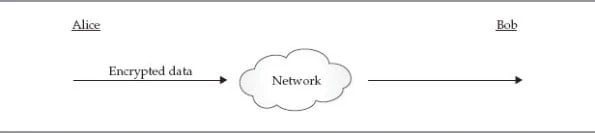
Alice sends the encrypted data to Bob.
Bob fetches Alice’s public key.
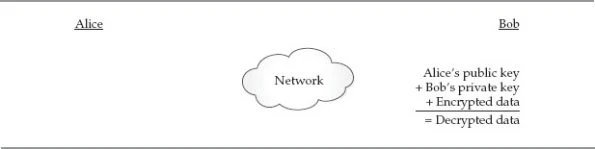
Bob uses Alice’s public key, along with his private key, to verify and decrypt the data, respectively
Configure SSH public key authentication
In the below steps I will configure SSH public key authentication between 3 nodes for root user.
I have 3 nodes with me using which I will configure SSH public key authentication to login to Linux server without password
- centos-master
- centos-client-1
- centos-client-2
Here, I will generate SSH key pair on centos-master using which we
will attempt to login and connect to centos-client nodes without
password (using ssh public key authentication)
SSH communication is secured using public key cryptography. When a user
connects to the SSH-server using SSH-client for the first time, the SSH
program stores the SSH-server public key in the user’s home directory
inside a file,known_hosts, in a hidden folder named~/.ssh/
1. Generate SSH key pair (private and public)
The first step would be to generate private and public ssh key. Here centos-master will be my master server.
In this step, the client uses a special utility, ssh-keygen, to generate an SSH key pair for authentication with the server. This utility is bundled with OpenSSH and by default it creates a 2048-bit RSA key pair. It supports RSA and DSA, both with different lengths of keys. A key length of 4096 bits is recommended for establishing a secure connection between two machines. The following diagram shows how to create a RSA (Rivest-Shamir-Adleman) key pair of 2048-bit:
[root@centos-master ~]# ssh-keygen -t rsa
Generating public/private rsa key pair.
Enter file in which to save the key (/root/.ssh/id_rsa):
Enter passphrase (empty for no passphrase):
Enter same passphrase again:
Your identification has been saved in /root/.ssh/id_rsa.
Your public key has been saved in /root/.ssh/id_rsa.pub.
The key fingerprint is:
SHA256:WDIWm4i8/UhU/zjiKZrmGVcg5PZj5mzXT4aZd37Gnbs root@centos-master.example.com
The key's randomart image is:
+---[RSA 2048]----+
|  .   o          |
| + . o =         |
|  * + * o        |
| . * o = o       |
|  . B + S .      |
|   * * + =       |
|  . B = = + .. ..|
|  .B o   = o  +..|
| o=       . .o Eo|
+----[SHA256]-----+
2. <a
href=“https://www.golinuxcloud.com/ssh-copy-folder-local-to-remote-server-linux/" target="_blank” rel=“noopener noreferrer”>Copy public key to remote Linux machine (authorized_keys)
When you connect to your remote host, SSH validates the key ID you’re
providing against a list of authorized_keys. There is one utility,
ssh-copy-id, which is also bundled with OpenSSH and can be used to
copy the key to the remote system. It automatically copies
the~/.ssh/id_rsa.pubfile by default into the remote system
We use ssh-copy-id because it copies the public key and also appends
the public key to the authorized_keys. Provide the path of the public
key using -i argument. This public key will be copied to our
centos-client-1 node and the content of the public SSH key will be
appended to root user’s /root/.ssh/authorized_keys
[root@centos-master ~]# ssh-copy-id -i /root/.ssh/id_rsa.pub root@centos-client-1
/usr/bin/ssh-copy-id: INFO: Source of key(s) to be installed: "/root/.ssh/id_rsa.pub"
/usr/bin/ssh-copy-id: INFO: attempting to log in with the new key(s), to filter out any that are already installed
/usr/bin/ssh-copy-id: INFO: 1 key(s) remain to be installed -- if you are prompted now it is to install the new keys
root@centos-client-1's password:

Number of key(s) added: 1

Now try logging into the machine, with:   "ssh 'root@centos-client-1'"
and check to make sure that only the key(s) you wanted were added.
Similarly I will copy SSH public key to centos-client-2 for root
user’s authorized_keys
[root@centos-master ~]# ssh-copy-id -i /root/.ssh/id_rsa.pub root@centos-client-2
/usr/bin/ssh-copy-id: INFO: Source of key(s) to be installed: "/root/.ssh/id_rsa.pub"
/usr/bin/ssh-copy-id: INFO: attempting to log in with the new key(s), to filter out any that are already installed
/usr/bin/ssh-copy-id: INFO: 1 key(s) remain to be installed -- if you are prompted now it is to install the new keys
Password:

Number of key(s) added: 1
Now try logging into the machine, with: "ssh 'centos-client-2'"
and check to make sure that only the key(s) you wanted were added.
3. Configuring and Securing Login (sshd_config)
Additional security measures can be enabled by modifying the OpenSSH
server configuration file/etc/ssh/sshd_config, on the remote host.
Following are the some steps that can be taken to secure the SSH logins:
Now, since we have configured the SSH key-based authentication in the
previous section, we can disable the password
authentication to secure SSH logins in the SSH server configuration
file. Edit the SSH daemon config file on the remote host running the
SSH server and set thePasswordAuthenticationdirective value tonoas
shown here:
# vi /etc/ssh/sshd_config
PasswordAuthentication no
Prohibit direct login as the root user through
SSH, as the root user has unrestricted privileges and exists by
default on every Linux system. To secure the root user account through
SSH, we can do following changes in configuration file:Comment the line
with the directivePermitRootLoginas shown here:
#PermitRootLogin yes
Allow only key-based ssh login in the root account by setting the
directive PermitRootLoginvalue aswithout-passwordas shown here:
PermitRootLogin without-password
After making changes in the SSH server configuration
file/etc/ssh/sshd_config, restart thesshdservice to bring the
applied changes into effect, as shown here:
# systemctl restart sshd
Create ssh authenticating agent (ssh-agent)
However, we did still have to enter the password we set on the private SSH key. If you have to do this each time you want to connect to a remote host, it defeats the purpose of setting up key-based authentication. SSHagent, a small daemon that keeps unlocked private SSH keys in memory.
ssh-agent is a program to hold private keys used for public key
authentication (RSA, DSA, ECDSA, Ed25519). ssh-agent is usually
started in the beginning of an X-session or a login session, and all
other windows or programs are started as clients to the ssh-agent
program.
[root@centos-master ~]# eval `ssh-agent` ssh-add /root/.ssh/id_rsa
Agent pid 4696
Enter passphrase for /root/.ssh/id_rsa:
Identity added: /root/.ssh/id_rsa (/root/.ssh/id_rsa)
Verify the process status
[root@centos-master ~]# ps -ef | grep ssh-agent
root      4696     1  0 21:32 ?        00:00:00 ssh-agent
root      4699  4004  0 21:32 pts/0    00:00:00 grep --color=auto ssh-agent
Install PSSH
You can get PSSH rpm from EPEL repository
[root@centos-master ~]# rpm -Uvh https://dl.fedoraproject.org/pub/epel/epel-release-latest-7.noarch.rpm
Retrieving https://dl.fedoraproject.org/pub/epel/epel-release-latest-7.noarch.rpm
Preparing...                          ################################# [100%]
Updating / installing...
   1:epel-release-7-11                ################################# [100%]
Next you can install PSSH using yum
[root@centos-master ~]# yum install pssh
Perform parallel SSH (PSSH)
Now we are all setup with SSH public key authentication and we can execute PSSH without the need of giving any password. Additionally I am using some more SSHD options with PSSH to disable password based login and select passphrase based authentication.
[root@centos-master ~]# pssh -i -H "centos-client-1 centos-client-2" -l root -x "-o StrictHostKeyChecking=no -o GSSAPIAuthentication=no -o PreferredAuthentications=publickey -o PubkeyAuthentication=yes" hostname
[1] 23:07:10 [SUCCESS] centos-client-2
centos-client-2.example.com
[2] 23:07:10 [SUCCESS] centos-client-1
centos-client-1.example.com
As you see I did not use “-A” and yet the PSSH tool was able to connect to all the provided host without prompting for any password.
ssh-agent. You can use kill -9
Lastly I hope the steps from the article to generate SSH Key pair and configure SSH public key authentication using PSSH with authorized_keys in RHEL/CentOS 7 Linux was helpful. So, let me know your suggestions and feedback using the comment section.
References:
Linux Administration
