
In this section we will use ansible to create new EC2 instances on AWS and further work on these instances. These operations can be completely automated using ansible.
Setup Environment for AWS provisioning
We have already setup our Ansible environment using AWS EC2 instance with one controller and two managed nodes. But now to provision new AWS instance automatically using ansible we must have fulfil few pre-requisites.
Choose the ec2 module to provision AWS EC2 Instances
We know that Ansible works with modules so to work with AWS EC2 Instances we need a separate module. You can get the complete list of cloud modules from Ansible. Here you can see a long list of modules used for different cloud environment.We will use “ec2 module” for this tutorial.
Create Access Key
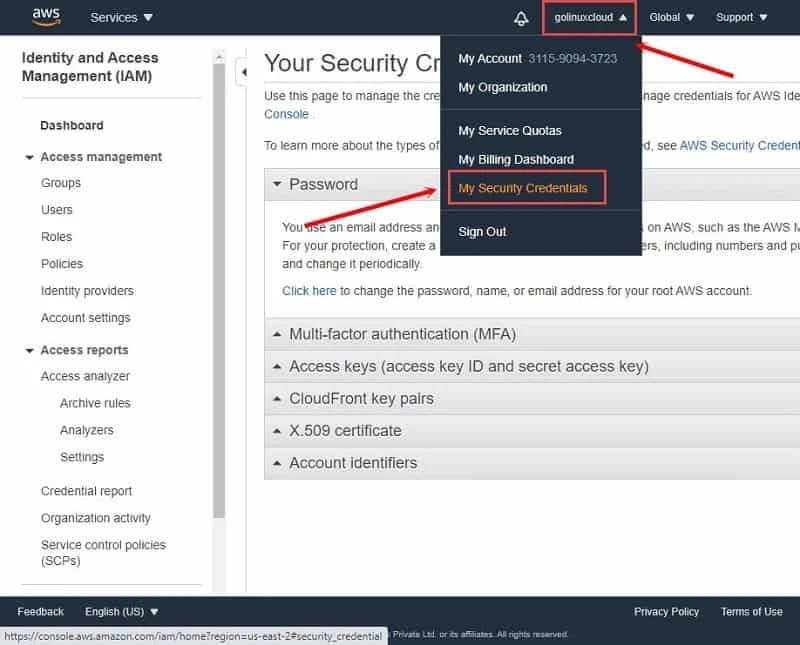
We must create an access key for our ansible on the controller node to be able to access the AWS account. Click on the username on your AWS Portal and from the drop down menu select “My Security Credentials”
Next click on “Access keys (access key ID and secret access key)” to expand the drop down menu and click on “Create New Access Key”
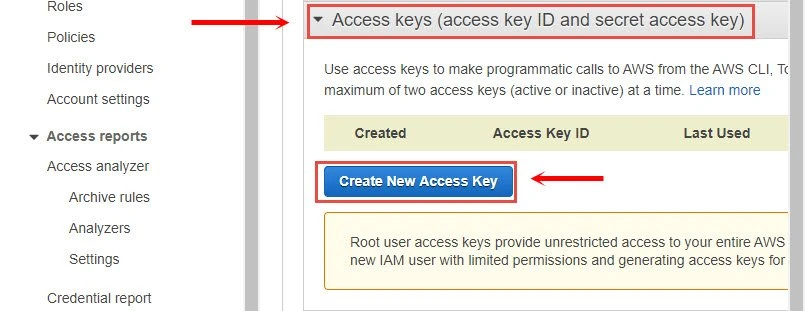
This should create a new access key. It is IMPORTANT that you either download the key file or save both Access Key ID and Secret Access Key as you will not be able to retrieve this later as the message says on the console.

Install boto3 module
Next we would need boto3 module on the controller node as required by
the ec2 module. We had already installed boto3 when working with
Ansible Facts, but you can install it using pip3. If you want to
install these only for the current user then append --user to this
command or use sudo as this would require root level privilege.
[ansible@controller ~]$ pip3 install boto boto3 --user
Get an AWS Amazon Machine Images (AMI) ID
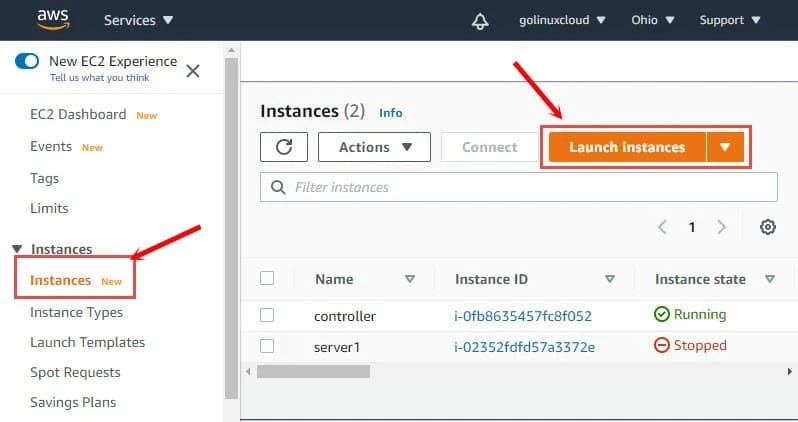
We would need an AMI ID which will be used to launch an instance. You can get the AMI ID in the AWS marketplace or you can click on “Launch Instance” which will show you a list of available Images
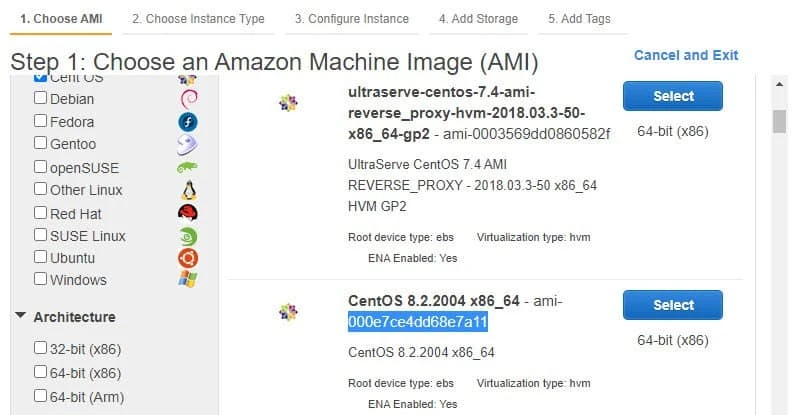
This will bring you a list of AMI. I intend to use CentOS so I am using Community AMIs to get the AMI ID of CentOS 8.2
We will use this AMI ID in our playbook later. If you created any custom AMI then you can use the AMI ID of the respective Image available under Images → AMI.
Install awscli
We will use awscli to store our login credentials instead of the
playbook for better security which requires awscli tool. We can
install awscli using pip3 again:
[ansible@controller ~]$ pip3 install awscli --user

...

Installing collected packages: colorama, botocore, docutils, rsa, awscli
Successfully installed awscli-1.18.147 botocore-1.18.6 colorama-0.4.3 docutils-0.15.2 rsa-4.5
Now we can store our access key using awscli. Execute aws configure
from the console as ansible user:
[ansible@controller ~]$ aws configure
AWS Access Key ID [None]: AKIAIKIJ6FV4C3QGWMGQ
AWS Secret Access Key [None]: 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
Default region name [None]: us-east-2
Default output format [None]:
I am provided region name as us-east-2a where my other instances are
launched. You can collect the zone information from the dashboard of
EC2 → Instances and mapping region information fromRegions,
Availability Zones, and Local Zones
Now you can access your configuration which will be stored in the home
folder of ansible user under ~/.aws
[ansible@controller ~]$ cat .aws/config
[default]
region = us-east-2

[ansible@controller ~]$ cat .aws/credentials
[default]
aws_access_key_id = AKIAIKIJ6FV4C3QGWNGQ
aws_secret_access_key = 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
Create ansible playbook
We are all done with the pre-requisites. Now let us create our ansible
playbook to launch AWS EC2 instance using Ansible. This is our sample
playbook launch_ec2.yml which contains multiple information about the
instance. We will learn more about these in the next chapter, you can
exclude those and leave everything to default if you have your custom
AMI ID.
---
 - name: Working with AWS EC2 Instance
   hosts: localhost
   connection: local
   gather_facts: false
   tasks:
     - name: Create ec2 instance
       ec2:
         instance_type: t2.micro
         image: ami-000e7ce4dd68e7a11
         count: 1
         key_name: ssh-1
         group: allow-all
         region: us-east-2
Let us execute this playbook:
[ansible@controller ~]$ ansible-playbook launch_ec2.yml

PLAY [Working with AWS EC2 Instamce] *********************************************************************************

TASK [Create ec2 instance] *******************************************************************************************
changed: [localhost]

PLAY RECAP ***********************************************************************************************************
localhost                  : ok=1    changed=1    unreachable=0    failed=0    skipped=0    rescued=0    ignored=0
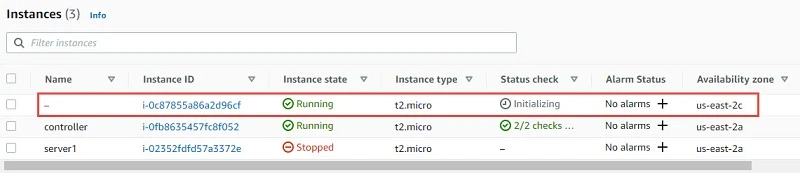
You can connect to your AWS EC2 Dashboard console and verify if a new instance has been launched:
Once the machine is in running state we can try to connect to the server using our existing key pair which we have specified in our playbook. I have a Linux client using which I will connect to my new instance along with the private key:
[root@client ~]# ssh -i /tmp/ssh-1.pem centos@ec2-3-131-169-183.us-east-2.compute.amazonaws.com
The authenticity of host 'ec2-3-131-169-183.us-east-2.compute.amazonaws.com (3.131.169.183)' can't be established.
ECDSA key fingerprint is SHA256:30lgYagKT3VxHTNrm4N8N3jb8pux+A2MOE9FPFDz5TU.
Are you sure you want to continue connecting (yes/no/[fingerprint])? yes
Warning: Permanently added 'ec2-3-131-169-183.us-east-2.compute.amazonaws.com,3.131.169.183' (ECDSA) to the list of known hosts.
Activate the web console with: systemctl enable --now cockpit.socket

[centos@ip-172-31-40-15 ~]$ sudo su -
[root@ip-172-31-40-15 ~]#
Define tags and security groups when launching an EC2 instance
In the previous example I had defined groups which is used to assign security group to the instance. We also have a bunch of other options which we can choose to assign when creating an instance. You can get the complete list from the ec2 module page from docs.ansible.com
In this sample playbook we will define some custom tags and security group to the instance. To get the security group information you can connect to your AWS EC2 Dashboard and click on Security Groups under Network & Security from the LEFT TAB
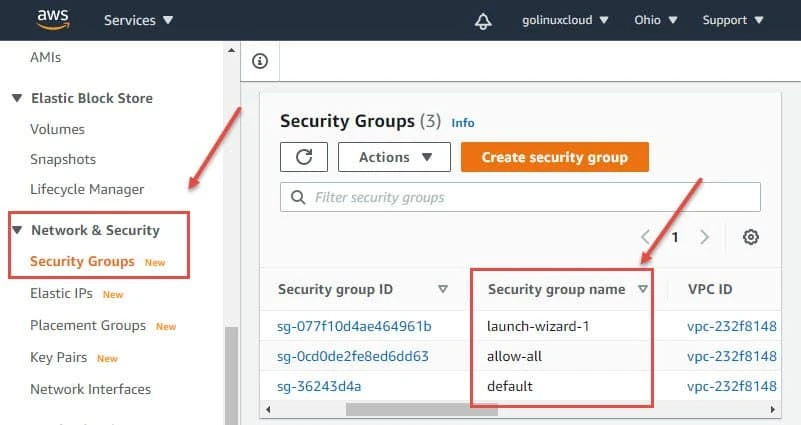
You can get the security group name here and place it in the playbook.
To assign a tag you must provide the Key and Value of the tag which
doesn’t require any changes on the AWS Console so let’s start creating
our playbook launch_ec2_2.yml:
---
 - name: Working with AWS EC2 Instance
   hosts: localhost
   connection: local
   gather_facts: false
   tasks:
     - name: Create ec2 instance
       ec2:
         instance_type: t2.micro
         image: ami-000e7ce4dd68e7a11
         count: 1
         key_name: ssh-1
         group: allow-all
         wait: yes
         region: us-east-2
         instance_tags:
           Name: server4
           Env: db
We have used some new definitions in our playbook. The tag can be
assigned using instance_tags where Name and Env are our Key while
server4 and db are the mapped value respectively. We have also added
wait: yes which means that the playbook will wait for the instance to
be created before exiting unlike our first example.
Let us execute our playbook now:
[ansible@controller ~]$ ansible-playbook launch_ec2_2.yml

PLAY [Working with AWS EC2 Instance] *********************************************************************************

TASK [Create ec2 instance] *******************************************************************************************
changed: [localhost]

PLAY RECAP ***********************************************************************************************************
localhost                  : ok=1    changed=1    unreachable=0    failed=0    skipped=0    rescued=0    ignored=0
Now you can verify on your EC2 dashboard, a new instance should be getting initialized.

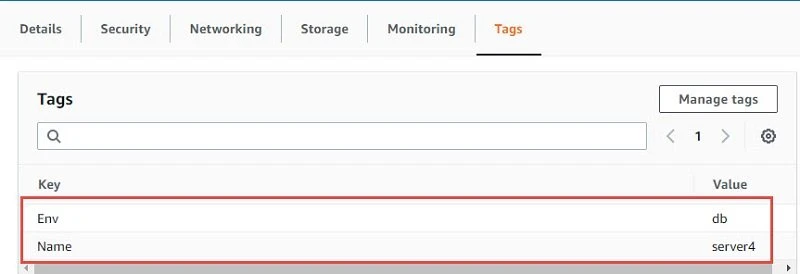
Once the instance is in running state you can verify the security group and tags assigned to the instance
Start, Stop and Terminate your EC2 Instance with Ansible
In this section we will use one of the instance we created in the previous example to perform start, stop and terminate operation. Similar to handling of services where we change the state of the service to started, restarted, stopped, we also can perform similar operation to the EC2 instances:
For example to start the instance we can use state: running. Following
is my playbook start_instance.yml to start the instance:
---
 - name: Working with AWS EC2 Instance
   hosts: localhost
   connection: local
   gather_facts: false
   tasks:
     - name: Start ec2 instance
       ec2:
         instance_ids:  i-09f7e5ca89f23cd03
         region: us-east-2
         state: running
You can get the instance id from your AWS EC2 Dashboard. Let us execute this playbook:
[ansible@controller ~]$ ansible-playbook start_instance.yml

PLAY [Working with AWS EC2 Instance] *********************************************************************************

TASK [Start ec2 instance] ********************************************************************************************
ok: [localhost]

PLAY RECAP ***********************************************************************************************************
localhost                  : ok=1    changed=0    unreachable=0    failed=0    skipped=0    rescued=0    ignored=0
The playbook was successfully executed but the changed=0 which means no action was performed. This is because the instance is already in running state so the playbook didn’t make any change.
Let us create another playbook stop_instance.yml to stop the instance
with state: stopped:
---
 - name: Working with AWS EC2 Instance
   hosts: localhost
   connection: local
   gather_facts: false
   tasks:
     - name: Stop ec2 instance
       ec2:
         instance_ids:  i-09f7e5ca89f23cd03
         region: us-east-2
         state: stopped
We have just changed the name and state of the play to perform stop operation: Let us execute this playbook:
[ansible@controller ~]$ ansible-playbook stop_instance.yml

PLAY [Working with AWS EC2 Instance] *********************************************************************************

TASK [Stop ec2 instance] ********************************************************************************************
changed: [localhost]

PLAY RECAP ***********************************************************************************************************
localhost                  : ok=1    changed=1    unreachable=0    failed=0    skipped=0    rescued=0    ignored=0
Now we see the status contains changed=1 which means the play has
successfully stopped the instance, you can manually verify this by
checking on the AWS EC2 Console.
Similarly to terminate an instance we will use state:absent, following
is the playbook terminate_instance.yml to terminate our instance:
---
 - name: Working with AWS EC2 Instance
   hosts: localhost
   connection: local
   gather_facts: false
   tasks:
     - name: Terminate ec2 instance
       ec2:
         instance_ids:  i-09f7e5ca89f23cd03
         region: us-east-2
         state: absent
Let us execute this playbook:
[ansible@controller ~]$ ansible-playbook terminate_instance.yml

PLAY [Working with AWS EC2 Instance] *********************************************************************************

TASK [Terminate ec2 instance] ****************************************************************************************
changed: [localhost]

PLAY RECAP ***********************************************************************************************************
localhost                  : ok=1    changed=1    unreachable=0    failed=0    skipped=0    rescued=0    ignored=0
We have changed=1 which means the action was successfully executed.
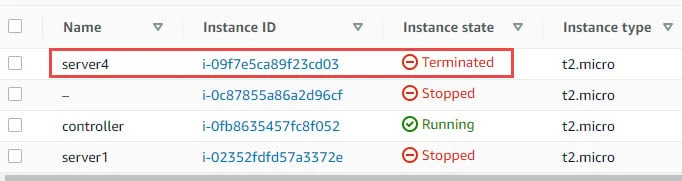
Let us verify the AWS EC2 dashboard:
Access EC2 instances using tags
In the previous example we performed start, stop and terminate operation
on EC2 instances using instance-id. Now the problem here is we have to
always check and store the instance id for any new instance which is
created. So to automate this process we can use tags. We will assign
common tags to all our instance and then use the tag’s Key:value pair
to get the instance_id of all the instances with mapping tag.
I have assigned tag Name as Env and value as db to all my instances.
If you re-call we used gather_facts to collect system information when
working with managed nodes, similarly we have ec_instance_info (in
earlier ansible version this is referred as ec2_instance_facts) which
will give us similar information about all the instances part of your
ID.
In this sample playbook ec2_instance_2.yml I am using loop module to
loop through all the available instances with the matching tag and value
and then store the instance_id in a variable which we will use later
to start, stop and terminate the instance.
---
 - name: Access instance with TAGS
   hosts: localhost
   connection: local
   gather_facts: false
   tasks:
   - name: Locate instance id with tags
     ec2_instance_info:
       region: us-east-2
       filters:
         "tag:Env": db
     register: ec2_info
   - name: Displaying output
     debug:
       msg: "{{ item.instance_id }}"
     loop: "{{ ec2_info.instances }}"
Let us execute this playbook:
[ansible@controller ~]$ ansible-playbook ec2_instance_2.yml

PLAY [Access instance with TAGS] *************************************************************************************

TASK [Locate instance id with tags] **********************************************************************************
ok: [localhost]

TASK [Displaying output] *********************************************************************************************
ok: [localhost] => (item={'ami_launch_index': 0, 'image_id': 'ami-000e7ce4dd68e7a11', 'instance_id': 'i-0c87855a86a2d96cf', 'instance_type': 't2.micro', 'key_name': 'ssh-1', 'launch_time': '2020-09-26T14:08:22+00:00', 'monitoring': {'state': 'disabled'}, 'placement': {'availability_zone': 'us-east-2c', 'group_name': '', 'tenancy': 'default'}, 'private_dns_name': 'ip-172-31-40-15.us-east-2.compute.internal', 'private_ip_address': '172.31.40.15', 'product_codes': [], 'public_dns_name': 'ec2-18-218-228-48.us-east-2.compute.amazonaws.com', 'public_ip_address': '18.218.228.48', 'state': {'code': 16, 'name': 'running'}, 'state_transition_reason': '', 'subnet_id': 'subnet-3b9bec77', 'vpc_id': 'vpc-232f8148', 'architecture': 'x86_64', 'block_device_mappings': [{'device_name': '/dev/sda1', 'ebs': {'attach_time': '2020-09-26T09:54:19+00:00', 'delete_on_termination': True, 'status': 'attached', 'volume_id': 'vol-045e152e0b325e061'}}, {'device_name': '/dev/sdb', 'ebs': {'attach_time': '2020-09-26T09:54:19+00:00', 'delete_on_termination': False, 'status': 'attached', 'volume_id': 'vol-0cc64005e32c93cd6'}}], 'client_token': '', 'ebs_optimized': False, 'ena_support': True, 'hypervisor': 'xen', 'network_interfaces': [{'association': {'ip_owner_id': 'amazon', 'public_dns_name': 'ec2-18-218-228-48.us-east-2.compute.amazonaws.com', 'public_ip': '18.218.228.48'}, 'attachment': {'attach_time': '2020-09-26T09:54:19+00:00', 'attachment_id': 'eni-attach-020b2922a37d25990', 'delete_on_termination': True, 'device_index': 0, 'status': 'attached'}, 'description': '', 'groups': [{'group_name': 'allow-all', 'group_id': 'sg-0cd0de2fe8ed6dd63'}], 'ipv6_addresses': [], 'mac_address': '0a:e4:b1:27:96:ea', 'network_interface_id': 'eni-0edd456abff86eb54', 'owner_id': '311590943723', 'private_dns_name': 'ip-172-31-40-15.us-east-2.compute.internal', 'private_ip_address': '172.31.40.15', 'private_ip_addresses': [{'association': {'ip_owner_id': 'amazon', 'public_dns_name': 'ec2-18-218-228-48.us-east-2.compute.amazonaws.com', 'public_ip': '18.218.228.48'}, 'primary': True, 'private_dns_name': 'ip-172-31-40-15.us-east-2.compute.internal', 'private_ip_address': '172.31.40.15'}], 'source_dest_check': True, 'status': 'in-use', 'subnet_id': 'subnet-3b9bec77', 'vpc_id': 'vpc-232f8148', 'interface_type': 'interface'}], 'root_device_name': '/dev/sda1', 'root_device_type': 'ebs', 'security_groups': [{'group_name': 'allow-all', 'group_id': 'sg-0cd0de2fe8ed6dd63'}], 'source_dest_check': True, 'tags': {'Env': 'db'}, 'virtualization_type': 'hvm', 'cpu_options': {'core_count': 1, 'threads_per_core': 1}, 'capacity_reservation_specification': {'capacity_reservation_preference': 'open'}, 'hibernation_options': {'configured': False}, 'metadata_options': {'state': 'applied', 'http_tokens': 'optional', 'http_put_response_hop_limit': 1, 'http_endpoint': 'enabled'}}) => {
    "msg": "i-0c87855a86a2d96cf"
}
ok: [localhost] => (item={'ami_launch_index': 1, 'image_id': 'ami-000e7ce4dd68e7a11', 'instance_id': 'i-02352fdfd57a3372e', 'instance_type': 't2.micro', 'key_name': 'ssh-1', 'launch_time': '2020-09-26T14:08:38+00:00', 'monitoring': {'state': 'disabled'}, 'placement': {'availability_zone': 'us-east-2a', 'group_name': '', 'tenancy': 'default'}, 'private_dns_name': 'ip-172-31-4-189.us-east-2.compute.internal', 'private_ip_address': '172.31.4.189', 'product_codes': [], 'public_dns_name': 'ec2-3-22-250-122.us-east-2.compute.amazonaws.com', 'public_ip_address': '3.22.250.122', 'state': {'code': 16, 'name': 'running'}, 'state_transition_reason': '', 'subnet_id': 'subnet-4690412d', 'vpc_id': 'vpc-232f8148', 'architecture': 'x86_64', 'block_device_mappings': [{'device_name': '/dev/sda1', 'ebs': {'attach_time': '2020-09-20T14:42:31+00:00', 'delete_on_termination': True, 'status': 'attached', 'volume_id': 'vol-0d9fb968fa03e3183'}}], 'client_token': '', 'ebs_optimized': False, 'ena_support': True, 'hypervisor': 'xen', 'network_interfaces': [{'association': {'ip_owner_id': 'amazon', 'public_dns_name': 'ec2-3-22-250-122.us-east-2.compute.amazonaws.com', 'public_ip': '3.22.250.122'}, 'attachment': {'attach_time': '2020-09-20T14:42:30+00:00', 'attachment_id': 'eni-attach-02d217c9750d194ca', 'delete_on_termination': True, 'device_index': 0, 'status': 'attached'}, 'description': '', 'groups': [{'group_name': 'allow-all', 'group_id': 'sg-0cd0de2fe8ed6dd63'}], 'ipv6_addresses': [], 'mac_address': '02:87:5e:1d:6a:00', 'network_interface_id': 'eni-090e668edc1f12699', 'owner_id': '311590943723', 'private_dns_name': 'ip-172-31-4-189.us-east-2.compute.internal', 'private_ip_address': '172.31.4.189', 'private_ip_addresses': [{'association': {'ip_owner_id': 'amazon', 'public_dns_name': 'ec2-3-22-250-122.us-east-2.compute.amazonaws.com', 'public_ip': '3.22.250.122'}, 'primary': True, 'private_dns_name': 'ip-172-31-4-189.us-east-2.compute.internal', 'private_ip_address': '172.31.4.189'}], 'source_dest_check': True, 'status': 'in-use', 'subnet_id': 'subnet-4690412d', 'vpc_id': 'vpc-232f8148', 'interface_type': 'interface'}], 'root_device_name': '/dev/sda1', 'root_device_type': 'ebs', 'security_groups': [{'group_name': 'allow-all', 'group_id': 'sg-0cd0de2fe8ed6dd63'}], 'source_dest_check': True, 'tags': {'Name': 'server1', 'Env': 'db'}, 'virtualization_type': 'hvm', 'cpu_options': {'core_count': 1, 'threads_per_core': 1}, 'capacity_reservation_specification': {'capacity_reservation_preference': 'open'}, 'hibernation_options': {'configured': False}, 'metadata_options': {'state': 'applied', 'http_tokens': 'optional', 'http_put_response_hop_limit': 1, 'http_endpoint': 'enabled'}}) => {
    "msg": "i-02352fdfd57a3372e"
}

PLAY RECAP ***********************************************************************************************************
localhost                  : ok=2    changed=0    unreachable=0    failed=0    skipped=0    rescued=0    ignored=0
The output contains a bunch of information related to each instance but
our variable item.instance_id is able to get the instance_id of
individual instance with mapping TAG value.
Now we can use this variable to perform different operations on the
instance but the output has too much information which is not required.
So we will add a loop_conrol to limit the information which is only
required i.e. instance_id
Let me update my playbook with loop_control:
---
 - name: Access instance with TAGS
   hosts: localhost
   connection: local
   gather_facts: false
   tasks:
   - name: Locate instance id with tags
     ec2_instance_info:
       region: us-east-2
       filters:
         "tag:Env": db
     register: ec2_info
   - name: Displaying output
     debug:
       msg: "{{ item.instance_id }}"
     loop: "{{ ec2_info.instances }}"
     loop_control:
       label:  "{{ item.instance_id }}"
Now if I execute the playbook I get only the instance_id:
[ansible@controller ~]$ ansible-playbook ec2_instance_2.yml

PLAY [Access instance with TAGS] *************************************************************************************

TASK [Locate instance id with tags] **********************************************************************************
ok: [localhost]

TASK [Displaying output] *********************************************************************************************
ok: [localhost] => (item=i-0c87855a86a2d96cf) => {
    "msg": "i-0c87855a86a2d96cf"
}
ok: [localhost] => (item=i-02352fdfd57a3372e) => {
    "msg": "i-02352fdfd57a3372e"
}

PLAY RECAP ***********************************************************************************************************
localhost                  : ok=2    changed=0    unreachable=0    failed=0    skipped=0    rescued=0    ignored=0
Let us further modify our playbook to start, stop and terminate instance
in a single playbook. It is IMPORTANT that in such case we use
wait: yes so that the playbook will wait for individual operation to
finish or else the play will fail.
Now I will further update my playbook to start, stop and terminate
instance using the instance_id variable. Additionally I have added
tags to each task section so we can use the tags to control the
individual task operation. If you are not familiar with the tags concept
then I would suggest you should go through my tutorial on “Ansible Tags”
to understand the difference between different tag name.
Following is my updated playbook ec2_instance_2.yml:
---
 - name: Access instance with TAGS
   hosts: localhost
   connection: local
   gather_facts: false
   tasks:
       - name: Locate instance id with tags
         ec2_instance_info:
           region: us-east-2
           filters:
             "tag:Env": db
         register: ec2_info
         tags:
          - always

       - name: Start ec2 instance
         ec2:
           instance_ids:  "{{ item.instance_id }}"
           region: us-east-2
           state: running
           wait: yes
         loop: "{{ ec2_info.instances }}"
         loop_control:
           label: "{{ item.instance_id }}"
         tags:
          - start
          - never

       - name: Stop ec2 instance
         ec2:
           instance_ids:  "{{ item.instance_id }}"
           region: us-east-2
           state: stopped
           wait: yes
         loop: "{{ ec2_info.instances }}"
         loop_control:
           label: "{{ item.instance_id }}"
         tags:
          - stop
          - never

       - name: Terminate ec2 instance
         ec2:
           instance_ids:  "{{ item.instance_id }}"
           region: us-east-2
           state: absent
           wait: yes
         loop: "{{ ec2_info.instances }}"
         loop_control:
           label: "{{ item.instance_id }}"
         tags:
          - terminate
          - never
Now let us try to perform stop operation using --tags stop as my
instances are already in running state:
[ansible@controller ~]$ ansible-playbook ec2_instance_2.yml  --tags stop

PLAY [Access instance with TAGS] *************************************************************************************

TASK [Locate instance id with tags] **********************************************************************************
ok: [localhost]

TASK [Stop ec2 instance] *********************************************************************************************
changed: [localhost] => (item=i-0c87855a86a2d96cf)
changed: [localhost] => (item=i-02352fdfd57a3372e)

PLAY RECAP ***********************************************************************************************************
localhost                  : ok=2    changed=1    unreachable=0    failed=0    skipped=0    rescued=0    ignored=0
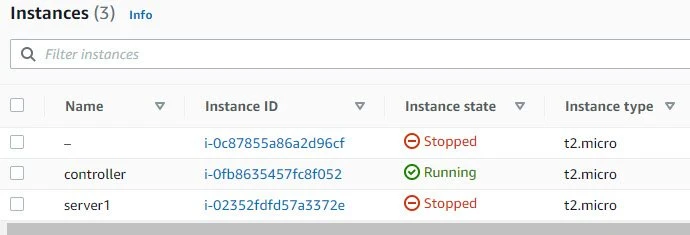
We have changed=1 so this means that the playbook has successfully
executed the play. Let us verify the instance status which shows as
stopped:
Next let us try to start the instance using --tags start:
[ansible@controller ~]$ ansible-playbook ec2_instance_2.yml --tags start
PLAY [Access instance with TAGS] *************************************************************************************
TASK [Locate instance id with tags] **********************************************************************************
ok: [localhost]
TASK [Start ec2 instance] ********************************************************************************************
changed: [localhost] => (item=i-0c87855a86a2d96cf)
changed: [localhost] => (item=i-02352fdfd57a3372e)
PLAY RECAP ***********************************************************************************************************
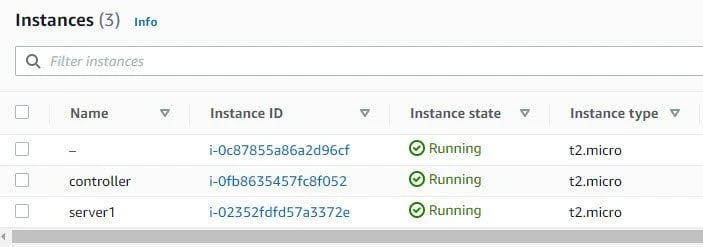
localhost : ok=2 changed=1 unreachable=0 failed=0 skipped=0 rescued=0 ignored=0
The playbook has successfully executed, let us verify the status of the instances on the AWS EC2 Dashboard:
Now similarly we can perform terminate operation but I would like to avoid that as again I have to create another instance so let me save some work for myself :). But you can try the playbook and let me know if you face any issues.
What’s Next
This is the last chapter of our Ansible Tutorial. Now you can start practicing on your own by writing playbooks to automate tasks in your test environment.
