
Step by Step Guide to install openstack on CentOS 7 or RHEL 7 Linux. Openstack installation guide using packstack CentOS 7. Step by step installation guide of packstack using packstack in RHEL or CentOS 7 Linux. Install OpenStack on CentOS 7 Linux.Openstack installation guide single node on CentOS 7. Step by step guide for openstack installation using packstack on CentOS 7 or RHEL 7 Linux server. Install Openstack on CentOS 7. openstack installation on centos 7 step by step. How to install openstack on CentOS 7 using Packstack.

In my earlier articles I shared the steps to bring up an openstack environment using tripleo deployment with an undercloud and overcloud. You should use tripleo deployment if you wish to bring up a multi node openstack environment. Although even with packstack you can bring up a multi node openstack deployment with two or more compute node but you cannot have more than one controller node when installing openstack using packstack. In this article I will share step by step tutorial to install OpenStack on CentOS 7 and RHEL 7 using Packstack.
In this article I have used KVM to create my Virtual Machines, I have written another article to install OpenStack on CentOS 7 (multinode) using Oracle VirtualBox installed on a Windows Laptop.
What is OpenStack?
OpenStack project, which is also called a cloud operational system, consists of a number of different projects developing separate subsystems. Any OpenStack installation can include only a part of them. Some subsystems can even be used separately or as part of any other OpenSource project. Their number is increasing from version to version of OpenStack project, both through the appearance of new ones and the functionality split of the existing ones. For example, nova-volume service was extracted as a separate Cinder project.
Make sure the hypervisor is enabled and supported on your blade
# grep -E ' svm | vmx' /proc/cpuinfo
You should see svm or vmx among the flags supported by the processor. Also if you execute the command:
# lsmod | grep kvm
kvm_intel 143187 3
kvm 455843 1 kvm_intel
or
# lsmod | grep kvm
kvm_amd 60314 3
kvm 461126 1 kvm_amd
you should see two kernel modules loaded in the memory. The kvm is the
module independent of the vendor, and the kvm_intel or kvm_amd
executes VT-x or AMD-V functionality, respectively
Download Links for OpenStack Distributions
Red Hat OpenStack Platform (60-day trial)
https://www.redhat.com/en/insights/openstack
RDO by Red Hat
https://www.rdoproject.org/
Mirantis OpenStack
https://www.mirantis.com/products/mirantis-openstacksoftware/
Ubuntu OpenStack
http://www.ubuntu.com/cloud/openstack
SUSE OpenStack Cloud (60-day trial)
https://www.suse.com/products/suse-openstack-cloud/
Install Openstack On CentOS 7 using Packstack
Packstack provides an easy way to deploy an OpenStack Platform environemnt on one or several machines because it is customizable through a answer file, which contains a set of parameters that allows custom configuration of underlying Openstack platform service.
What is Answer File?
Packstack provides by default an answer file template that deploys an all in one environment.When you run thepackstackcommand non-interactively you must provide your configuration options via a text file, referred to as an answer file, instead of via standard input.
Step 1: Bring UP the physical host server
Firstly you need a base server on which you will create your entire Openstack cloud for which I have bought my server with RHEL 7.4
My setup detail
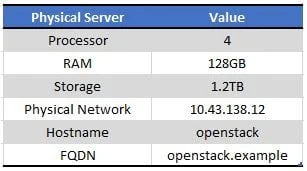
- Next login to your server and register it with Red Hat Subscription
- Install Virtual Machine Manager (if not already installed) using the “Application Installer”
- Next start creating your virtual machines as described in below chapters
Step 2: Configure BIND DNS Server
A DNS server is recommended before you install OpenStack on CentOS 7 using Packstack.
Below are my sample configuration files
# cd /var/named/chroot/var/named
Forward zone configuration file for the controller and compute nodes
# cat example.zone
$TTL 1D
@   IN SOA example. root (
                    0   ; serial
                    1D   ; refresh
                    1H   ; retry
                    1W   ; expire
                    3H )  ; minimum
@       IN NS example.
        IN A  127.0.0.1
        IN A  10.43.138.12
openstack   IN A  10.43.138.12
controller   IN A  192.168.122.49
compute    IN A  192.168.122.215
compute-rhel  IN A  192.168.122.13
controller-rhel IN A  192.168.122.12
First reverse zone file for my physical host server hosting OpenStack
# cat example.rzone
$TTL 1D
@   IN SOA example. root.example. (
                    0   ; serial
                    1D   ; refresh
                    1H   ; retry
                    1W   ; expire
                    3H )  ; minimum
@   IN NS example.
    IN A  127.0.0.1
    IN PTR localhost.
12   IN PTR openstack.example.
Second reverse zone file for controller and compute node
# cat openstack.rzone
$TTL 1D
@   IN SOA example. root.example. (
                    0   ; serial
                    1D   ; refresh
                    1H   ; retry
                    1W   ; expire
                    3H )  ; minimum
@   IN NS example.
    IN A  127.0.0.1
    IN PTR localhost.
49   IN PTR controller.example.
215  IN PTR compute.example.
12   IN PTR controller-rhel.example.
13   IN PTR compute-rhel.example.
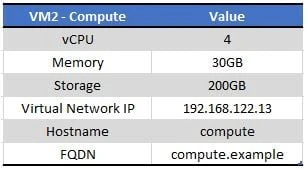
Step 3: Bring UP Compute VM
One of the basic services is OpenStack Compute (Nova). This service is installed on all cluster computer nodes. It manages the level of abstraction of virtual equipment (processors, memory, block devices, network adapters). Nova provides the management of instances of virtual machines addressing the hypervisor and giving such commands as it is launching and stopping.
My setup detail
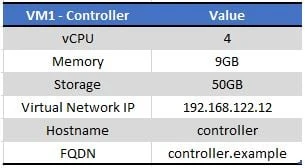
Step 4: Bring UP Controller VM
The Controller node is where most of the shared OpenStack services and other tools run. It supplies API, scheduling, and other shared services for the cloud.
I have already shared the configuration for my Virtual Machine. Since controller node will only host important openstack services hence we do not need too assign too much resource to this node.
My setup details
Next execute the packstack utility on the controller node to install OpenStack on CentOS 7 using the syntax as shown below
[root@controller-rhel ~]# packstack --answer-file /root/answers.txt
Welcome to the Packstack setup utility

The installation log file is available at: /var/tmp/packstack/20180707-225026-DOdBB6/openstack-setup.log

Installing:
Clean Up                      [ DONE ]
Discovering ip protocol version          [ DONE ]
Setting up ssh keys                [ DONE ]
Preparing servers                 [ DONE ]
Pre installing Puppet and discovering hosts' details[ DONE ]
Adding pre install manifest entries        [ DONE ]
Installing time synchronization via NTP      [ DONE ]
Setting up CACERT                 [ DONE ]
Adding AMQP manifest entries            [ DONE ]
Adding MariaDB manifest entries          [ DONE ]
Adding Apache manifest entries           [ DONE ]
Fixing Keystone LDAP config parameters to be undef if empty[ DONE ]
Adding Keystone manifest entries          [ DONE ]
Adding Glance Keystone manifest entries      [ DONE ]
Adding Glance manifest entries           [ DONE ]
Adding Cinder Keystone manifest entries      [ DONE ]
Checking if the Cinder server has a cinder-volumes vg[ DONE ]
Adding Cinder manifest entries           [ DONE ]
Adding Nova API manifest entries          [ DONE ]
Adding Nova Keystone manifest entries       [ DONE ]
Adding Nova Cert manifest entries         [ DONE ]
Adding Nova Conductor manifest entries       [ DONE ]
Creating ssh keys for Nova migration        [ DONE ]
Gathering ssh host keys for Nova migration     [ DONE ]
Adding Nova Compute manifest entries        [ DONE ]
Adding Nova Scheduler manifest entries       [ DONE ]
Adding Nova VNC Proxy manifest entries       [ DONE ]
Adding OpenStack Network-related Nova manifest entries[ DONE ]
Adding Nova Common manifest entries        [ DONE ]
Adding Neutron VPNaaS Agent manifest entries    [ DONE ]
Adding Neutron FWaaS Agent manifest entries    [ DONE ]
Adding Neutron LBaaS Agent manifest entries    [ DONE ]
Adding Neutron API manifest entries        [ DONE ]
Adding Neutron Keystone manifest entries      [ DONE ]
Adding Neutron L3 manifest entries         [ DONE ]
Adding Neutron L2 Agent manifest entries      [ DONE ]
Adding Neutron DHCP Agent manifest entries     [ DONE ]
Adding Neutron Metering Agent manifest entries   [ DONE ]
Adding Neutron Metadata Agent manifest entries   [ DONE ]
Adding Neutron SR-IOV Switch Agent manifest entries[ DONE ]
Checking if NetworkManager is enabled and running [ DONE ]
Adding OpenStack Client manifest entries      [ DONE ]
Adding Horizon manifest entries          [ DONE ]
Adding post install manifest entries        [ DONE ]
Copying Puppet modules and manifests        [ DONE ]
Applying 192.168.122.13_prescript.pp
Applying 192.168.122.12_prescript.pp
192.168.122.13_prescript.pp:            [ DONE ]
192.168.122.12_prescript.pp:            [ DONE ]
Applying 192.168.122.13_chrony.pp
Applying 192.168.122.12_chrony.pp
192.168.122.13_chrony.pp:             [ DONE ]
192.168.122.12_chrony.pp:             [ DONE ]
Applying 192.168.122.12_amqp.pp
Applying 192.168.122.12_mariadb.pp
192.168.122.12_amqp.pp:              [ DONE ]
192.168.122.12_mariadb.pp:             [ DONE ]
Applying 192.168.122.12_apache.pp
192.168.122.12_apache.pp:             [ DONE ]
Applying 192.168.122.12_keystone.pp
Applying 192.168.122.12_glance.pp
Applying 192.168.122.12_cinder.pp
192.168.122.12_keystone.pp:            [ DONE ]
192.168.122.12_cinder.pp:             [ DONE ]
192.168.122.12_glance.pp:             [ DONE ]
Applying 192.168.122.12_api_nova.pp
192.168.122.12_api_nova.pp:            [ DONE ]
Applying 192.168.122.12_nova.pp
Applying 192.168.122.13_nova.pp
192.168.122.12_nova.pp:              [ DONE ]
192.168.122.13_nova.pp:              [ DONE ]
Applying 192.168.122.13_neutron.pp
Applying 192.168.122.12_neutron.pp
192.168.122.12_neutron.pp:             [ DONE ]
192.168.122.13_neutron.pp:             [ DONE ]
Applying 192.168.122.12_osclient.pp
Applying 192.168.122.12_horizon.pp
192.168.122.12_osclient.pp:            [ DONE ]
192.168.122.12_horizon.pp:             [ DONE ]
Applying 192.168.122.13_postscript.pp
Applying 192.168.122.12_postscript.pp
192.168.122.12_postscript.pp:           [ DONE ]
192.168.122.13_postscript.pp:           [ DONE ]
Applying Puppet manifests             [ DONE ]
Finalizing                    [ DONE ]
**** Installation completed successfully ******
Additional information:
* File /root/keystonerc_admin has been created on OpenStack client host 192.168.122.12. To use the command line tools you need to source the file.
* To access the OpenStack Dashboard browse to http://192.168.122.12/dashboard .
Please, find your login credentials stored in the keystonerc_admin in your home directory.
* The installation log file is available at: /var/tmp/packstack/20180707-225026-DOdBB6/openstack-setup.log
* The generated manifests are available at: /var/tmp/packstack/20180707-225026-DOdBB6/manifests
If everything goes nice then you should see all GREEN and at the end of you will get the link to your dashboard (as highlighted). So this means our openstack installation on RHEL/CentOS 7 is complete.
-d if you need to update
the configuration.
Step 6: Check OpenStack service status
Install openstack-utils to check the status of all the openstack
services
# yum -y install openstack-utils
Next check the status
[root@controller-rhel ~]# openstack-status
== Nova services ==
openstack-nova-api:          active
openstack-nova-cert:          active
openstack-nova-compute:        inactive (disabled on boot)
openstack-nova-network:        inactive (disabled on boot)
openstack-nova-scheduler:       active
openstack-nova-conductor:       active
== Glance services ==
openstack-glance-api:         active
openstack-glance-registry:       active
== Keystone service ==
openstack-keystone:          inactive (disabled on boot)
== Horizon service ==
openstack-dashboard:          active
== neutron services ==
neutron-server:            active
neutron-dhcp-agent:          active
neutron-l3-agent:           active
neutron-metadata-agent:        active
neutron-openvswitch-agent:       active
== Cinder services ==
openstack-cinder-api:         active
openstack-cinder-scheduler:      active
openstack-cinder-volume:        active
openstack-cinder-backup:        inactive (disabled on boot)
== Support services ==
mysqld:                unknown
libvirtd:               active
openvswitch:              active
dbus:                 active
target:                active
rabbitmq-server:            active
memcached:               active
== Keystone users ==
Warning keystonerc not sourced
ALSO READ:
Check Openstack version and
mapped release information
Step 7: Source keystonerc file
Now once you install OpenStack on CentOS 7, next you can source your
keystoncerc file to get more detailed list of openstack-service
status. This keystonerc file will be available at the home folder of
the root user as shown below:
[root@controller-rhel ~]# ls -l keystonerc_admin
-rw-------. 1 root root 229 Jul 7 22:57 keystonerc_admin
[root@controller-rhel ~]# pwd
/root

[root@controller-rhel ~]# source keystonerc_admin
Next check the status of openstack services
[root@controller-rhel ~(keystone_admin)]#openstack-status
== Nova services ==
openstack-nova-api:          active
openstack-nova-cert:          active
openstack-nova-compute:        inactive (disabled on boot)
openstack-nova-network:        inactive (disabled on boot)
openstack-nova-scheduler:       active
openstack-nova-conductor:       active
== Glance services ==
openstack-glance-api:         active
openstack-glance-registry:       active
== Keystone service ==
openstack-keystone:          inactive (disabled on boot)
== Horizon service ==
openstack-dashboard:          active
== neutron services ==
neutron-server:            active
neutron-dhcp-agent:          active
neutron-l3-agent:           active
neutron-metadata-agent:        active
neutron-openvswitch-agent:       active
== Cinder services ==
openstack-cinder-api:         active
openstack-cinder-scheduler:      active
openstack-cinder-volume:        active
openstack-cinder-backup:        inactive (disabled on boot)
== Support services ==
mysqld:                unknown
libvirtd:               active
openvswitch:              active
dbus:                 active
target:                active
rabbitmq-server:            active
memcached:               active
== Keystone users ==
+----------------------------------+---------+---------+-------------------+
|        id        | name | enabled |   email   |
+----------------------------------+---------+---------+-------------------+
| e97f18a9994e4b99bcc0e6fe8db95cd3 | admin | True | root@localhost |
| dccbaca5e2ee4866b343573678ec3bf7 | cinder | True | cinder@localhost |
| 7dec80c93f8a4aafa1559a59e6bf606c | glance | True | glance@localhost |
| 778e4fbefdfa4329bf9b7143ce6ffe74 | neutron | True | neutron@localhost |
| e3d85ca8a8bb4ba5a9457712ce5814f5 | nova | True | nova@localhost |
+----------------------------------+---------+---------+-------------------+
== Glance images ==
+----+------+
| ID | Name |
+----+------+
+----+------+
== Nova managed services ==
+----+------------------+------------------------+----------+---------+-------+----------------------------+-----------------+
| Id | Binary     | Host         | Zone  | Status | State | Updated_at        | Disabled Reason |
+----+------------------+------------------------+----------+---------+-------+----------------------------+-----------------+
| 1 | nova-consoleauth | controller-rhel.example| internal | enabled | up  | 2018-07-07T18:02:59.000000 | -       |
| 2 | nova-scheduler | controller-rhel.example| internal | enabled | up  | 2018-07-07T18:03:00.000000 | -       |
| 3 | nova-conductor | controller-rhel.example| internal | enabled | up  | 2018-07-07T18:03:01.000000 | -       |
| 4 | nova-cert    | controller-rhel.example| internal | enabled | up  | 2018-07-07T18:02:57.000000 | -       |
| 5 | nova-compute  | compute-rhel.example | nova  | enabled | up  | 2018-07-07T18:03:04.000000 | -       |
+----+------------------+------------------------+----------+---------+-------+----------------------------+-----------------+
== Nova networks ==
+----+-------+------+
| ID | Label | Cidr |
+----+-------+------+
+----+-------+------+
== Nova instance flavors ==
+----+-----------+-----------+------+-----------+------+-------+-------------+-----------+
| ID | Name   | Memory_MB | Disk | Ephemeral | Swap | VCPUs | RXTX_Factor | Is_Public |
+----+-----------+-----------+------+-----------+------+-------+-------------+-----------+
| 1 | m1.tiny | 512   | 1  | 0    |   | 1  | 1.0    | True   |
| 2 | m1.small | 2048   | 20 | 0    |   | 1  | 1.0    | True   |
| 3 | m1.medium | 4096   | 40 | 0    |   | 2  | 1.0    | True   |
| 4 | m1.large | 8192   | 80 | 0    |   | 4  | 1.0    | True   |
| 5 | m1.xlarge | 16384  | 160 | 0    |   | 8  | 1.0    | True   |
+----+-----------+-----------+------+-----------+------+-------+-------------+-----------+
== Nova instances ==
+----+------+--------+------------+-------------+----------+
| ID | Name | Status | Task State | Power State | Networks |
+----+------+--------+------------+-------------+----------+
+----+------+--------+------------+-------------+----------+
So as you see it gives me a detailed status of all the openstack services.
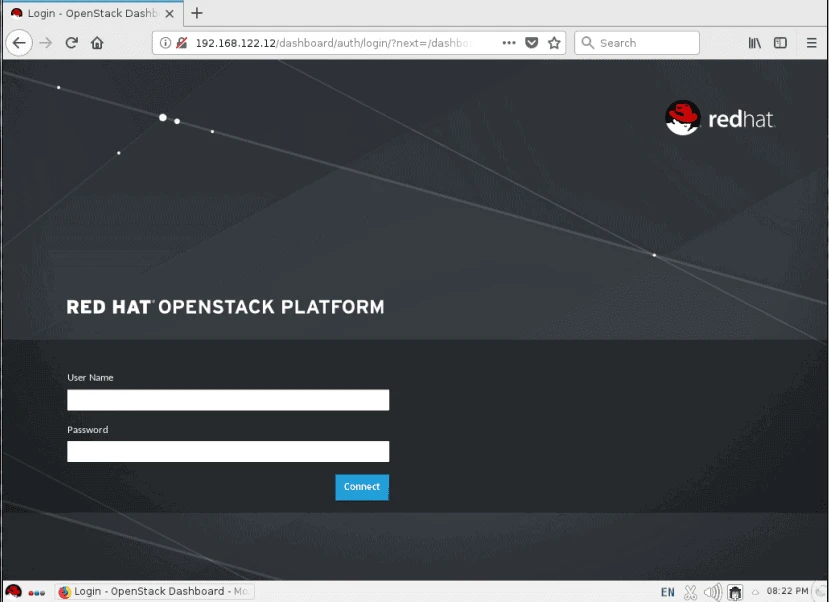
Step 8: Access OpenStack Horizon Dashboard
So now our OpenStack installation is complete using packstack on CentOS/RHEL 7 and we can see our services are also up and running properly. Finally now you can login to the horizon dashboard.
Lastly I hope the steps from the article to install OpenStack on CentOS 7 Linux was helpful. So, let me know your suggestions and feedback using the comment section.
