
In this tutorial we will learn about SAN certificates and steps to generate CSR for SAN certificates. We will be using openssl command to generate and sign the certificate. If you are new to this tool then I would recommend you to also check our OpenSSL CheatSheet which covers different possible examples covering the usage of openssl command.
What are SAN (Subject Alternative name) Certificates
- SAN is an acronym for Subject Alternative Name
- These certificates generally cost a little bit more than single-name certs, because they have more capabilities.
- When you request a SAN certificate, you have the option of defining multiple DNS names that the certificate can protect.
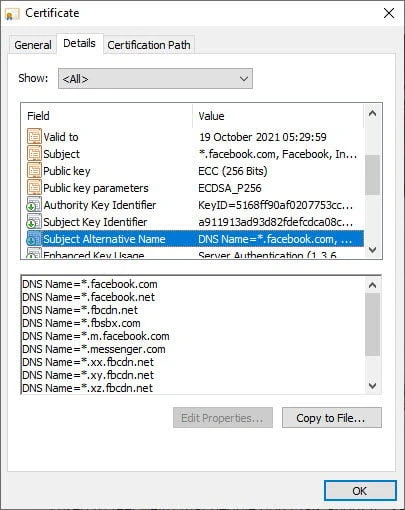
- Once issued, the SAN certificate will contain a primary DNS name, which is typically the main name of the website, and, further inside the cert properties, you will find listed the additional DNS names that you specified during your request.
- This single certificate can be installed on a web server and used to validate traffic for any of the DNS names that are contained in the certificate.
- For example have a look at the certificate of
facebook.com. It is using a Subject Alternative Name with multiple DNS defined in the certificate so it avoids creating multiple certificate for each sub domain.
Lab Environment
We will need RootCA certificate and Private key to sign the certificates. I have already created self-signed CA certificate to demonstrate this article. I will share the commands to create the same, but if you are interested then you should check other articles on similar topic from the LEFT Sidebar MENU:
## create a directory structure for storing the rootca certificates
mkdir /root/tls/{private,certs}

## navigate inside your tls path
cd /root/tls

## generate rootca private key
openssl genrsa  -out private/cakey.pem 4096

## generate rootCA certificate
openssl req -new -x509 -days 3650  -config openssl.cnf  -key private/cakey.pem -out certs/cacert.pem

## Verify the rootCA certificate content and X.509 extensions
openssl x509 -noout -text -in certs/cacert.pem
You can collect mysample openssl.cnf from a different article where I
have explained how to revoke a certificate.
Generate Private Key
First of all we need a private key. Now I could have combined the steps
to generate private key and CSR for SAN but let’s keep it simple. I have
not assigned any passphrase to the private key, you can also use -des3
encryption algorithm to add a passphrase to your private key
# openssl genrsa -out server.key 4096
Generating RSA private key, 4096 bit long modulus (2 primes)
.......................................................++++
.................++++
e is 65537 (0x010001)
Generate CSR for SAN Certificate
We will not use the complete /etc/pki/tls/openssl.cnf instead we will
create our own custom ssl configuration file with required parameters
only.
To generate CSR for SAN we need
distinguished_name and req_extensions
I have also added the value for individual distinguished_name
parameters in this configuration file to avoid user prompt. If you are
not familiar with these parameters then I suggest you to readThings to
consider when creating CSR with OpenSSL
# cat server_cert.cnf
[req]
distinguished_name = req_distinguished_name
req_extensions = req_ext
prompt = no

[req_distinguished_name]
C   = IN
ST  = Karnataka
L   = Bengaluru
O   = GoLinuxCloud
OU  = R&D
CN  = ban21.example.com

[req_ext]
subjectAltName = @alt_names

[alt_names]
IP.1 = 10.10.10.13
IP.2 = 10.10.10.14
IP.3 = 10.10.10.17
DNS.1 = centos8-2.example.com
DNS.2 = centos8-3.example.com
Next we will use openssl to generate our Certificate Signing Request
for SAN certificate.
# openssl req -new -key server.key -out server.csr -config server_cert.cnf
Since we have used prompt=no and have also provided the CSR
information, there is no output for this command but our CSR is
generated
# ls -l server.csr
-rw-r--r-- 1 root root 1842 Aug 10 15:55 server.csr
Verify Subject Alternative Name value in CSR
Next verify the content of your Certificate Signing Request to make sure it contains Subject Alternative Name section under “Requested Extensions”
# openssl req -noout -text -in server.csr | grep -A 1 "Subject Alternative Name"
            X509v3 Subject Alternative Name:
                IP Address:10.10.10.13, IP Address:10.10.10.14, IP Address:10.10.10.17, DNS:centos8-2.example.com, DNS:centos8-3.example.com
So our CSR contains all the IP Address and DNS value which we provided while generating the CSR for SAN.
Generate SAN certificate
Next we will use this CSR to generate our SAN certificate:
# openssl x509 -req -days 365 -in server.csr -CA /root/tls/certs/cacert.pem -CAkey /root/tls/private/cakey.pem -CAcreateserial -out server.crt
Signature ok
subject=C = IN, ST = Karnataka, L = Bengaluru, O = GoLinuxCloud, OU = R&D, CN = ban21.example.com
Getting CA Private Key
Verify SAN Extensions in the certificate
Once the certificate is generated, let’s verify if our SAN fields are retained inside the certificate:
# openssl x509 -text -noout -in server.crt | grep -A 1 "Subject Alternative Name"
We get an empty output. The SAN Extensions are missing from our certificate.
Missing SAN Extensions from the Certificate
This is an expected behavior. As per official documentation from openssl
Extensions in certificates are not transferred to certificate requests and vice versa.
Due to this, the extensions which we added in our CSR were not transferred by default to the certificate. So these extensions must be added to the certificate explicitly.
Generate SAN Certificates with X509 extensions
We need to use -extensions argument with the name of the extension to
be used from the configuration file. We have defined our SAN fields
under req_ext extension so we will use the same and re-generate the
certificate:
# openssl x509 -req -days 365 -in server.csr -CA /root/tls/certs/cacert.pem -CAkey /root/tls/private/cakey.pem -CAcreateserial -out server.crt -extensions req_ext -extfile server_cert.cnf
Signature ok
subject=C = IN, ST = Karnataka, L = Bengaluru, O = GoLinuxCloud, OU = R&D, CN = ban21.example.com
Getting CA Private Key
You may have observed that sometimes we use openssl x509 while in some
cases we use openssl ca command to sign a certificate, you can check
openssl ca Vs openssl x509
to understand the difference and which one you should use.
Re-verify the SAN Extensions in the certificate
Now let us view the certificate content and re-verify the SAN extension in our certificate:
# openssl x509 -text -noout -in server.crt | grep -A 1 "Subject Alternative Name"
X509v3 Subject Alternative Name:
                IP Address:10.10.10.13, IP Address:10.10.10.14, IP Address:10.10.10.17, DNS:centos8-2.example.com, DNS:centos8-3.example.com
So this time our certificates are properly generated with the SAN fields.
Conclusion
In this tutorial I gave you an overview on SAN certificates, and the steps to create Certificate Signing Request for SAN certificates using openssl in Linux. SAN certificates have gained alot of popularity with major domains across world choose for this option as this saves money because it avoids creating individual certificates for respective domains.
Lastly I hope the steps from the article to generate csr for SAN on Linux using openssl was helpful. So, let me know your suggestions and feedback using the comment section.
