
In this article we will explore Elliptic Curve Cryptography (ECC) and generate ECC certificates using OpenSSL. We will be creating CA certificate, server and client certificates using ECC private key and later we will use this certificate with Apache server for demonstration.
Overview on Elliptic Curve Cryptography (ECC)
- Elliptic Curve Cryptography (ECC) is an encryption technique that provides public-key encryption similar to RSA.
- While the security strength of RSA is based on very large prime numbers, ECC uses the mathematical theory of elliptic curves and achieves the same security level with much smaller keys.
- ECC does not replace RSA for authenticating the communication partners, but is used for generating the ephemeral DH session key with the help of an EC private key. RSA is still used for providing authentication.
- The main advantage of Elliptic Curve Cryptography with Diffie-Hellman (ECDHE-RSA) over plain Diffie-Hellman (DHE-RSA) is better performance and the same level of security with less key bits.
- A disadvantage is the additional effort for creating and maintaining the EC key.
RSA vs ECC keys
Compared to traditional algorithms such as RSA, ECC makes it possible to create smaller keys, with obvious advantages both in terms of computational efficiency and the required working memory.
In the following table we have a comparison between different size of the RSA and ECC keys to achieve the same level of security:
| RSA size (in bits) | ECC size |
|---|---|
| 1024 | 160 |
| 2048 | 224 |
| 3072 | 256 |
| 7680 | 384 |
| 15360 | 521 |
However, ECC is mainly used in the management of key exchange and digital signatures, rather than in encryption. Even in the case of ECC, once a secure key exchange protocol has been established between two counterparts, it is possible to share a symmetric encryption key to carry out efficient communication encoding.
Lab Environment
I will be using two virtual machines to generate and validate the ECC
certificates. These virtual machines are running on Oracle VirtualBox
and installed with Ubuntu 22 and Kali Linux. Out of these two VMs,
Ubuntu will act as a server and Kali Linux will act as a client. I will
use the server node to generate all the certificates. The hostname of
the server node is deepak-VirtualBox with an IP address of
10.10.1.15 while the hostname of client node is kali with an IP
address of 10.10.1.10
Generate Certificates using ECC Key
Step-1: List available ECC curves
ECC is based on domain parameters defined by various standards. You can see the list of all available standards defined and recommended elliptical cryptography curves using the following openssl command.
[root@server ~]# openssl ecparam -list_curves
  secp256k1 : SECG curve over a 256 bit prime field
  secp384r1 : NIST/SECG curve over a 384 bit prime field
  secp521r1 : NIST/SECG curve over a 521 bit prime field
  prime256v1: X9.62/SECG curve over a 256 bit prime field
The recommended ECC key size is 256-bit so we wll use prime256v1 to
generate all our ECC private keys in this tutorial. If greater
encryption strength is required, your other private key option is
secp384r1.
Step-2: Create CA certificate (Optional)
First we would need a CA certificate required to sign the server and client certificate. You can skip this step if you have already generated CA certificate and CA Key.
We will keep all our certificates inside /certs so let’s create this directory:
mkdir /certs
cd /certs
It does not matter even if the CA certificate is generated using RSA Key but for the sake of relativity we will generate one using ECC Key.
openssl ecparam -name prime256v1 -genkey -noout -out ca.key
This command creates an ECC private key using the prime256v1 curve.
The key is saved to the file ca.key.
Generate the CA certificate:
openssl req -x509 -new -nodes -key ca.key -sha256 -days 1024 -out ca.pem -subj "/C=IN/ST=Bengaluru/L=City/O=SomeOrg/OU=Test/CN=RootCA"
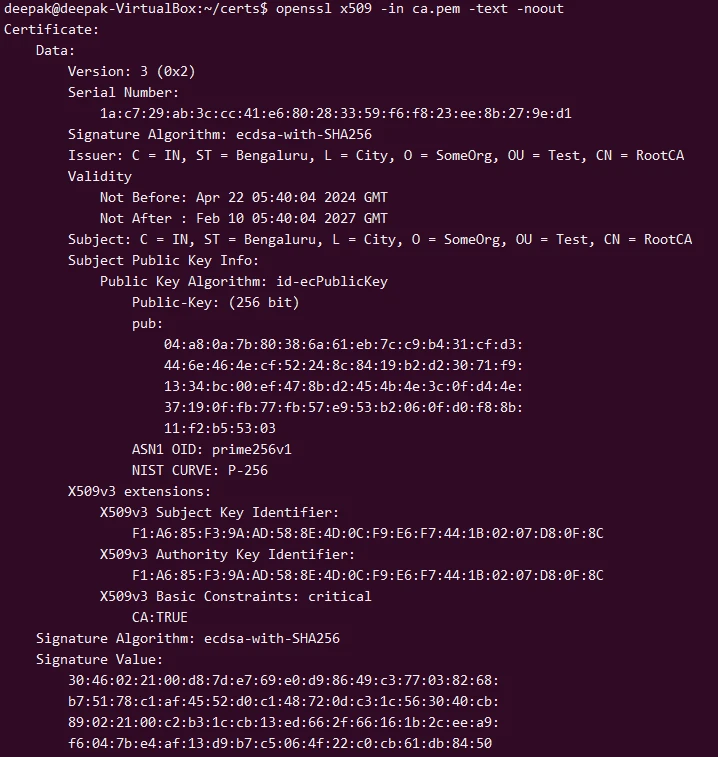
Verify the certificate:
openssl x509 -in ca.pem -text -noout
Step-3: Generate ECC Private Keys for Server and Client
Generate ECC Server Private Key:
openssl ecparam -name prime256v1 -genkey -noout -out server.key
Generate ECC Client Private Key:
openssl ecparam -name prime256v1 -genkey -noout -out client.key
Step-4: Create Certificate Signing Requests (CSRs)
We will need to create server CSR having SAN Field which will be used by the client to validate that is is connecting to a legitimate server with authorized IP and domain name.
Create a file named server_csr.cnf with the following content:
[ req ]
default_bits       = 256
prompt             = no
default_md         = sha256
req_extensions     = req_ext
distinguished_name = dn

[ dn ]
C=IN
ST=Karnataka
L=Bengaluru
O=SomeOrganisation
OU=Test
CN=deepak-VirtualBox # Server's HostName

[ req_ext ]
subjectAltName = @alt_names

[ alt_names ]
IP.1    = 10.10.1.15 # Server IP Address where Apache would be Running
Here I have only given IP Address but you can also choose to give DNS
address. Read more at Create SAN certificate. The
10.10.1.15 IP Address is of my server where I would be running my
Apache Server.
Then generate the CSR:
openssl req -new -key server.key -out server.csr -config server_csr.cnf
For client we don’t need to provide any SAN Fields for mTLS communciation so we will just generate the client certificate:
openssl req -new -key client.key -out client.csr -subj "/C=IN/ST=Karnataka/L=Bengaluru/O=SomeOrganization/OU=Tes/CN=kali"
Step-5: Sign the CSRs with Your CA Certificate
Many people miss most important points when they are creating a CSR. If you are not sure about what should be added for individual fields then I would recommend to read this article before you generate CSR:
Let’s sign the CSR using the generated CA certificate and key to create client and server certificates:
Sign Server CSR:
openssl x509 -req -in server.csr -CA ca.pem -CAkey ca.key -CAcreateserial -out server.crt -days 365 -sha256 -extfile server_csr.cnf -extensions req_ext
Sign Client CSR:
openssl x509 -req -in client.csr -CA ca.pem -CAkey ca.key -CAcreateserial -out client.crt -days 365 -sha256
Step-6: Verify the Certificates
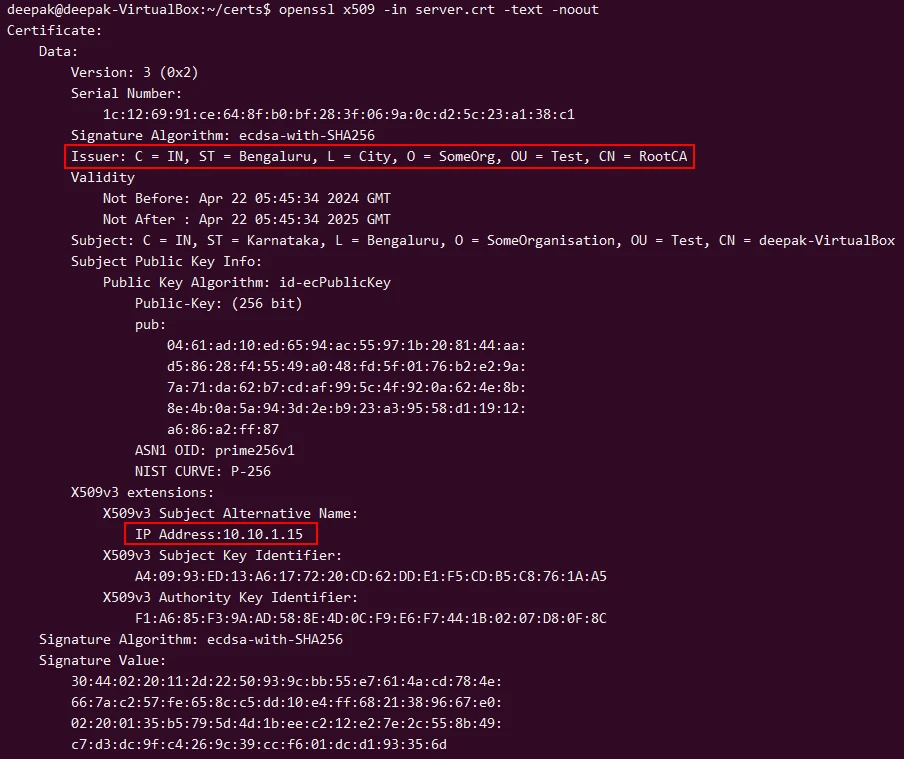
Verify Server Certificate:
openssl x509 -in server.crt -text -noout
Verify Client Certificate:
openssl x509 -in client.crt -text -noout

Configure Apache2 with SSL (HTTPS)
We will validate our ECC certificates using a simple apache server.
1. Install Apache packages
So first let us install the required packages to setup an HTTPS web server:
sudo apt update
sudo apt install apache2
sudo a2enmod ssl
2. Configure Apache to use SSL
I will create a new directory certs under /etc/apache2/ssl where I
will store all the server certificates and CA crtificate in this path:
sudo mkdir -p /etc/apache2/ssl
sudo cp server.crt /etc/apache2/ssl/
sudo cp server.key /etc/apache2/ssl/
sudo cp ca.pem /etc/apache2/ssl/
If you are setting up apache on a different server then you can copy these certificates to different node using scp or rsync accordingly.
Replace the content with the following configuration in
/etc/apache2/sites-available/default-ssl.conf, adjusting paths and
names as necessary:
        <VirtualHost *:443>
            ServerAdmin admin@example.com
            ServerName deepak-VirtualBox # Server's HostName
            DocumentRoot /var/www/html

            SSLEngine on
            SSLCertificateFile /etc/apache2/ssl/server.crt
            SSLCertificateKeyFile /etc/apache2/ssl/server.key
            SSLCertificateChainFile /etc/apache2/ssl/ca.pem

            <Directory /var/www/html>
               Options Indexes FollowSymLinks MultiViews
               AllowOverride All
               Require all granted
             </Directory>

             ErrorLog ${APACHE_LOG_DIR}/error.log
             CustomLog ${APACHE_LOG_DIR}/access.log combined
        </VirtualHost>
Enable SSL:
sudo a2ensite default-ssl
Restart apache2 to apply the changes:
sudo systemctl restart apache2
3. Enable Firewall
Allow traffic on Apache on ufw firewall (which is the default firewall
in Ubuntu). You can list the available application profiles:
sudo ufw app list

You can choose the profile based on your environment:
- Apache: This profile opens only port 80 (HTTP).
- Apache Full: This profile opens both port 80 (HTTP) and port 443 (HTTPS).
- Apache Secure: This profile opens only port 443 (HTTPS).
To allow HTTPS we can execute:
sudo ufw allow 'Apache Secure'
After configuring the rules, check the status to ensure that the rules are applied correctly:
sudo ufw status
Configure client for mTLS Authentication
We will copy our client certificates over to the client node. I have
already created a directory /certs on the client node to store the
certificates and private key:
deepak@deepak-VirtualBox:~/certs$ scp client.* ca.pem root@10.10.1.10:/certs/
The authenticity of host '10.10.1.10 (10.10.1.10)' can't be established.
ED25519 key fingerprint is SHA256:T1CNHGebJRu8fwEL9tKhQnurrGNKXZL014G88UY9tYs.
This key is not known by any other names
Are you sure you want to continue connecting (yes/no/[fingerprint])? yes
Warning: Permanently added '10.10.1.10' (ED25519) to the list of known hosts.
root@10.10.1.10's password:
client.crt                                                                                                                                                              100%  680   153.0KB/s   00:00
client.csr                                                                                                                                                              100%  481   148.0KB/s   00:00
client.key                                                                                                                                                              100%  227    99.0KB/s   00:00
ca.pem                                                                                                                                                                  100%  790   572.5KB/s   00:00
Validate mutual TLS authentication
We will use curl to connect to our web server from the client node:
└─# curl -v --cacert ca.pem --cert client.crt --key client.key https://10.10.1.15
*   Trying 10.10.1.15:443...
* Connected to 10.10.1.15 (10.10.1.15) port 443
* ALPN: curl offers h2,http/1.1
* TLSv1.3 (OUT), TLS handshake, Client hello (1):
*  CAfile: ca.pem
*  CApath: /etc/ssl/certs
* TLSv1.3 (IN), TLS handshake, Server hello (2):
* TLSv1.3 (IN), TLS handshake, Encrypted Extensions (8):
* TLSv1.3 (IN), TLS handshake, Certificate (11):
* TLSv1.3 (IN), TLS handshake, CERT verify (15):
* TLSv1.3 (IN), TLS handshake, Finished (20):
* TLSv1.3 (OUT), TLS change cipher, Change cipher spec (1):
* TLSv1.3 (OUT), TLS handshake, Finished (20):
* SSL connection using TLSv1.3 / TLS_AES_256_GCM_SHA384 / X25519 / id-ecPublicKey
* ALPN: server accepted http/1.1
* Server certificate:
*  subject: C=IN; ST=Karnataka; L=Bengaluru; O=SomeOrganisation; OU=Test; CN=deepak-VirtualBox
*  start date: Apr 22 05:45:34 2024 GMT
*  expire date: Apr 22 05:45:34 2025 GMT
*  subjectAltName: host "10.10.1.15" matched cert's IP address!
*  issuer: C=IN; ST=Bengaluru; L=City; O=SomeOrg; OU=Test; CN=RootCA
*  SSL certificate verify ok.
*   Certificate level 0: Public key type EC/prime256v1 (256/128 Bits/secBits), signed using ecdsa-with-SHA256
*   Certificate level 1: Public key type EC/prime256v1 (256/128 Bits/secBits), signed using ecdsa-with-SHA256
* using HTTP/1.x
> GET / HTTP/1.1
> Host: 10.10.1.15
> User-Agent: curl/8.5.0
> Accept: */*
>
* TLSv1.3 (IN), TLS handshake, Newsession Ticket (4):
* TLSv1.3 (IN), TLS handshake, Newsession Ticket (4):
* old SSL session ID is stale, removing
< HTTP/1.1 200 OK
< Date: Mon, 22 Apr 2024 06:40:08 GMT
< Server: Apache/2.4.52 (Ubuntu)
< Last-Modified: Mon, 22 Apr 2024 05:54:54 GMT
< ETag: "150-616a913a11fc4"
< Accept-Ranges: bytes
< Content-Length: 336
< Vary: Accept-Encoding
< Content-Type: text/html
<
...
* Connection #0 to host 10.10.1.15 left intact
As you can see the connection was successful with proper TLS handshake. So our ECC certificates are working as expected. If you face any issues then you can refer Setup & verify Mutual TLS authentication (MTLS) with openssl
Summary
In this tutorial we covered following topics
- We learned about Elliptic Curve Cryptography (ECC) encryption algorithm.
- We understood the difference between RSA and ECC keys
- We created ECC private keys andverify the algorithm
- We created CA certificate, server and client certificate using ECC private keys
- We then validated our certificate authentication using an apache server.
Further Readings
What is Elliptic Curve
Cryptography?
Command Line Elliptic
Curve Operations
Elliptic
Curve Cryptography (ECC) Cipher Suites for Transport Layer Security
(TLS)
OpenSSL ECDSA
