![Node.js Child Process Tutorial [With Examples]](/node-js-child-process/nodejs_exec_spawn.jpg)
You may need to run multiple processes on multiple CPU cores as your application’s workload increases. That is where the Node.js child process module comes in.
The module enables starting other processes using its methods. You can
view all the properties and methods by
enteringthe REPL mode
and typing child_process. then double-pressing the tab key.
Welcome to Node.js v18.9.0.
Type ".help" for more information.
> child_process.
child_process.__proto__             child_process.constructor           child_process.hasOwnProperty        child_process.isPrototypeOf         child_process.propertyIsEnumerable  child_process.toLocaleString        child_process.toString
child_process.valueOf
child_process.ChildProcess          child_process._forkChild            child_process.exec                  child_process.execFile              child_process.execFileSync          child_process.execSync              child_process.fork
child_process.spawn                 child_process.spawnSync
This tutorial walks you through using two of the commonly used Node.js
child process module methods: exec() and spawn().
Let’s get started.
How to use some of the Node.js child process module’s methods
The exec() method
The exec method starts a shell process to execute typical commands. It
takes a command, options, and a callback function.
exec([command], [options], [callback function])
The command (in strings) can be a Unix command like ls or cat.
"ls -l"
Note:
The commands are platform-specific. For example, a Linux terminal
understands ls, while a Windows terminal does not recognize the
command.
Using the shell syntax could expose your file system tocommand injection attacksif the commands originate from an external dynamic input. For instance, a user could input a command that deletes all of your application’s directories.
The options control the output. Examples of options are the current
working directory (cwd), environment variables (env), encoding,
maximum buffer (maxBuffer), timeout, and the kill signal like
SIGTERM.
const options = {
    encoding: 'utf-8',
    maxBuffer: 100 * 1024,
    cwd: null,
    timeout: 0,
    env: null,
    killSignal: 'SIGTERM'
}
The callback function returns an error object, the standard output
(stdout) and standard error (stderr) buffer/string, respectively.
(err, stdout, stderr)
You probably wonder why we return two error parameters.
Here is the thing.
Most built-in Node.js modules accommodate asynchronous programming through a callback function. The first parameter to the callback function is usually an error object. We can print the error object or throw it to be handled by custom error handlers.
So, the first error parameter in the exec() function relates to
running the Node.js callback function, while the standard error buffer
relates to getting the shell process output.
Besides the callback-based exec function, we can execute the shell
process synchronously using the execSync() method. However, we block
subsequent code execution this time until the synchronous ends.
We then store the buffered output in a variable and convert it to a string before using it. Here, we can handle exceptions with Node.js try catch finally blocks.
try {
    const data = cp.execSync([command], [options])
    console.log(data.toString())
} catch (error) {
    // handle exceptions
}
The spawn method
The spawn() method offers more control than the exec() method. It
allows the separation of the primary command from optional flags (in an
options array).
spawn([command], [command options], [spawn options])
Unlike theexec() method, which buffers the entire data in memory
before passing it to a callback function, the spawn() method uses
streams. We can then manipulate the output by registering event handlers
for the returned data stream - a ChildProcess Instance.
For instance, we can run events on the returned object or its properties
like stdout and stderr.
// spawn a process to run a command
const cpSpawn = cp.spawn([command], [command options], [spawn options])

// run the data event on the standard output, convert the data to string, and print it the console output
cpSpawn.stdout.on("data", content => console.log(content.toString()))

// close the child process
cpSpawn.on("close", code => console.log("The process ended with the code", code))
Similar to the exec() method, the spawn method has a synchronous
version spawnSync(), from which we can grab the stdout and stderr
objects.
Let’s set up a lab environment and practice using the Node.js child process module.
Lab environment
Assume we want to list an application’s files and directories through a secondary Node.js process.
Create the project directory with the main script file and subdirectories and files.
childProcess
├── controllers
├── main.js
├── models
├── public
│ ├── index.html
│ ├── script.js
│ └── style.css
└── views
I use Ubuntu for the demos.
$ mkdir childProcess && cd childProcess
$ touch main.js
$ mkdir models views controllers public
$ cd public
$ touch index.html style.css script.js
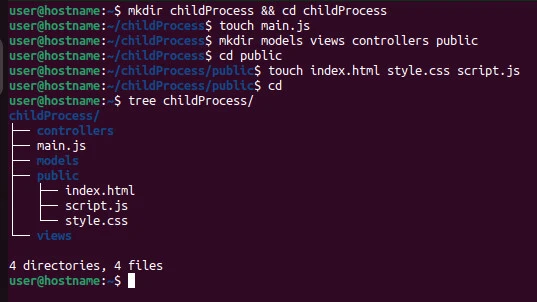
Now let’s list the target directory’s files.
Some practical examples
Example~1: List the contents of the public directory using the node.js exec method
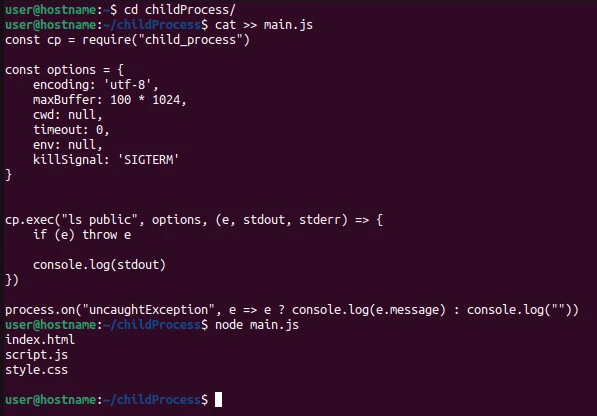
Open the main script file and write the following code.
Input
const cp = require("child_process")
const options = {
encoding: 'utf-8',
maxBuffer: 100 * 1024,
cwd: null,
timeout: 0,
env: null,
killSignal: 'SIGTERM'
}
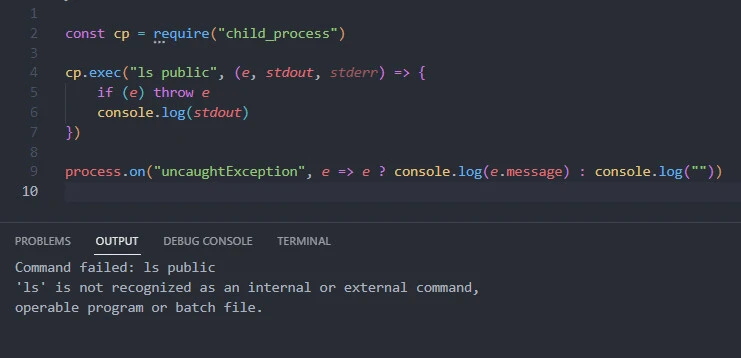
cp.exec("ls public", options, (e, stdout, stderr) => {
if (e) throw e
console.log(stdout)
})
process.on("uncaughtException", e => e ? console.log(e.message) : console.log(""))
We import the child_process module and store its contents in the cp
variable.
Next, we create an options object and run the ls command in the exec
method. We also pass the options object and a callback function to the
exec() method.
If the callback function returns an error object, we throw the error and
handle the exception with the uncaughtException event on the process
module. Otherwise, we console-log the standard output.
Save the file and run it with the node command.
node main.js
Output
user@hostname:~/childProcess$ node main.js
index.html
script.js
style.css
We get the contents of the public directory.
Example~2: List the contents of the project directory using the node.js spawn method
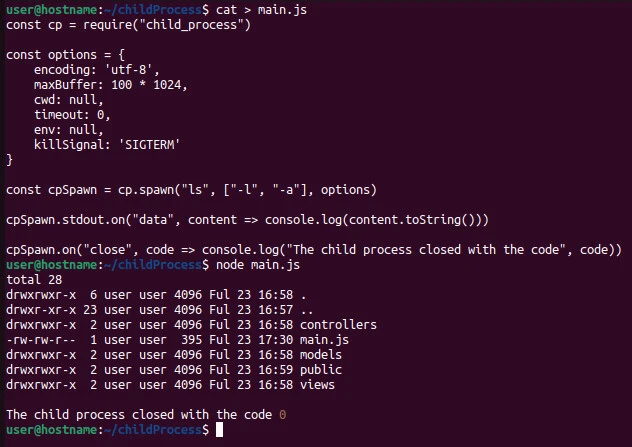
Replace the contents of the main.js file with the following input, save
the file then run it with the node command.
Input
const cp = require("child_process")

const options = {
    encoding: 'utf-8',
    maxBuffer: 100 * 1024,
    cwd: null,
    timeout: 0,
    env: null,
    killSignal: 'SIGTERM'
}

const cpSpawn = cp.spawn("ls", ["-l", "-a"], options)

cpSpawn.stdout.on("data", content => console.log(content.toString()))

cpSpawn.on("close", code => console.log("The child process closed with the code", code))
We import the Node.js child process module and store it in the cp
variable. Using the variable’s spawn() method, we run the ls command
with the -l and -a options and the options object.
We store the output in the cpSpawn object. Next, we listen for the
data event and convert the buffer to a string before console-logging
it.
Lastly, we print the code when the Node.js child process closes.
Output
user@hostname:~/childProcess$ node main.js
total 28
drwxrwxr-x  6 user user 4096 Ful 23 16:58 .
drwxr-xr-x 23 user user 4096 Ful 23 16:57 ..
drwxrwxr-x  2 user user 4096 Ful 23 16:58 controllers
-rw-rw-r--  1 user user  395 Ful 23 17:30 main.js
drwxrwxr-x  2 user user 4096 Ful 23 16:58 models
drwxrwxr-x  2 user user 4096 Ful 23 16:59 public
drwxrwxr-x  2 user user 4096 Ful 23 16:58 views

The child process closed with the code 0
The system returns all files and directories in the main directory. An error code of zero means the child process did not encounter an error.
Summary
The exec() and spawn() methods are some of the frequently used
Node.js child process module methods. Use the exec() method to run
shell-like syntax commands on a small data volume. Otherwise, use the
spawn() command, as shown in this tutorial.