![Using lvreduce to PROPERLY shrink Logical Volume [Cheat Sheet]](/lvm-shrink-logical-volume/lvreduce__command.jpg)
Introduction to lvreduce command
lvreduce command reduces the size of the logical volume. You have to be careful when reducing the logical volume because data in the reduced part will be lost.
Are you new to LVM and still learning how it works?
We have written detailed articles covering different areas of managing logical volumes, which you can follow using the given links:
Manage
Logical Volume in Linux - One STOP Solution
Understand
LVM Architecture
Create
LVM during installation RHEL/CentOS 7/8
How
to use LVM Snapshot for Backup and Restore
Create
Mirrored Logical Volume
Create
Striped Logical Volume
Pre-requisites and Important Points Before You Start
The data is stored on disk in chunks which are distributed across your entire allotted disk so shrinking a storage may lead to data loss or partition corruption so it is very important to backup your data.
Shrinking a non-root i.e. data logical volume will not require reboot
but it must be un-mounted first. So if any application or process is
using this path then shrinking is not possible. You can use
lsof | grep <partition> to check the list of processes using the
<partition>
Shrinking a root logical volume (mounted on /) is not possible without reboot as it cannot be unmouned. So this must be performed in rescue mode and will have some extra steps. I have already covered detailed steps to extend or shrink root logical volume with examples so I will not repeat the same here.
I am using ext4 partition for all my examples, some of the commands may
vary if you have a different file system such as XFS in which case
resize2fs has to be replaced with xfs_growfs command. You can check
xfs_growfs man page for more information.
Different examples to use lvreduce command
The syntax for lvreduce command is as follows:
# lvreduce option LV_path
1. Reduce the size of the logical volume in units of megabytes
The -L or --size option of lvreduce command reduces the logical
volume in units of megabytes.
With the - sign, the size will be subtracted from the actual size of
the logical volume.
The following command reduces the size of the logical volume by 40 MiB.
# lvreduce -L -40M /dev/vol_grp/lvol1
OR
# lvreduce -L -40M /dev/vol_grp/lvol1
Sample Output:

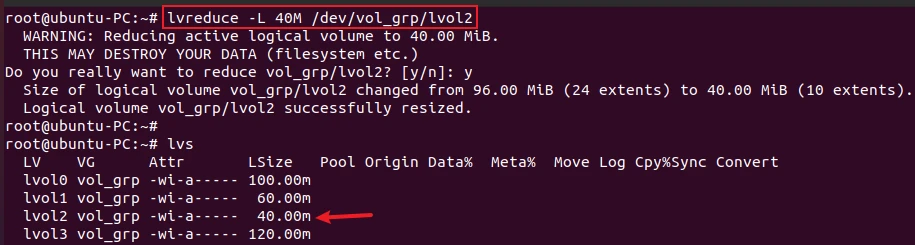
Without the - sign, the given size will be the new size of the logical
volume. The size should be smaller than the existing size.
# lvreduce -L 40M /dev/vol_grp/lvol2
OR
# lvreduce -L 40M /dev/vol_grp/lvol2
Sample Output:
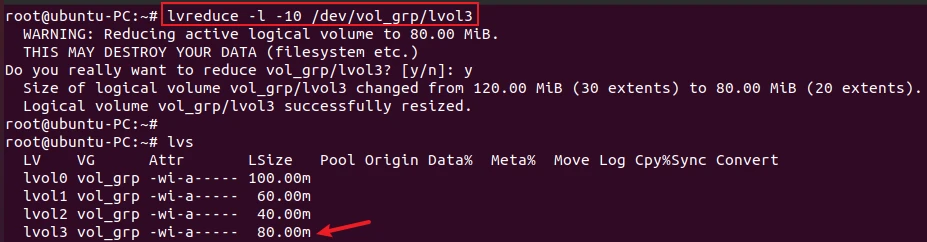
2. Reduce the size of the logical volume by logical extents
You can reduce the logical volume size in units of logical extents by
using -l or --extents option. With the - sign, the value is
subtracted from the actual size and without the - sign, the value will
be the new reduced size of the logical volume.
The following example reduces the logical volume lvol3 in the volume
group vol_grp by 10 extents.
# lvreduce -l -10 /dev/vol_grp/lvol3
OR
# lvreduce -l -10 /dev/vol_grp/lvol3
Sample Output:
3. Resize filesystem together with the logical volume
If the logical volume contains a file system, you must ensure that the
file system is not using the space in the logical volume that is being
reduced. In that case, you need to use -r or --resizefs option to
prevent data loss.
# lvreduce -r -L 40M /dev/vol_grp/lvol0
OR
# lvreduce --resizefs -L 40M /dev/vol_grp/lvol0
Sample Output:
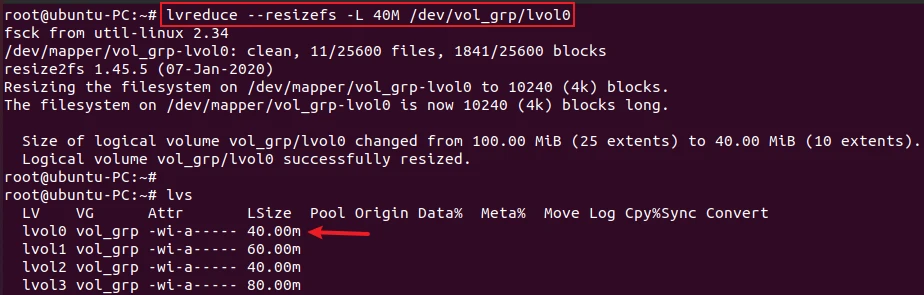
lvreduce tries to shrink the filesystem
before reducing the logical volume. If shrinking the filesystem fails,
the lvreduce command will fail and not attempt to reduce the logical
volume.
How to properly shrink non-root logical volume [Step-by-Step]
Reducing the size of the logical volume can lead to data loss on a filesystem located on that volume. You must first decrease the size of the filesystem to avoid possible data loss.
If you follow the steps below to reduce the logical volume then you don’t have to worry about any data loss. But it is still strictly recommended to backup your filesystem before performing any such operation.
Step-1: Unmount the filesystem
If the logical volume you are reducing is mounted to a filesystem other
than the root, you have to unmount the mount point with the umount
command.
root@ubuntu-PC:~# df -h /test
Filesystem                 Size  Used Avail Use% Mounted on
/dev/mapper/vol_grp-lvol3   74M   60K   68M   1% /test
root@ubuntu-PC:~#
root@ubuntu-PC:~# umount /test
Step-2: Check the filesystem for any errors
It is important to check the filesystem for errors before reducing its
size by using e2fsck command. The -f option is used to forcefully
check the file system, even if the filesystem is clean.
root@ubuntu-PC:~# e2fsck -f /dev/mapper/vol_grp-lvol3
e2fsck 1.45.5 (07-Jan-2020)
Pass 1: Checking inodes, blocks, and sizes
Pass 2: Checking directory structure
Pass 3: Checking directory connectivity
Pass 4: Checking reference counts
Pass 5: Checking group summary information
/dev/mapper/vol_grp-lvol3: 11/20480 files (9.1% non-contiguous), 1683/20480 blocks
Step-3: Reduce the filesystem
The next step is to reduce the filesystem by using the resize2fs
command.
The following command reduces the filesystem /test to 40M.
root@ubuntu-PC:~# resize2fs /dev/mapper/vol_grp-lvol3 40M
resize2fs 1.45.5 (07-Jan-2020)
Resizing the filesystem on /dev/mapper/vol_grp-lvol3 to 10240 (4k) blocks.
The filesystem on /dev/mapper/vol_grp-lvol3 is now 10240 (4k) blocks long.
Step-4: Reduce the logical volume
Now, we will reduce the logical volume to 40M using the lvreduce
command.
root@ubuntu-PC:~# lvreduce -L 40M /dev/vol_grp/lvol3
  WARNING: Reducing active logical volume to 40.00 MiB.
  THIS MAY DESTROY YOUR DATA (filesystem etc.)
Do you really want to reduce vol_grp/lvol3? [y/n]: y
  Size of logical volume vol_grp/lvol3 changed from 80.00 MiB (20 extents) to 40.00 MiB (10 extents).
  Logical volume vol_grp/lvol3 successfully resized.
Step-5: Mount the filesystem
After reducing the size of the logical volume, you can mount the
filesystem back using the mount command.
root@ubuntu-PC:~# mount /dev/vol_grp/lvol3 /test
root@ubuntu-PC:~#
root@ubuntu-PC:~# df -h /test
Filesystem                 Size  Used Avail Use% Mounted on
/dev/mapper/vol_grp-lvol3   34M   60K   31M   1% /test
Conclusion
We hope this article helps you to understand how to reduce the logical volume size using the lvreduce command. This article also covers the steps by steps instructions to properly reduce the logical volume without any data loss.
If you have any question or feedback, please let us know in the comment section below.
What’s Next
lvremove command examples in Linux [Cheat
Sheet]
10+ lvchange command examples in Linux [Cheat
Sheet]