
Overview on Logical Volume Manager
The Logical Volume Manager (LVM) provides tools to create virtual block devices from physical devices. LVM is a collection of one or more physical devices called Volume Group (VG), each physical device on the VG called a Physical Volume (PV). A Logical Volume (LV) is a virtual block device that can be used by the system or applications. Each block of data in an LV is stored on one or more PV in the VG, according to algorithms implemented by Device Mapper (DM) in the kernel.
LVM helps us to create flexible disk space management includes allocating disks, striping, mirroring, and resizing logical volumes. We are going to learn these in this tutorial.
For more information about LVM, please refer: Beginners guide to how LVM works in Linux
Lab Environment and Prerequisites
LVM tools are available on all the major Linux Distributions. You can refer this article for Any Linux system.
Install LVM on Linux servers:
If LVM is not installed on your system, use the below appropriate command to install lvm2 packages with your system’s package manager.
To install LVM on Rocky Linux, CentOS, Fedora, RHEL:
[root@testserver ~]# dnf -y install lvm2
To install LVM on Ubuntu, Debian, and Linux Mint:
[root@testserver ~]# apt install lvm2
In this tutorial, I have used an additional 2x10GB of drives as shown in the below snippet. You can use one or more drives of any size. I would suggest using USB Flash Drives on your local system for testing purposes.
Here I have 2x10GB additional disks sdb and sdc
1. Managing LVM Physical Volumes
Physical volumes are devices that are initialized using LVM, i.e., hard disk drives, solid-state drives, partitions, etc.
1.1 Why should I partition the disk?
We can create Physical volumes without partitioning like
pvcreate /dev/sdb . However, it is not recommended to do so because of
the management issues it can create. Any other OS that looks at the disk
will not recognize the LVM metadata and display the disk as being free,
so it is likely it will be overwritten. It is generally recommended that
you create a
single partition that covers the whole disk to label as an LVM
physical volume for Administrative convenience.
1.2 Create Disk partitions:
We have made GPT Partition
Table and created a partition using the full available space. Also,
Set the LVM flag on the partition with set 1 lvm on. Replace the
device name sdX with your device name. In my case, it was sdb and
sdc.
[root@testserver ~]# parted --script /dev/sdb "mklabel gpt"
[root@testserver ~]# parted --script /dev/sdb "mkpart 'LVM2' 0% 100%"
[root@testserver ~]# parted --script /dev/sdb "set 1 lvm on"

[root@testserver ~]# parted --script /dev/sdc "mklabel gpt"
[root@testserver ~]# parted --script /dev/sdc "mkpart 'LVM2' 0% 100%"
[root@testserver ~]# parted --script /dev/sdc "set 1 lvm on"
Run the following command to print the created partitions. You can also
confirm the partitions with commands lsblk (list block devices) and
blkid (locate /print block device attributes)
## Print /dev/sdb partition details
[root@testserver ~]# parted /dev/sdb print
Model: QEMU QEMU HARDDISK (scsi)
Disk /dev/sdb: 10.7GB
Sector size (logical/physical): 512B/512B
Partition Table: gpt
Disk Flags:
Number Start End Size File system Name Flags
1 1049kB 10.7GB 10.7GB LVM2 lvm
## Print /dev/sdc partition details
[root@testserver ~]# parted /dev/sdc print
Model: QEMU QEMU HARDDISK (scsi)
Disk /dev/sdc: 10.7GB
Sector size (logical/physical): 512B/512B
Partition Table: gpt
Disk Flags:
Number Start End Size File system Name Flags
1 1049kB 10.7GB 10.7GB LVM2 lvm
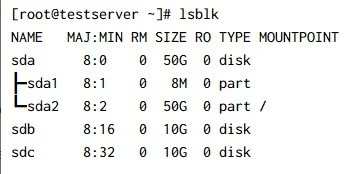
## List partitions using lsblk
[root@testserver ~]# lsblk
NAME MAJ:MIN RM SIZE RO TYPE MOUNTPOINT
sda 8:0 0 50G 0 disk
├─sda1 8:1 0 8M 0 part
└─sda2 8:2 0 50G 0 part /
sdb 8:16 0 10G 0 disk
└─sdb1 8:17 0 10G 0 part
sdc 8:32 0 10G 0 disk
└─sdc1 8:33 0 10G 0 part
[root@testserver ~]#
## List partitions using blkid
[root@testserver ~]# blkid
/dev/sda2: LABEL="cloudimg-rootfs" UUID="a973c41f-5500-4a23-ad95-b81eb77da647" BLOCK_SIZE="4096" TYPE="ext4" PARTLABEL="root" PARTUUID="5d05471e-5c46-423b-bf95-3c9c619bb75c"
/dev/sdb1: UUID="G1hRZO-Bnlc-TOuj-RPyD-8MR4-VyqV-WoShqe" TYPE="LVM2_member" PARTLABEL="LVM2" PARTUUID="9ce4c46c-035b-4d84-ae75-b8557fc73baf"
/dev/sdc1: UUID="WiQV7D-G6dE-7XWz-AMgE-lUNE-Be5s-SVbDky" TYPE="LVM2_member" PARTLABEL="LVM2" PARTUUID="f66bc0a6-89f2-452c-ae88-70486597f824"
/dev/sda1: PARTLABEL="BSP" PARTUUID="5f89cd1d-6475-4206-8336-b9a6f82ff4c1"
[root@testserver ~]#
1.3 Create Physical Volumes
Now, let us create the physical volumes using one or more disks. We are using both disks.
[root@testserver ~]# pvcreate /dev/sdb1 /dev/sdc1
  Physical volume "/dev/sdb1" successfully created.
  Physical volume "/dev/sdc1" successfully created.
To display the details of the physical volumes, use any following
commands pvscan, pvs , pvdisplay
# pvscan command result

[root@testserver ~]# pvscan
  PV /dev/sdb1                      lvm2 [<10.00 GiB]
  PV /dev/sdc1                      lvm2 [<10.00 GiB]
  Total: 2 [<20.00 GiB] / in use: 0 [0   ] / in no VG: 2 [<20.00 GiB]

# pvs command result

[root@testserver ~]# pvs
  PV         VG Fmt  Attr PSize   PFree
  /dev/sdb1     lvm2 ---  <10.00g <10.00g
  /dev/sdc1     lvm2 ---  <10.00g <10.00g

# pvdisplay command result

[root@testserver ~]# pvdisplay
  "/dev/sdb1" is a new physical volume of "<10.00 GiB"
  --- NEW Physical volume ---
  PV Name               /dev/sdb1
  VG Name
  PV Size               <10.00 GiB
  Allocatable           NO
  PE Size               0
  Total PE              0
  Free PE               0
  Allocated PE          0
  PV UUID               HvnkiZ-Nvbx-YdTp-We7Z-c1Ke-JT4K-dSrjWW

  "/dev/sdc1" is a new physical volume of "<10.00 GiB"
  --- NEW Physical volume ---
  PV Name               /dev/sdc1
  VG Name
  PV Size               <10.00 GiB
  Allocatable           NO
  PE Size               0
  Total PE              0
  Free PE               0
  Allocated PE          0
  PV UUID               ZldeOt-fi2e-guEL-2VNm-ACAj-X1HH-1pHA5K
1.4 Resize Physical Volume
We can resize physical volume(s) using pvresize. It works when PV
may already be in a VG and may have active LVs allocated on it. We
have resized the PV /dev/sdb1 to 8 GB in the below example.
[root@testserver ~]# pvresize --setphysicalvolumesize 8G /dev/sdb1
/dev/sdb1: Requested size 8.00 GiB is less than real size <10.00 GiB. Proceed?  [y/n]: y
  WARNING: /dev/sdb1: Pretending size is 16777216 not 20967424 sectors.
  Physical volume "/dev/sdb1" changed
  1 physical volume(s) resized or updated / 0 physical volume(s) not resized

# After resizing the PV sdb1

[root@testserver ~]# pvs
  PV         VG Fmt  Attr PSize   PFree
  /dev/sdb1     lvm2 ---    8.00g   8.00g
  /dev/sdc1     lvm2 ---  <10.00g <10.00g
1.5 Delete Physical Volume
Using pvremove, we can delete the physical volume(s). In the below
command, we are deleting the PV /dev/sdb1
[root@testserver ~]# pvremove /dev/sdb1
  Labels on physical volume "/dev/sdb1" successfully wiped.

# After the delete check for PV

[root@testserver ~]# pvdisplay /dev/sdb1
  Failed to find physical volume "/dev/sdb1".
2. Managing LVM Volume Groups
Physical volumes are combined into volume groups (VG) or A VG is a
collection of physical volumes of varying sizes and types. I have
re-added the deleted PV using the command pvcreate /dev/sdb1.
2.1 Create Volume Group
We can create a volume group from one or more physical volumes. In the
below example, I have created a VG named new_vg using our physical
volumes. vgcreate is the utility used to create VG.
[root@testserver ~]# vgcreate new_vg /dev/sdb1 /dev/sdc1
  Volume group "new_vg" successfully created
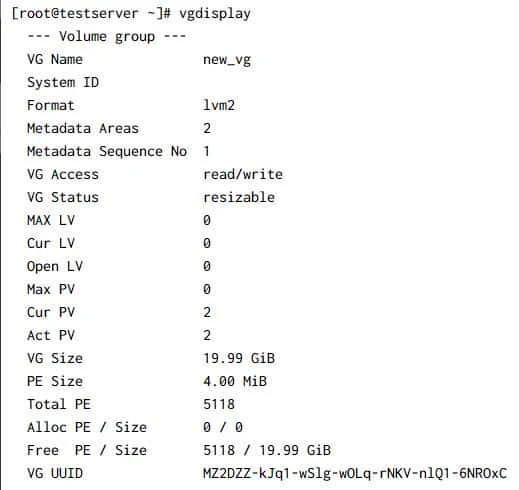
The VG new_vg has been created with 2 PVs. The following commands are
used to search and Display volume group information.
[root@testserver ~]# vgscan
  Found volume group "new_vg" using metadata type lvm2

[root@testserver ~]# vgs
  VG     #PV #LV #SN Attr   VSize  VFree
  new_vg   2   0   0 wz--n- 19.99g 19.99g
Sample Output:
2.2 Rename Volume Group
All VGs visible to a system need to have different names. Otherwise,
many LVM commands will refuse to run or give warning messages.
vgrename command is used to rename the existing VG.
[root@testserver ~]# vgrename new_vg new1_vg
  Volume group "new_vg" successfully renamed to "new1_vg"

[root@testserver ~]# vgscan
  Found volume group "new1_vg" using metadata type lvm2
The above command will rename the VG named new_vg to a new name
new1_vg. vgscan has found the new volume group “new1_vg”
2.3 Remove Physical Volume from a Volume Group
vgreduce command is used to remove unwanted/unused PVs from a Volume
Group. The removed physical volumes can be used in different VG.
Before removing a physical volume from a volume group, you need to make
sure that the physical volume is not used by any logical volumes by
displaying the information in pvdisplay command.
In the below example, I have removed the PV /dev/sdc1
[root@testserver ~]# vgreduce new1_vg /dev/sdc1
  Removed "/dev/sdc1" from volume group "new1_vg"

# Run pvs to confirm
[root@testserver ~]# pvs
  PV         VG      Fmt  Attr PSize   PFree
  /dev/sdb1  new1_vg lvm2 a--  <10.00g <10.00g
  /dev/sdc1          lvm2 ---  <10.00g <10.00g
2.4 Add Physical Volumes to a Volume Group
vgextend command is used to add one or more initialized physical
volumes to an existing volume group to extend it in size. In other
words, vgextend allows us to re-add the physical volumes missing for
any reason.
In the example, I have re-added the physical volume /dev/sdc1 to our
volume groupthat we had removed in the previous section
[root@testserver ~]# vgextend new1_vg /dev/sdc1
  Volume group "new1_vg" successfully extended

# Run vgs or pvs to confirm

[root@testserver ~]# vgs
  VG      #PV #LV #SN Attr   VSize  VFree
  new1_vg   2   0   0 wz--n- 19.99g 19.99g

[root@testserver ~]# pvs
  PV         VG      Fmt  Attr PSize   PFree
  /dev/sdb1  new1_vg lvm2 a--  <10.00g <10.00g
  /dev/sdc1  new1_vg lvm2 a--  <10.00g <10.00g
2.5 Remove Volume Group
vgremovecommand allows us to **delete the volume group that contains
no logical volumes.**In this example, I am going to delete the volume
group new1_vg where we have not created any logical volumes.
[root@testserver ~]# vgremove new1_vg
  Volume group "new1_vg" successfully removed

# Confirm the VG has been removed

[root@testserver ~]# vgdisplay new1_vg
  Volume group "new1_vg" not found
  Cannot process volume group new1_vg
2.6 Activating and Deactivating Volume Group
The volume group will be activated by default when it’s created. We can
deactivate or activate a volume group using vgchange We can deactivate
individual logical volumes with thelvchange command. We can discuss
this in the next section.
# To Deactivate VG
[root@testserver ~]# vgchange -a n new1_vg

# To Activate VG
[root@testserver ~]# vgchange -a y new1_vg
3. Managing LVM Logical Volumes
3.1 Linear Volumes
A linear volume aggregates multiple physical volumes into one logical volume. In other words, linear means arranged in or extending along a straight. For example; We have 2 physical volumes of 10 GB each. When we create an LV of 2GB in size, it will create the volume in the first disk. If we create a logical volume above 15 GB, the logical volume will use both the disk. Creating a linear volume assigns a range of physical extents to an area of a logical volume in order.
3.2 Create Logical Volumes
lvcreate is used to create logical volumes. Created the VG
new_vg again. In the example, I have created 2 LVs test1_lv and
test2_lv under the volume group new_vg
[root@testserver ~]# lvcreate -L 2G -n test1_lv new_vg
  Logical volume "test1_lv" created.

[root@testserver ~]# lvcreate -L 2G -n test2_lv new_vg
  Logical volume "test2_lv" created.
We can make use of the following commands to list all logical volumes in volume groups and to get information about the created LVs.
[root@testserver ~]# lvscan
  ACTIVE            '/dev/new_vg/test1_lv' [2.00 GiB] inherit
  ACTIVE            '/dev/new_vg/test2_lv' [2.00 GiB] inherit

[root@testserver ~]# lvs
  LV       VG     Attr       LSize Pool Origin Data%  Meta%  Move Log Cpy%Sync Convert
  test1_lv new_vg -wi-a----- 2.00g
  test2_lv new_vg -wi-a----- 2.00g
3.3 Rename Logical Volumes
Use lvrename command to rename an existing logical volume. The
following command renames logical volume test1_lv to test_lv
[root@testserver ~]# lvrename new_vg test1_lv test_lv
  Renamed "test1_lv" to "test_lv" in volume group "new_vg"

# Confirm the LV is renamed

[root@testserver ~]# lvscan
  ACTIVE            '/dev/new_vg/test_lv' [2.00 GiB] inherit
  ACTIVE            '/dev/new_vg/test2_lv' [2.00 GiB] inherit
3.4 Snapshot Volumes
LVM snapshot is the state of a logical volume at a particular point in
time. Snapshots of volumes are often used to enhance data protection. If
we have accidentally
deleted any
files from the active logical volume, we can recover them from the
snapshot if it has it. Snapshot is not a mirroring volume. A snapshot is
only a logical copy of volume content, captured at a particular point in
time. Using lvcreate we can create a snapshot test_lv-snaphost of
logical volume /dev/new_vg/test_lvas below.
[root@testserver ~]# lvcreate -s -L 2G -n test_lv-snaphost /dev/new_vg/test_lv
  Logical volume "test_lv-snaphost" created.

[root@testserver ~]# lvscan
  ACTIVE   Original '/dev/new_vg/test_lv' [2.00 GiB] inherit
  ACTIVE            '/dev/new_vg/test2_lv' [2.00 GiB] inherit
  ACTIVE   Snapshot '/dev/new_vg/test_lv-snaphost' [2.00 GiB] inherit

[root@testserver ~]# lvdisplay -m /dev/new_vg/test_lv
  --- Logical volume ---
  LV Path                /dev/new_vg/test_lv
  LV Name                test_lv
  VG Name                new_vg
  LV UUID                LNVUj4-eSyT-5VBu-ifua-bxPw-BbC1-ZSCpEA
  LV Write Access        read/write
  LV Creation host, time testserver.testserver.com, 2021-08-10 06:54:40 +0000
  LV snapshot status     source of
                         test_lv-snaphost [active]
  LV Status              available
  # open                 0
  LV Size                2.00 GiB
  Current LE             512
  Segments               1
  Allocation             inherit
  Read ahead sectors     auto
  - currently set to     8192
  Block device           253:0

  --- Segments ---
  Logical extents 0 to 511:
    Type        linear
    Physical volume /dev/sdb1
    Physical extents    0 to 511
We can use lvscan lvs andlvdispaly commands to display the
snapshot details. We can also resize the snapshot volumes using
lvextend or lvreduce.
Please refer the article for more info: Linux lvm snapshot backup and restore tutorial RHEL/CentOS 7/8
3.5 Remove logical volume
lvremove command is used to remove one or more LVs. LVs cannot be
deactivated or removed while they
are open (if LVs mounted). Removing an origin LV will also remove all
dependent snapshots. In the below example we are removing only the
snapshot volume that we had created in the previous section.
[root@testserver ~]# lvremove /dev/new_vg/test_lv-snaphost
Do you really want to remove active logical volume new_vg/test_lv-snaphost? [y/n]: y
  Logical volume "test_lv-snaphost" successfully removed

[root@testserver ~]# lvs
  LV       VG     Attr       LSize Pool Origin Data%  Meta%  Move Log Cpy%Sync Convert
  test2_lv new_vg -wi-a----- 2.00g
  test_lv  new_vg -wi-a----- 2.00g
3.6 Create file systems and mount the Logical Volumes
In this tutorial, we have learned that Logical volumes are block devices
that are created from the physical extents present in the same volume
group. To use the LVs to store our data, we need to create file systems.
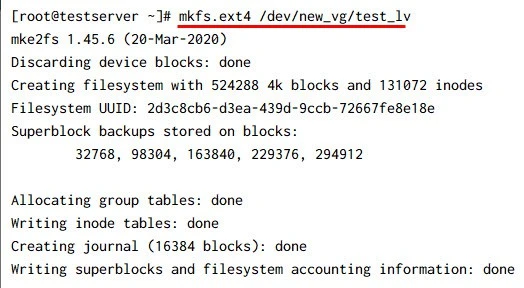
mkfs is used to build a Linux filesystem on a device. Either xfs or
ext4 is the default filesystems on all recent major Linux distributions.
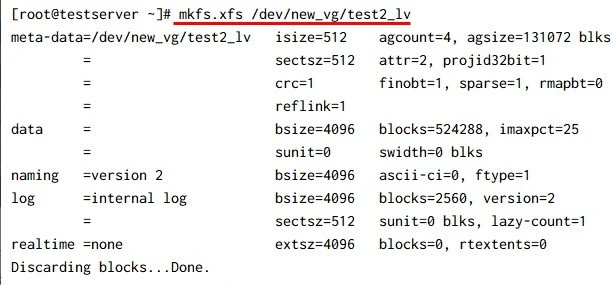
In the example, we are creating both xfs and ext4 filesystems on the 2
logical volumes we have. Create ext4 on the LV /dev/new_vg/test_lv and
xfs on /dev/new_vg/test2_lv.
Create ext4 filesystem on test_lv
Create xfs filesystem on test2_lv
We can use the
Linux
commands lsblk -f or blkid to list the filesystems that we have
created using LVs. Once the
filesystems
are created, we need to mount them to some directories called mount
points. So, let’s temporarily create 2 directories under /mnt as shown
below and mount the logical volumes using mount command.
# List the filesystems we created
[root@testserver ~]# blkid | grep _lv
/dev/mapper/new_vg-test_lv: UUID="2d3c8cb6-d3ea-439d-9ccb-72667fe8e18e" BLOCK_SIZE="4096" TYPE="ext4"
/dev/mapper/new_vg-test2_lv: UUID="2ffd5fc3-f603-4260-910e-c7579b5beb3e" BLOCK_SIZE="512" TYPE="xfs"

# Create mount points and mount

[root@testserver ~]# mkdir /mnt/lv_volume1 /mnt/lv_volume2
[root@testserver ~]# mount -t ext4 /dev/new_vg/test_lv /mnt/lv_volume1
[root@testserver ~]# mount -t xfs /dev/mapper/new_vg-test2_lv /mnt/lv_volume2

# Check the mounts with df command
[root@testserver ~]# df -h /mnt/lv_volume*
Filesystem                   Size  Used Avail Use% Mounted on
/dev/mapper/new_vg-test_lv   2.0G  6.0M  1.8G   1% /mnt/lv_volume1
/dev/mapper/new_vg-test2_lv  2.0G   47M  2.0G   3% /mnt/lv_volume2
We can display the mounted volumes using the df command. The df -h
command reports the mounted filesystem and the file system disk space.
3.7 Extend Logical Volumes
lvextend is used to add space to a logical volume. Resizing the
filesystems is the main task for system admins. Due to the flexible disk
space management i.e Resizing capability, Logical Volume Manager is
used.
In the example let us extend both the logical volumes to 3 GB.
[root@testserver ~]# lvextend -L 3G /dev/new_vg/test_lv
  Size of logical volume new_vg/test_lv changed from 2.00 GiB (512 extents) to 3.00 GiB (768 extents).
  Logical volume new_vg/test_lv successfully resized.

[root@testserver ~]# lvextend -L 3G /dev/new_vg/test2_lv
  Size of logical volume new_vg/test2_lv changed from 2.00 GiB (512 extents) to 3.00 GiB (768 extents).
  Logical volume new_vg/test2_lv successfully resized.

[root@testserver ~]# lvs
  LV       VG     Attr       LSize Pool Origin Data%  Meta%  Move Log Cpy%Sync Convert
  test2_lv new_vg -wi-ao---- 3.00g
  test_lv  new_vg -wi-ao---- 3.00g
In the above example, we have successfully extended our logical volumes. However, the mounted volumes still show the old size.
[root@testserver ~]# df -h /mnt/lv_volume*
Filesystem                   Size  Used Avail Use% Mounted on
/dev/mapper/new_vg-test_lv   2.0G  6.0M  1.8G   1% /mnt/lv_volume1
/dev/mapper/new_vg-test2_lv  2.0G   47M  2.0G   3% /mnt/lv_volume2
To expand the filesystem to its actual size we need to use the commands
resize2fs in the case of ext filesystems and xfs_growfs in the
case of xfs filesystems. We can expand the filesystems when it’s
mounted. The existing contents of the filesystem are undisturbed, and
the added space becomes available for additional file storage.
# Resize ext filesystems
[root@testserver ~]# resize2fs /dev/mapper/new_vg-test_lv
resize2fs 1.45.6 (20-Mar-2020)
Filesystem at /dev/mapper/new_vg-test_lv is mounted on /mnt/lv_volume1; on-line resizing required
old_desc_blocks = 1, new_desc_blocks = 1
The filesystem on /dev/mapper/new_vg-test_lv is now 786432 (4k) blocks long.

# Resize ext filesystems
[root@testserver ~]# xfs_growfs /dev/mapper/new_vg-test2_lv
meta-data=/dev/mapper/new_vg-test2_lv isize=512    agcount=4, agsize=131072 blks
         =                       sectsz=512   attr=2, projid32bit=1
         =                       crc=1        finobt=1, sparse=1, rmapbt=0
         =                       reflink=1
data     =                       bsize=4096   blocks=524288, imaxpct=25
         =                       sunit=0      swidth=0 blks
naming   =version 2              bsize=4096   ascii-ci=0, ftype=1
log      =internal log           bsize=4096   blocks=2560, version=2
         =                       sectsz=512   sunit=0 blks, lazy-count=1
realtime =none                   extsz=4096   blocks=0, rtextents=0
data blocks changed from 524288 to 786432

# Confirm the filesystems are extended using df command
[root@testserver ~]# df -h /mnt/lv_volume*
Filesystem                   Size  Used Avail Use% Mounted on
/dev/mapper/new_vg-test_lv   2.9G  6.0M  2.8G   1% /mnt/lv_volume1
/dev/mapper/new_vg-test2_lv  3.0G   54M  3.0G   2% /mnt/lv_volume2
The above example that the filesystems are extended to 3GB each. (We can ignore small differences in size as we had used 2 different types of filesystems here for the example)
3.8 Shrink Logical Volumes
We can reduce the size of a logical volume with the lvreduce. However,
we should be more careful when doing so. make sure you are not
reducing the size below your actual data size. So, lets follow the below
steps to shrink the logical volumes:
Step-1. Unmount the filesystems
Let us unmount the filesystem using umount command as shown below. If
any services using the mountpoints, we should stop the service first.
[root@testserver ~]# umount -v /mnt/lv_volume1
umount: /mnt/lv_volume1 unmounted
Step-2. Run filesystem checks
Before resizing the logical volumes, it is good practice to run fsck (Filesystem checks) on ext filesystems. So let us unmount an run the fsck as shown in below. We running fsck on volume /dev/mapper/new_vg-test_lv which was mounted to /mnt/lv_volume1.
[root@testserver ~]# fsck -f /dev/new_vg/test_lv
fsck from util-linux 2.32.1
e2fsck 1.45.6 (20-Mar-2020)
Pass 1: Checking inodes, blocks, and sizes
Pass 2: Checking directory structure
Pass 3: Checking directory connectivity
Pass 4: Checking reference counts
Pass 5: Checking group summary information
/dev/mapper/new_vg-test_lv: 11/196608 files (0.0% non-contiguous), 30268/786432 blocks
Step-3. Shrink the filesystem using resize2fs
Before running lvreduce, we need to use resize2fs to resize the filesystem. In the below example I have resized the ext4 filesystem to 2GB.
[root@testserver ~]# resize2fs /dev/mapper/new_vg-test_lv 2G
resize2fs 1.45.6 (20-Mar-2020)
Resizing the filesystem on /dev/mapper/new_vg-test_lv to 524288 (4k) blocks.
The filesystem on /dev/mapper/new_vg-test_lv is now 524288 (4k) blocks long.
Step-4. Reduce logical volume using lvreduce
Once the filesystem is shrinked, lets run lvreduce to reduce the size
to 2GB. It will ask for confirmation as to make sure you have considered
all the drawbacks of the lvreduce. Use command lvs after the lvreduce
activity.
[root@testserver ~]# lvreduce -L 2G /dev/mapper/new_vg-test_lv
  WARNING: Reducing active logical volume to 2.00 GiB.
  THIS MAY DESTROY YOUR DATA (filesystem etc.)
Do you really want to reduce new_vg/test_lv? [y/n]: y
  Size of logical volume new_vg/test_lv changed from 3.00 GiB (768 extents) to 2.00 GiB (512 extents).
  Logical volume new_vg/test_lv successfully resized.
Step-5. Run fsck again and mount the LV
Running fsck again is optional. However, it clears if any errors occurred during resize.
[root@testserver ~]# fsck -f /dev/mapper/new_vg-test_lv
fsck from util-linux 2.32.1
e2fsck 1.45.6 (20-Mar-2020)
Pass 1: Checking inodes, blocks, and sizes
Pass 2: Checking directory structure
Pass 3: Checking directory connectivity
Pass 4: Checking reference counts
Pass 5: Checking group summary information
/dev/mapper/new_vg-test_lv: 11/131072 files (0.0% non-contiguous), 26156/524288 blocks

[root@testserver ~]# mount -t ext4 /dev/new_vg/test_lv /mnt/lv_volume1

# Confirm the volume has reduced to 2GB
[root@testserver ~]# lvs /dev/new_vg/test_lv
  LV      VG     Attr       LSize Pool Origin Data%  Meta%  Move Log Cpy%Sync Convert
  test_lv new_vg -wi-ao---- 2.00g

[root@testserver ~]# df -h /mnt/lv_volume1
Filesystem                  Size  Used Avail Use% Mounted on
/dev/mapper/new_vg-test_lv  2.0G  6.0M  1.8G   1% /mnt/lv_volume1
xfsdump we can back up files and
their attributes and using xfsrestore we can restore it.
3.9 Resize a logical volume using lvresize
In the previous sections, we have learned how to extend and reduce the
filesystems using lvextend and lvreducecommands. We have an
alternative command lvresize to resize the filesystems in onliner.
In the below example I have used lvresize to extend the volume
/dev/mapper/new_vg-test_lv to +1GB (i.e Total 3GB)
[root@testserver ~]# lvresize --resizefs --size +1GB /dev/mapper/new_vg-test_lv
  Size of logical volume new_vg/test_lv changed from 2.00 GiB (512 extents) to 3.00 GiB (768 extents).
  Logical volume new_vg/test_lv successfully resized.
resize2fs 1.45.6 (20-Mar-2020)
Filesystem at /dev/mapper/new_vg-test_lv is mounted on /mnt/lv_volume1; on-line resizing required
old_desc_blocks = 1, new_desc_blocks = 1
The filesystem on /dev/mapper/new_vg-test_lv is now 786432 (4k) blocks long.

# Confirm the resize

[root@testserver ~]# lvs /dev/mapper/new_vg-test_lv
  LV      VG     Attr       LSize Pool Origin Data%  Meta%  Move Log Cpy%Sync Convert
  test_lv new_vg -wi-ao---- 3.00g

[root@testserver ~]# df -h /mnt/lv_volume1
Filesystem                  Size  Used Avail Use% Mounted on
/dev/mapper/new_vg-test_lv  2.9G  6.0M  2.8G   1% /mnt/lv_volume1
lvresize resizes an LV in the same way as lvextend and lvreduce.
However, it is not recommended to use it for shrinking the volume. To
shrink the volumes, Just to be on the safe side we can follow the steps
used in the section Reduce logical volume using lvreduce.
3.10 Activate and Deactivate the logical volumes
lvchange allows you to change the attributes of a logical volume. The
following examples explain deactivating and activating the logical
volumes.
Deactivate logical volumes
# unmount the LV
[root@testserver ~]# umount /mnt/lv_volume1

# Deactivate the LV
[root@testserver ~]# lvchange -a n /dev/new_vg/test_lv

# Check LV status
[root@testserver ~]# lvscan
  inactive          '/dev/new_vg/test_lv' [3.00 GiB] inherit
  ACTIVE            '/dev/new_vg/test2_lv' [3.00 GiB] inherit
3.11 Activate logical volumes
[root@testserver ~]# lvchange -a y /dev/new_vg/test_lv

[root@testserver ~]# lvscan
  ACTIVE            '/dev/new_vg/test_lv' [3.00 GiB] inherit
  ACTIVE            '/dev/new_vg/test2_lv' [3.00 GiB] inherit
References
Configuring and managing logical
volumes
Logical Volume Manager
