![How to log an object in Node.js [Practical Examples]](/log-an-object-in-node-js/nodejs_log_object.jpg)
Learning how to log an object in Node.js helps you work with objects comfortably.Although you can use multiple ways to console-log an object’s content, the two primary ways are using
the util module
const util = require('util');
console.log(util.inspect( <object>, {<options>} ));
where theinspect method takes the target object and reveals its contents depending on the supplied options.
OR
JSON
console.log('<message> %j', <object>);
// OR
console.log(JSON.stringify(<object>, <replacer>, <indentation level>));
where %j represents JSON in string format. Alternatively, you can
control the output using the stringify() method.
This tutorial walks you through how to log an object in Node.js
practically using the console.log() method with the util module or
JSON. Lastly, you will find an alternative way to view an entire object
tree without the console.log() method.
First, it would be best to understand the options we will use. Let’s get started.
Learn how to log an object in Node.js by understanding the available options
This section teaches you how the console.log() method, the util
module, and JSON work. With that knowledge, you will find it comfortable
to apply them.
Option-1: Using the console object
The console object is one of the high-level Node APIs for printing any
data type. It has multiple methods like the log() method, mainly used
during Node.js debugging.
console.log() extends to the process object, an interface for reading
or writing to the operating system. For example, we can print the
new Date() using the process object.
process.stdout.write(new Date().toString())
The process object expects a string input. That is why we convert the new Date() object to a string before writing to the OS.
The best part is that the high-level console.log() method does the
lengthy work for you. So, you don’t have to convert most of the built-in
objects to a string before printing them.
console.log(new Date())
Otherwise, you must convert the object into a string before inspecting its contents.
You can customize console.log() to print a massive object, throwing
its hugely nested branches. Better yet, you can effortlessly control the
output using the higher-level console.dir() method.
Option-2: Using the util module
The util module presents you with multiple functions to print
formatted strings. Most of the utility functions are significant for
Node.js
debugging.
For example, during debugging, the inspect() method lets you control
an object’s content to your desired nesting level and appearance. It
does that through many options like
showHidden: a boolean property revealing (or not) an object’s enumerable properties. It defaults to false.depth: the number of nested levels you wish to recurse. It defaults to 2. You can recurse all branches by setting it tonull.colorize: enables the pretty printing of the output.
Option-3: Using JSON
JSON, short for JavaScript Object Notation, is a data representation format mainly used to work with API and configuration data.
Its familiarity with data handling arises from its lightweight, easy-to-integrate, readable, and writable formats. Being a superset of JavaScript, you do not import any library to work with JSON in Node.js.
You can print JSON data by console-logging its string %j
representation of an object. Or use the stringify() method to handle
more readable data.
Now that you understand the needed tools, let me show you how to log an object in Node.js practically.
Set up Lab Environment
Create and open an entry file with a code editor. Next, build a deeply nested object tree.
const managers = {
 do : {
   teams : [
     {
       re : {
         teams : [
           {
             mi : {
               teams : [],
               roles : ['HR']
             }
           },
           {
             fa: {
               teams: [],
               roles: ['Sales']
             }
           }
         ]
       },
     },
     {
     so : {
       teams: [],
       roles: ['Marketing']
     }
     }
   ]
 },
 la : {
   teams : [
     {
       ti : {
         teams : [
           {
             doo : {
               teams : [
                 {
                   jane : {
                     teams : [],
                     roles : ['AI']
                   },
                   doe : {
                     teams: [
                       {
                         sam : {
                           teams: [],
                           roles: ['DS']
                         }
                       }
                     ]
                   }
                 }
               ],
             },
             smith : {
               teams : [],
               roles : ['Web3']
             }
           }
         ]
       }
     }
   ]
 }
}
I have created the managers object with deeply nested subcategories
(of teams and roles) inside the index.js file.If you console-log
the object,
console.log(managers)
you will get concealed objects.
{ do: { teams: [ [Object], [Object] ] }, la: { teams: [ [Object] ] } }
Here is how to see the hidden branches.
Example~1: How to log an object in Node.js using the util module
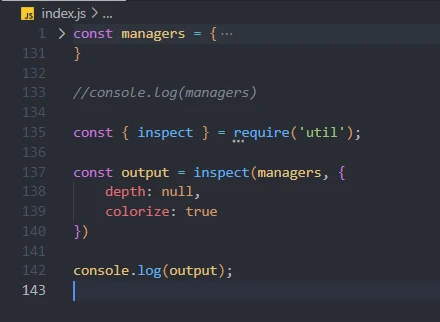
Import the inspect() method from the util module.
const { inspect } = require('util');
Store the output.
const output = inspect(managers, {
 depth: null,
 colorize: true
})
We print a colorized output revealing every child of the managers
object tree.
Now log the output on the console.
console.log(output)
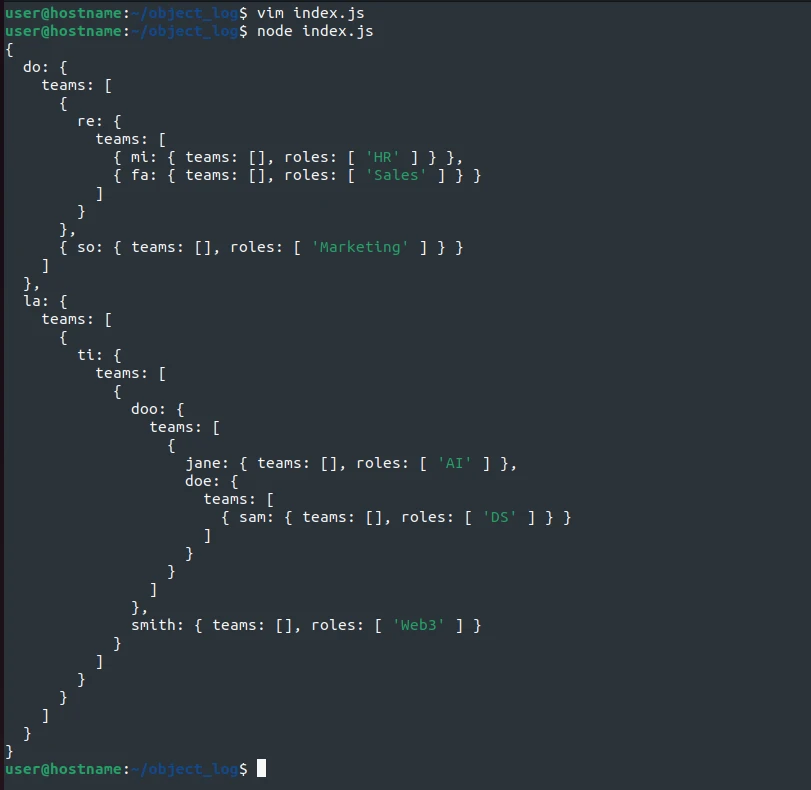
Finally, let’s run the file with the node command.
node index.js
We get the expected output.
Example~2: How to log an object in Node.js using JSON methods
Method-1: console-logging JSON
The simplest way to decode an object is to console-log an unpretty JSON version.
console.log('managers: %j', managers)
You get a less organized object structure.
managers: {"do":{"teams":[{"re":{"teams":[{"mi":{"teams":[],"roles":["HR"]}},{"fa":{"teams":[],"roles":["Sales"]}}]}},{"so":{"teams":[],"roles":["Marketing"]}}]},"la":{"teams":[{"ti":{"teams":[{"doo":{"teams":[{"jane":{"teams":[],"roles":["AI"]},"doe":{"teams":[{"sam":{"teams":[],"roles":["DS"]}}]}}]},"smith":{"teams":[],"roles":["Web3"]}}]}}]}}
Here is how to log an organized object structure using the
JSON.stringify() method.
Method-2: JSON.stringify() method
Feed the JSON.stringify() function with the managers object.
console.log(JSON.stringify(managers, null, 2))
null means we do not replace the object, and 2 is an indentation level (of two white spaces).
On rerunning the index.js file,
node index.js
you get the following output:
{
"do": {
 "teams": [
  {
   "re": {
    "teams": [
     {
      "mi": {
       "teams": [],
       "roles": [
        "HR"
       ]
      }
     },
     {
      "fa": {
       "teams": [],
       "roles": [
        "Sales"
       ]
      }
     }
    ]
   }
  },
  {
   "so": {
    "teams": [],
    "roles": [
     "Marketing"
    ]
   }
  }
 ]
},
"la": {
 "teams": [
  {
   "ti": {
    "teams": [
     {
      "doo": {
       "teams": [
        {
         "jane": {
          "teams": [],
          "roles": [
           "AI"
          ]
         },
         "doe": {
          "teams": [
           {
            "sam": {
             "teams": [],
             "roles": [
              "DS"
             ]
            }
           }
          ]
         }
        }
       ]
      },
      "smith": {
       "teams": [],
       "roles": [
        "Web3"
       ]
      }
     }
    ]
   }
  }
 ]
}
}
Bonus tricks
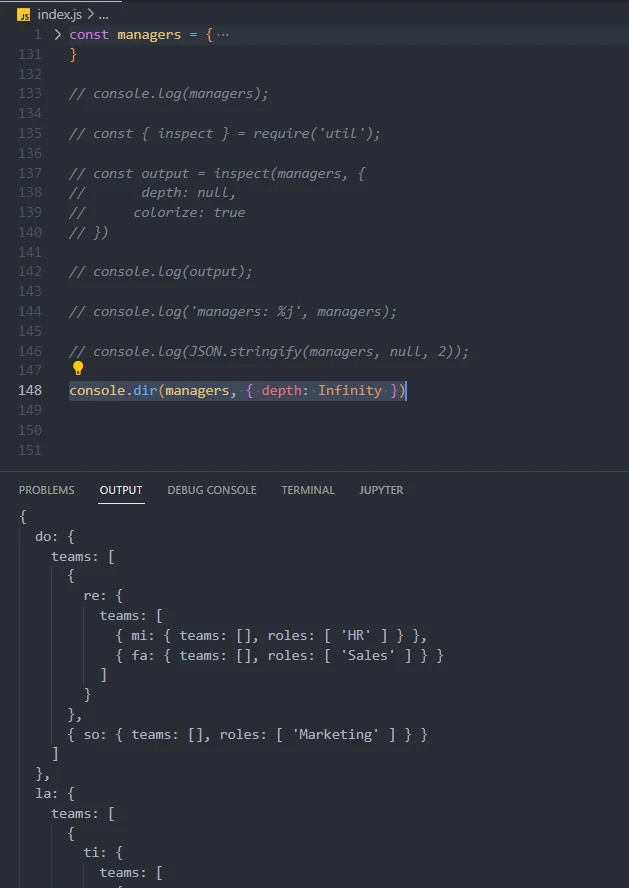
Apart from console.log(), we can also get the desired tree view using
the console.dir() method with a depth of any integer.
console.dir(managers, { depth: 5 })
Better yet, we can set the depth value as Infinity to enable us to see all the object tree branches.
console.dir(managers, { depth: Infinity })
Conclusion
Knowing how to log an object in Node.js is straightforward if you
understand the process and console objects, the util module, and JSON.
Then, you can control the viewable tree depth, as shown in this
tutorial.