![Setup local YUM/DNF repo server Rocky Linux 8 [Step-by-Step]](/local-offline-yum-dnf-repo-http-rocky-linux-8/offline_repo.jpg)
Rocky Linux Local YUM/DNF Repository - Overview
Rocky Linux is a community enterprise Operating System designed to be 100% bug-for-bug compatible with Enterprise Linux. The CentOS project recently announced a shift in strategy for CentOS. Whereas previously CentOS existed as a downstream build of its upstream vendor. Rocky Linux aims to function as a downstream build as CentOS had done previously, building releases after they have been added to the upstream vendor.
YUM/DNF repository or in short we can call it repo is the place where
the rpm packages are stored from which your system retrieves and
installs OS updates and applications. We can have a local repository
server on our LAN (Local Area Network). This local repository lets you
save bandwidth for downloading packages from the internet.
Advantages of having a local repository
Following are some benefits of having an offline local YUM or DNF repository server:
- The local repository lets you save internet bandwidth.
- We don’t need an internet connection on the machines in LAN to install software packages.
- The download speed will be more when we have local repo. So we can save more time.
In Rocky Linux there are mainly two repositories which are enabled by
default. BaseOS and AppStream.
BaseOSrepository is intended to provide a core set of the underlying OS functionality that provides the foundation for all installations.AppStreamrepository includes additional user-space applications, runtime languages, and databases in support of the varied workloads and uses cases.
Lab Environment and Prerequisites
You will need to set up two Rocky Linux 8 systems. One is for the master repository server and the other one is the client machine. Please refer the article for Install Rocky Linux 8 [Step-by-Step with Screenshots]
We will create one server are our local offline yum/dnf repository server with HTTP using Nginx. This server will be connected to internet to download the latest packages. Later you can use this server inside your private network to configure offline repository. So this server will then act as your repo server for the private network with no internet access.
We have updated our /etc/hosts so that we can use the DNS name to
connect to the repo server:
echo "192.168.0.100 reposerver.example.com reposerver" >> /etc/hosts
Step 1: Install HTTP server - Nginx
Yum/DNF typically delivers files over either FTP or HTTP. However, you cannot configure for both. In this tutorial, we are going to set up an HTTP local repository. Let us begin with installing Nginx. We can also use Apache HTTP server
We can install Nginx from the default appstream repository in Rocky
Linux 8.
[root@reposerver ~]# dnf install nginx
Add Nginx to target and restart the service.
[root@reposerver ~]# systemctl enable nginx --now
Created symlink /etc/systemd/system/multi-user.target.wants/nginx.service → /usr/lib/systemd/system/nginx.service.
Next check the status of the nginx service, it should be up and running:
Step 2: Create a local DNF/YUM repository
We can check the default enabled repositories from the below command.
dnf repolist allcommand will list all the repositories including the
disabled ones.

2.1 Install yum-utils
yum-utils is a collection of tools and programs for managing yum
repositories.
[root@reposerver ~]# dnf install yum-utils
2.2 Create a Directory to Store the Repositories
Now we can create some folders for storing the packages.
/usr/share/nginx/html is the default Nginx web root directory. Let us
create the directories as below.
[root@reposerver ~]# mkdir /usr/share/nginx/html/repos
[root@reposerver ~]# mkdir -p /usr/share/nginx/html/repos/{baseos,appstream}
Step 3: Synchronize repositories
dnf reposync is used to synchronize repositories to the local
directories as shown. In the below example, we are syncing the baseos
and appstream repositories. It will take a couple of hours to sync all
the packages from the default repo.
[root@reposerver ~]# dnf reposync -g --delete -p /usr/share/nginx/html/repos/ --repoid=baseos --newest-only --download-metadata
[root@reposerver ~]# dnf reposync -g --delete -p /usr/share/nginx/html/repos/ --repoid=appstream --newest-only --download-metadata
-g: Remove packages that fail GPG signature checking after downloading.--delete: Delete local packages no longer present in the repository.-p: Root path under which the downloaded repositories are stored--newest-only: Download only newest packages per-repo.--download-metadata: Download all repository metadata.
Step 4: Create a Cron Job to Synchronize repositories
We can also configure a cron job to Synchronize the repositories daily.
Let us create a very simple bash script to run the cron jobs daily.
Update the below content in a file /etc/cron.daily/update-localrepos.
This cron will run daily to update the repositories.
#!/bin/bash
/bin/dnf reposync -g --delete -p /usr/share/nginx/html/repos/ --repoid=baseos --newest-only --download-metadata
/bin/dnf reposync -g --delete -p /usr/share/nginx/html/repos/ --repoid=appstream --newest-only --download-metadata
baseos
and appstream. You can try to sync any other repositories using the
same commands. You just need to replace the repo id.
Step 5: Configure Nginx
We have already installed Nginx in Step 1. In this section, let us
configure it. We have to create a file
/etc/nginx/conf.d/repos.confand add the below contents. We are using
server_name as reposerver.example.com. You can change this to your
own domain name. autoindex on will enable the directory listing on
Nginx.
# vi /etc/nginx/conf.d/repos.conf
server {
        listen   80;
        server_name  reposerver.example.com;
        root   /usr/share/nginx/html/repos;
    index index.html;
    location / {
                autoindex on;
        }
}
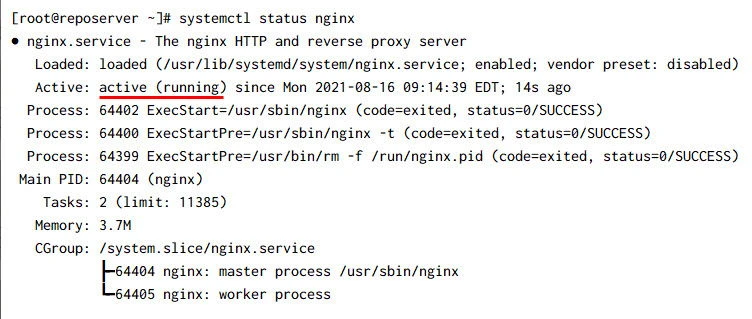
Once the above file is configured. We need to restart the Nginx and check the status to make sure the service has properly started
[root@reposerver ~]# systemctl restart nginx

[root@reposerver ~]# systemctl status nginx
Step 6: Configure Firewall and SELinux
If you have enabled firewall on the server, you need to open ports 80 and 443 of the Nginx service to allow HTTP and HTTPS web traffic.
[root@reposerver ~]# firewall-cmd --zone=public --permanent --add-service=http
success

[root@reposerver ~]# firewall-cmd --zone=public --permanent --add-service=https
success

[root@reposerver ~]# firewall-cmd --reload
success
Once the ports are enabled, you should be able to access the default Nginx page via a web browser using server hostname or IP
Check the status of SELinux using the below command.
[root@reposerver ~]# getenforce
Enforcing
If the SELinux status is Permissive or Disabled then you may choose to ignore this step.If it is Enforcing, run the below command to fix the change file SELinux security context:
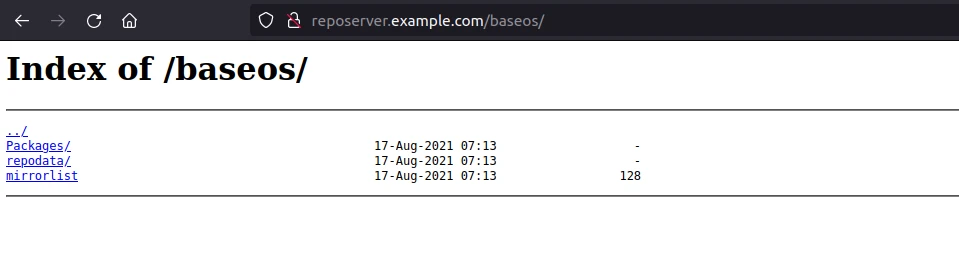
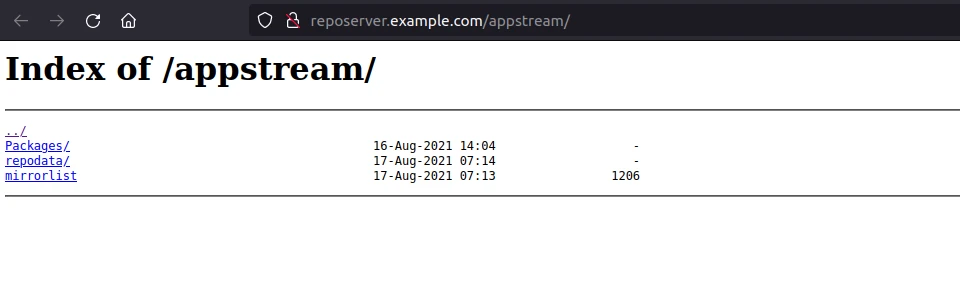
[root@reposerver ~]# chcon -Rt httpd_sys_content_t /usr/share/nginx/html/repos/
Once the permissions are set. You should be able to access the repo URLs. In the example our baseos and appstream repositories are loading as shown in the below snippets:
Step 7: Set up the client to use offline YUM/DNF repository
Now set up a local Yum Repository on a client’s machine. My client machine is also installed with Rocky Linux 8. Make sure the client node has network connectivity to reach your repo server.
7.1 Move the existing repo
We can move or remove the existing repositories. It is not compulsory though and is completely optional. If you are already using some other repository then you can ignore this step:
[root@client ~]# mv /etc/yum.repos.d/*.repo /tmp/
7.2 Create a new repo file
Let us create a new repo file under the /etc/yum.repos.d/ directory.
In the example, I have created a file /etc/yum.repos.d/localrepo.repo
with the below contents.
I have used domain reposerver.example.com. You can replace it with
your own domain. If you do not have a local DNS
Server then make sure you update your /etc/hosts file to map
reposerver.example.com. You can also use the IP address instead of the
domain name.
[root@client ~]# vi /etc/yum.repos.d/localrepo.repo
[localrepo-base]
name=RockyLinux Base
baseurl=http://reposerver.example.com/baseos/
gpgcheck=0
enabled=1

[localrepo-appstream]
name=RockyLinux Base
baseurl=http://reposerver.example.com/appstream/
gpgcheck=0
enabled=1
7.3 Clean DNF cache and check repolist
Let us clean the DNF cache and check the repo list. Under the command
dnf repolist you can see that our local repositories are loaded.
[root@client ~]# dnf clean all
55 files removed

[root@client ~]# dnf repolist
repo id                                                                  repo name
localrepo-appstream                                                      RockyLinux Base
localrepo-base                                                           RockyLinux Base
7.4 Test the Configuration
Let us test the local repository configurations, by installing any
packages. In the below example I have tried to install Nginx. The Nginx
and its Dependencies are installing from the localrepo-appstream.
[root@client ~]# yum install nginx
Last metadata expiration check: 0:01:06 ago on Monday 16 August 2021 06:08:36 PM EDT.
Dependencies resolved.
==============================================================================================================================================
 Package                       Architecture       Version                                               Repository                       Size
==============================================================================================================================================
Installing:
 nginx                         x86_64             1:1.18.0-3.module+el8.4.0+544+e40554cf.1              localrepo-appstream             579 k
Installing dependencies:
 nginx-filesystem              noarch             1:1.18.0-3.module+el8.4.0+544+e40554cf.1              localrepo-appstream              24 k
 rocky-logos-httpd             noarch             84.5-8.el8                                            localrepo-base                   22 k

Transaction Summary
==============================================================================================================================================
Install  3 Packages

Total download size: 626 k
Installed size: 1.7 M
Is this ok [y/N]:
Summary
After these steps, you now know how to set up a local YUM/DNF repository on Rocky Linux 8. You can also follow the same steps for Oracle/Centos 7/8 servers.
References
Nginx-based YUM/DNF repository on Red Hat Enterprise Linux 8
