
In this article I will share the steps to move directory to another partition in RHEL/CentOS 7/8 Linux. I will use /usr directory but you can use the same steps to move any other directory from your Linux system to create another separate partition such as move opt to another partition or move home to another partition. Now moving a data partition such as home or opt to another partition is less riskier then moving a system directory such as to move usr from root to another partition
Lab Environment
I have created a Virtual Machine using Oracle VirtualBox installed on Linux server. I have installed CentOS 8 on this virtual machine but the same steps will work on RHEL 7/8 or CentOS 7. On this VM I have added a virtual disk which we will use to create a new partition.
Below are the list of currently mounted partitions. As you see currently
usr is mounted under root[/]. So we wish to make /usr a separate
partition.
[root@centos-8 ~]# df -h
Filesystem             Size  Used Avail Use% Mounted on
devtmpfs               2.4G     0  2.4G   0% /dev
tmpfs                  2.4G     0  2.4G   0% /dev/shm
tmpfs                  2.4G  8.6M  2.4G   1% /run
tmpfs                  2.4G     0  2.4G   0% /sys/fs/cgroup
/dev/mapper/rhel-root   14G  4.3G  8.4G  34% /
/dev/sda1              488M  181M  272M  40% /boot
tmpfs                  479M     0  479M   0% /run/user/0
Step 1: Create new partition
Now since we wish to move usr directory from root to another partition,
we will need a new partition which for me is /dev/sdb. I will not
explain the steps here, you can just follow the input provided with the
comments
[root@centos-8 ~]# fdisk /dev/sdb   <--- My virtual disk where I will create a new partition

Welcome to fdisk (util-linux 2.32.1).
Changes will remain in memory only, until you decide to write them.
Be careful before using the write command.

Command (m for help): n <--- To create a new partition
Partition type
   p   primary (0 primary, 0 extended, 4 free)
   e   extended (container for logical partitions)
Select (default p): p  <--- To create a primary partition
Partition number (1-4, default 1):  <--- We will leave it to default by just pressing ENTER
First sector (2048-41943039, default 2048):  <--- We will leave it to default by just pressing ENTER
Last sector, +sectors or +size{K,M,G,T,P} (2048-41943039, default 41943039): +10G  <-- We will create partition of 10G

Created a new partition 1 of type 'Linux' and of size 10 GiB.

Command (m for help): p  <--- To print the existing partition table
Disk /dev/sdb: 20 GiB, 21474836480 bytes, 41943040 sectors
Units: sectors of 1 * 512 = 512 bytes
Sector size (logical/physical): 512 bytes / 512 bytes
I/O size (minimum/optimal): 512 bytes / 512 bytes
Disklabel type: dos
Disk identifier: 0x48ed4091

Device     Boot Start      End  Sectors Size Id Type
/dev/sdb1        2048 20973567 20971520  10G 83 Linux

Filesystem/RAID signature on partition 1 will be wiped.

Command (m for help): t  <--- To change the type of partition
Selected partition 1
Hex code (type L to list all codes): 8e  <--- 8e is for Linux LVM type
Changed type of partition 'Linux' to 'Linux LVM'.

Command (m for help): w  <--- To save the partition table
The partition table has been altered.
Calling ioctl() to re-read partition table.
Syncing disks.
Refresh the partition table of your Linux node
[root@centos-8 ~]# partprobe
To view the partition tree we use lsblk
[root@centos-8 ~]# lsblk
NAME          MAJ:MIN RM  SIZE RO TYPE MOUNTPOINT
sda             8:0    0   15G  0 disk
├─sda1          8:1    0  512M  0 part /boot
└─sda2          8:2    0 14.5G  0 part
  ├─rhel-root 253:0    0 13.6G  0 lvm  /
  └─rhel-swap 253:1    0  956M  0 lvm  [SWAP]
sdb             8:16   0   20G  0 disk
└─sdb1          8:17   0   10G  0 part
sr0            11:0    1  6.7G  0 rom
sr1            11:1    1 1024M  0 rom
Step 2: Create new logical volume (optional)
Now this step is optional. You can choose to skip this step and move directory to another partition which is physical and not logical. But we would like to use a logical volume so that we have an option to extend our LVM in future if required.
We currently have single volume group so we will use the same the VG to create new logical volume
[root@centos-8 ~]# vgs
  VG   #PV #LV #SN Attr   VSize   VFree
  rhel   1   2   0 wz--n- <14.50g    0
Below are the list of available logical volumes
[root@centos-8 ~]# lvs
  LV   VG   Attr       LSize   Pool Origin Data%  Meta%  Move Log Cpy%Sync Convert
  root rhel -wi-ao----  13.56g
  swap rhel -wi-ao---- 956.00m
The first step we will create physical volume on top of our partition
/dev/sdb1
[root@centos-8 ~]# pvcreate /dev/sdb1
  Physical volume "/dev/sdb1" successfully created.
Second step is to extend our volume group with this physical volume
/dev/sdb1
[root@centos-8 ~]# vgextend rhel /dev/sdb1
  Volume group "rhel" successfully extended
Verify the VFree section which now shows that 10G is free from our new
physical volume.
[root@centos-8 ~]# vgs
  VG   #PV #LV #SN Attr   VSize  VFree
  rhel   2   2   0 wz--n- 24.49g <10.00g
We will use this additional 10G size to create a new logical volume.
Since we wish to move usr directory from root to another partition so we
will name this new logical volume as “usr” with a size of 8G and
keeping 2G free.
[root@centos-8 ~]# lvcreate -L 8G --name usr rhel
  Logical volume "usr" created.
Step 3: Create file system
Now if you have skipped step
2 then you can create your filesystem on /dev/sdb1, and
if you have performed step
2 then you must create the file system on your logical volume.
For this article I will create ext4 file system.
[root@centos-8 ~]# mkfs.ext4 /dev/mapper/rhel-usr
mke2fs 1.44.3 (10-July-2018)
Creating filesystem with 2097152 4k blocks and 524288 inodes
Filesystem UUID: b6915614-671d-4dd6-8a0f-0807ef80eca1
Superblock backups stored on blocks:
        32768, 98304, 163840, 229376, 294912, 819200, 884736, 1605632

Allocating group tables: done
Writing inode tables: done
Creating journal (16384 blocks): done
Writing superblocks and filesystem accounting information: done
Step 4: Completely move directory to another partition
Now we have our partition/logical volume in place, we will attempt to move usr directory from root to another partition.
Create a temporary directory under any location. We will create under
/tmp
[root@centos-8 ~]# mkdir /tmp/usr
Next mount your new logical volume on this temporary mount point
[root@centos-8 ~]# mount /dev/mapper/rhel-usr /tmp/usr/
Next copy the content of /usr to our temporary location under
/tmp/usr using rsync
[root@centos-8 ~]# rsync -avz /usr/ /tmp/usr/
Step 5: Verify the backup of usr partition
There are multiple commands and methods to verify the difference between
two directories. You can use basic diff command
# diff /usr/ /tmp/usr/
Observe the output to make sure all the files from /usr is backed up.
You may observe some broken symlinks but that should get fixed once we
mount this logical volume on /usr
You can also use du command to check size of individual files in bytes
and compare with both locations
# du /usr/
# du /tmp/usrtmp/
If you feel both the locations are identical and contains all the files, move to the next step to move directory to another partition in Linux or Unix.
Step 6: Mount logical volume using /etc/fstab
Now since we have taken backup of /usr on our logical volume, it is
time to mount this logical volume using /etc/fstab. Since we cannot
mount runtime as /usr is a system partition and it mounted on root
[/] we won’t be able to unmount it.
We will use blkid to get the UUID value of our new logical volume
/dev/mapper/rhel-usr
[root@centos-8 ~]# blkid /dev/mapper/rhel-usr
/dev/mapper/rhel-usr: UUID="b6915614-671d-4dd6-8a0f-0807ef80eca1" TYPE="ext4"
Add below content in /etc/fstab
[root@centos-8 ~]# cat /etc/fstab
UUID=b6915614-671d-4dd6-8a0f-0807ef80eca1       /usr    ext4 defaults   0 0
blkid output:
Step 7: Manage SELinux (Optional)
If SELinux is in Enforcing/Permission state
[root@centos-8 ~]# getenforce
Enforcing
Restore the selinux context:
[root@centos-8 ~]# restorecon -vvFR /usr
If the SELinux is in disabled state then you can ignore this step.
Step 8: Update GRUB2
Next we must add the location of new logical volume in GRUB2
configuration file /etc/sysconfig/grub. Add in the format
“rd.lvm.lv=rhel/usr” where rhel is the VG name while usr is the
logical volume name as shown below:
[root@centos-8 ~]# grep GRUB_CMDLINE_LINUX /etc/sysconfig/grub
GRUB_CMDLINE_LINUX="crashkernel=auto resume=/dev/mapper/rhel-swap rd.lvm.lv=rhel/root rd.lvm.lv=rhel/swap rd.lvm.lv=rhel/usr rhgb quiet"
Step 8.1: Rebuild the GRUB2 configuration file
~]# grub2-mkconfig -o /boot/efi/EFI/redhat/grub.cfg
[root@centos-8 ~]# grub2-mkconfig -o /boot/grub2/grub.cfg
Generating grub configuration file ...
done
Backup your initramfs file just in case if required later.
[root@centos-8 ~]# cp /boot/initramfs-$(uname -r).img /boot/initramfs-$(uname -r).img.$(date +%m-%d-%H%M%S).bak
Rebuild your initramfs image
[root@centos-8 ~]# dracut -f
Step 9: Verify the configuration and steps
Now we are all done with the steps. Next reboot your node and I hope it comes up properly to check if we are able to move directory to another partition. Fingers crossed.
Well lucky me the node came up properly and when I verify the mounted
partitions, I can see /usr is a new partition. So our steps to move
usr directory from root to another partition was successful.
[root@centos-8 ~]# df -h
Filesystem             Size  Used Avail Use% Mounted on
devtmpfs               2.4G     0  2.4G   0% /dev
tmpfs                  2.4G     0  2.4G   0% /dev/shm
tmpfs                  2.4G  8.6M  2.4G   1% /run
tmpfs                  2.4G     0  2.4G   0% /sys/fs/cgroup
/dev/mapper/rhel-root   14G  4.3G  8.4G  34% /
/dev/mapper/rhel-usr   7.9G  3.9G  3.6G  53% /usr
/dev/sda1              488M  205M  249M  46% /boot
tmpfs                  479M     0  479M   0% /run/user/0
Step 10: Remove old /usr content
Now since our node has come up successfully and we cannot remove the old
/usr content at this stage. Well this cannot be done unless you are in
rescue mode. So you can boot
into rescue mode using RHEL/CentOS 7/8 ISO Image based on
your Linux environment.
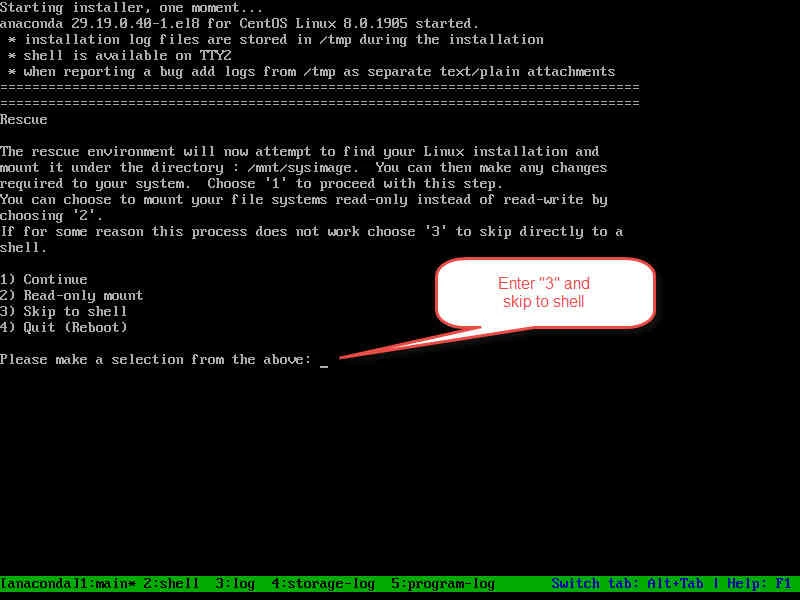
Step 10.1: Boot into rescue mode
At the below screen in the rescue mode press “3” to get a shell.
Next you can check the existing mounted partitions using df command.
Now since we are using Live ISO Image for rescue image so the live CD
files are used for mounting the file system,
Step 10.2: Activate logical volume
Activate the volume groups and logical volumes using vgchange -ay
You can check the list of logical volumes using lvs or lvdisplay
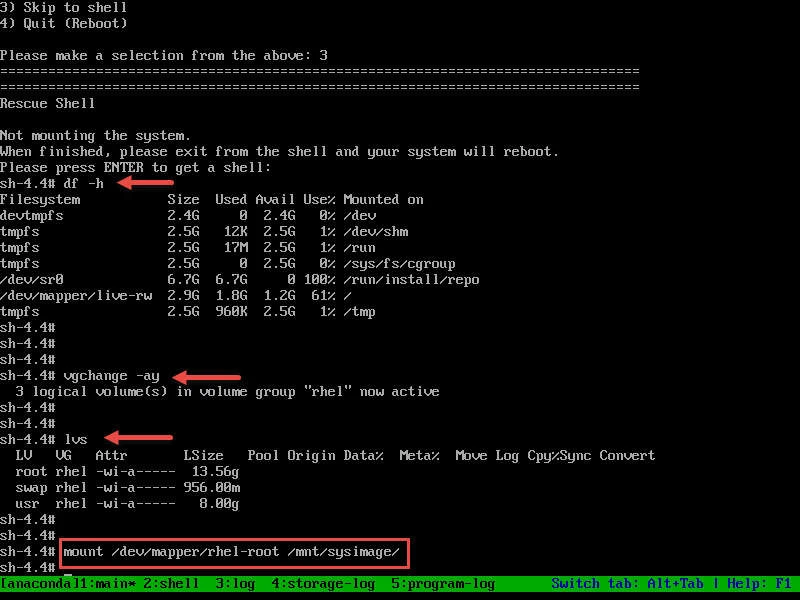
Step 10.3: Mount the file system on sysimage
Since the dev, sys, proc file systems are not mounted, we will try to mount it manually as shown below:
# mount /dev/mapper/rhel-root /mnt/sysimage
# mount -o bind /dev /mnt/sysimage/dev
# mount -o bind /usr /mnt/sysimage/usr
# mount -o bind /sys /mnt/sysimage/sys
# mount -t proc /proc /mnt/sysimage/proc
# mount -o bind /dev/shm /mnt/sysimage/dev/shm
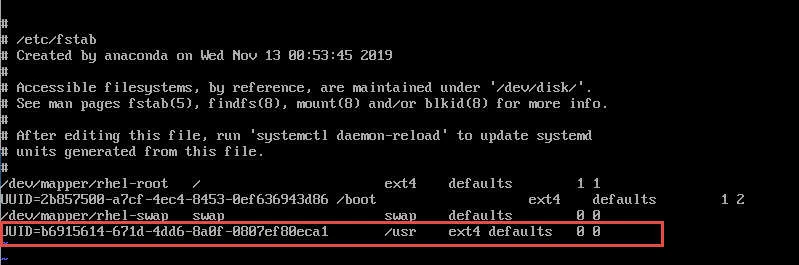
Step 10.4: Update /etc/fstab file
At this stage since our root [/] file system is mounted on
/mnt/sysimage, we must edit /mnt/sysimage/etc/fstab and un-comment
the /dev/mapper-rhel-usr line which we had commented earlier.
Step 10.5: Clear old /usr content
Now again since our root [/] logical volume is mounted on
/mnt/sysimage, and /dev/mapper/rhel-usr is not in mounted state at
this stage so you can manually remove the old /usr content from
/mnt/sysimage/usr and complete our steps to move directory to another
partition.
# rm -rf /mnt/sysimage/usr/*
/dev/mapper/rhel-usr is not
mounted on /mnt/sysimage/usr or else your node will become unusable.
Step 10.6: Mount logical volumes
We can also mount other logical volumes which we had observed with lvs
command as those will also be required for verification of final stage:
# mount /dev/sda1 /mnt/sysimage/boot
# mount /dev/mapper/rhel-usr /mnt/sysimage/usr
So all our required partitions are mounted on /mnt/sysimage. Change
root [/] to the already installed root file system:
# chroot /mnt/sysimage
Step 10.7: Verify content
Next list the mounted partitions using below command to make sure all your logical volumes are properly mounted:
# df -h
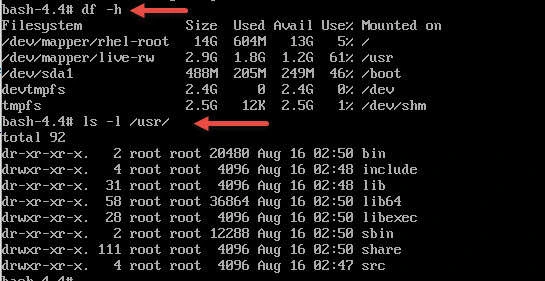
Also verify the content of /usr to make sure the content is in place.
So all looks good and we were able to move directory to another
partition successfully. Next you can reboot your node and verify if all
is good in your default.target
Conclusion
In real time production environments it is always recommended to create separate LVM partitions for critical paths. This is because in case of some disk failure the loss will be minimal. We also have LVM based snapshots which we can use for backup and restore. But if you have single LVM partition then it becomes overhead for maintenance.
Moreover you should avoid using non-LVM partitions as I have never seen non-LVM storage in any of the production environments. if you are starting to learn Linux then start with LVM as your backend storage option. You can also explore GFS2, GlusfterFS and other types of Storage File System.
Lastly I hope the steps from this tutorial guide to move directory to to another partition in CentOS/RHEL 7/8 Linux was helpful. You can also use the same steps to move any other partition such as opt, home from root to another separate partition or drive. So, let me know your suggestions and feedback using the comment section.
References:
I have used below external references for this tutorial guide
Moving
usr to a different partition on Red Hat Enterprise Linux
