![Laravel storage::disk [In-Depth Tutorial]](/laravel-storage-disk/laravel-storage-disk.jpg)
Laravel is a popular PHP framework for web development that comes with various built-in features, including a robust storage system. The storage system provides a simple and unified API for interacting with various storage systems such as local disk, Amazon S3, FTP, and more.
One of the essential features of Laravel’s storage system is the disk
method, which provides a way to work with different disks in your
application. A disk represents a storage location, such as the local
file system or a cloud storage service like Amazon S3.
The disk method is used to retrieve an instance of the file system
from a specific disk. You can use this instance to perform various
operations on files and directories stored on the disk, such as
creating, reading, updating, and deleting files.
For example, to retrieve an instance of the local disk, you can use the following code:
$disk = Storage::disk('local');
This will return an instance of the local disk file system that you can use to perform file operations on the local disk.
Understand Laravel storage::disk
Laravel supports many storage options. For example, you can upload a file to a local disk or transfer it to a cloud storage like Amazon S3.
The storage options are referred to as disks. You can inspect the
available disks and their settings inside the config/filesystems.php
file.
<?php

return [

    'default' => env('FILESYSTEM_DISK', 'local'),

    'disks' => [

        'local' => [
            'driver' => 'local',
            'root' => storage_path('app'),
            'throw' => false,
        ],

        'public' => [
            'driver' => 'local',
            'root' => storage_path('app/public'),
            'url' => env('APP_URL').'/storage',
            'visibility' => 'public',
            'throw' => false,
        ],

        's3' => [
            'driver' => 's3',
            'key' => env('AWS_ACCESS_KEY_ID'),
            'secret' => env('AWS_SECRET_ACCESS_KEY'),
            'region' => env('AWS_DEFAULT_REGION'),
            'bucket' => env('AWS_BUCKET'),
            'url' => env('AWS_URL'),
            'endpoint' => env('AWS_ENDPOINT'),
            'use_path_style_endpoint' => env('AWS_USE_PATH_STYLE_ENDPOINT', false),
            'throw' => false,
        ],

    ],

    'links' => [
        public_path('storage') => storage_path('app/public'),
    ],

];
local is the default storage disk, but you can change it according to
your needs.
The public disk is meant for files to be publicly accessible. Such
files end up instorage/app/public file. If you use the destination for
uploads, you should link to the root public folder using the following
command.
php artisan storage:link
You can perform several actions on the disks using Laravel Storage facade. For instance, you can use the Laravel storage::disk to specify the disk when uploading a file.
Storage::disk('local')->put('explorers.txt', 'The first explorers to visit the moon and Mars');
Here, we create a file called explorers.txtwith the contentThe first explorers to visit the moon and Marsin the local disk.
Here is a more practical example of Laravel storage::disk.
Example-1: Upload file to local disk
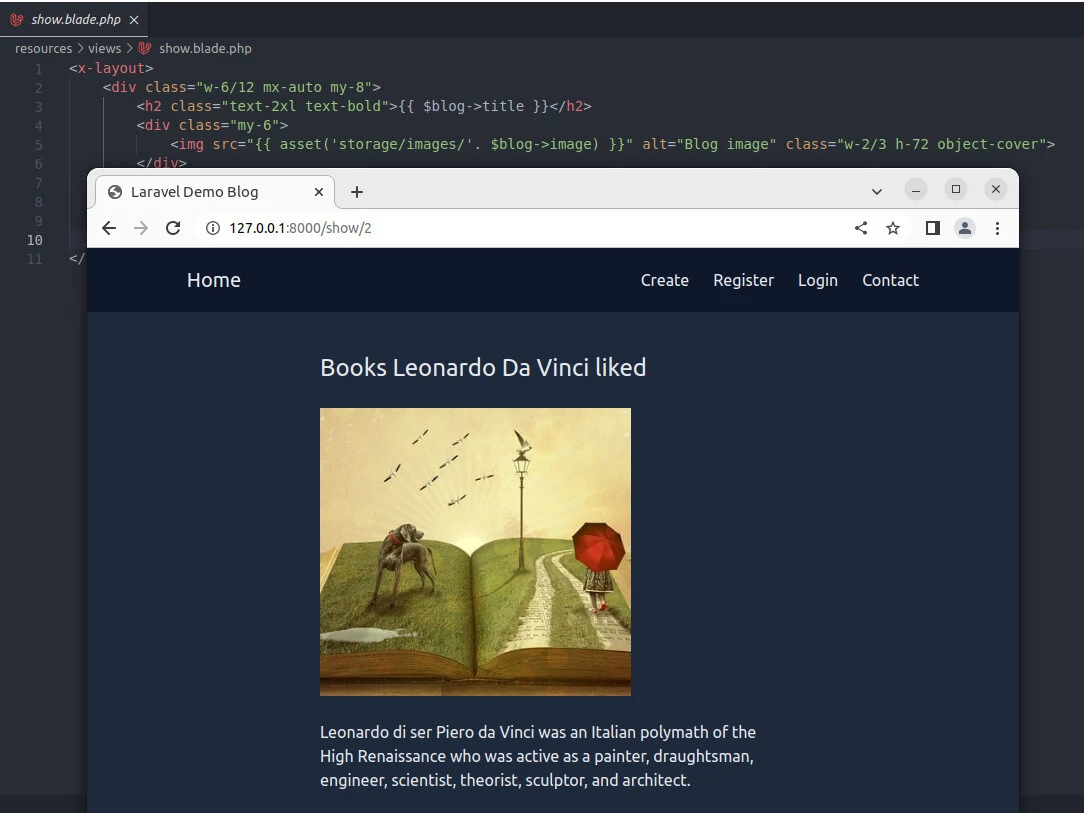
This section shows you how to upload an image to public Laravel
storage::disk before displaying the image on the browser. You can get
the full code on GitHub.
We will focus on the files that relate to image upload.
Laravel Setup
laravel new laravel_demo_blog
cd laravel_demo_blog
php artisan make:model Blog -mcr
code .
We create a Laravel app called larave_demo_blog and navigate to the
new project directory. We then make a model with a
migration and
controller with default functions.
Model
Database
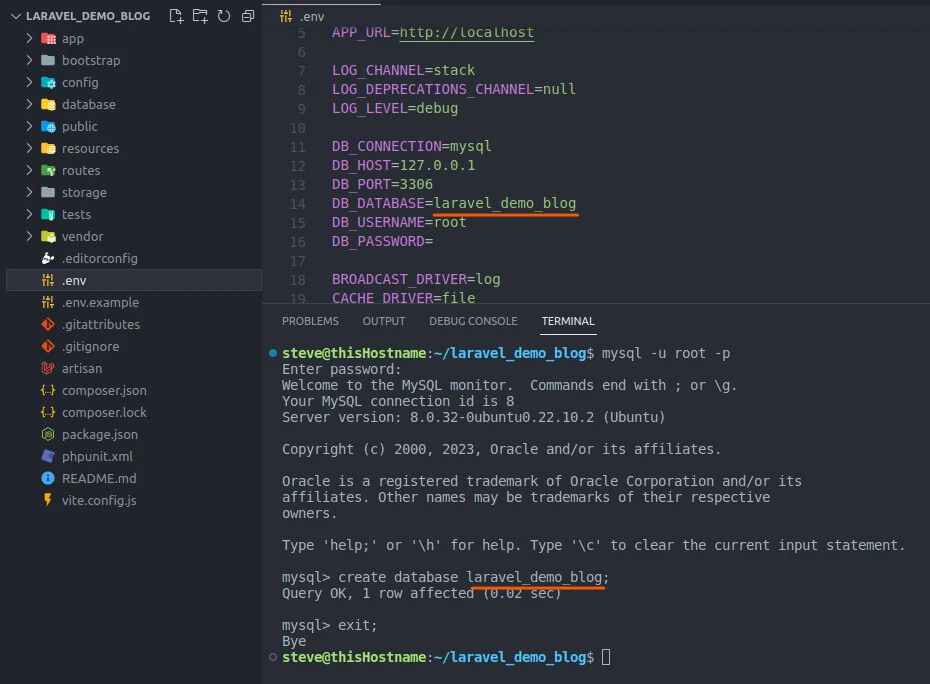
Create a database with a name specified in the .env file.
mysql -u root -p
mysql> create database laravel_demo_blog;
mysql> exit;
We login to MySQL database service with the root user and create the
laravel_demo_blog before quitting the the prompt.
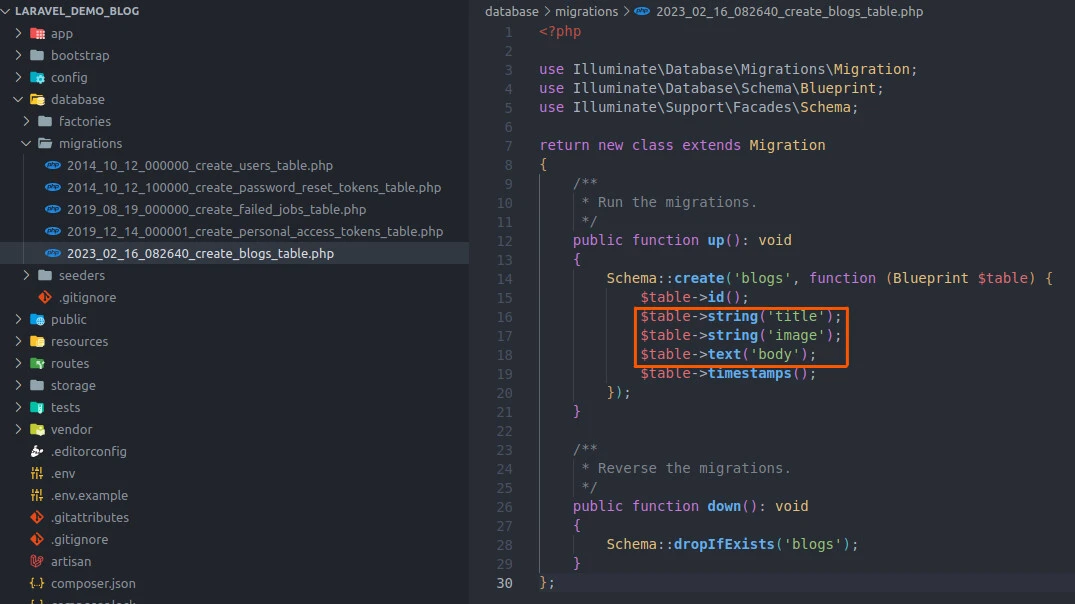
Schema
Open the blogs table in the database/migrations folder and add the
method of the title,image, andbodybetween the id() and
timestamps() methods.
<?php

use Illuminate\Database\Migrations\Migration;
use Illuminate\Database\Schema\Blueprint;
use Illuminate\Support\Facades\Schema;

return new class extends Migration
{
    /**
     * Run the migrations.
     */
    public function up(): void
    {
        Schema::create('blogs', function (Blueprint $table) {
            $table->id();
            $table->string('title');
            $table->string('image');
            $table->text('body');
            $table->timestamps();
        });
    }

    /**
     * Reverse the migrations.
     */
    public function down(): void
    {
        Schema::dropIfExists('blogs');
    }
};
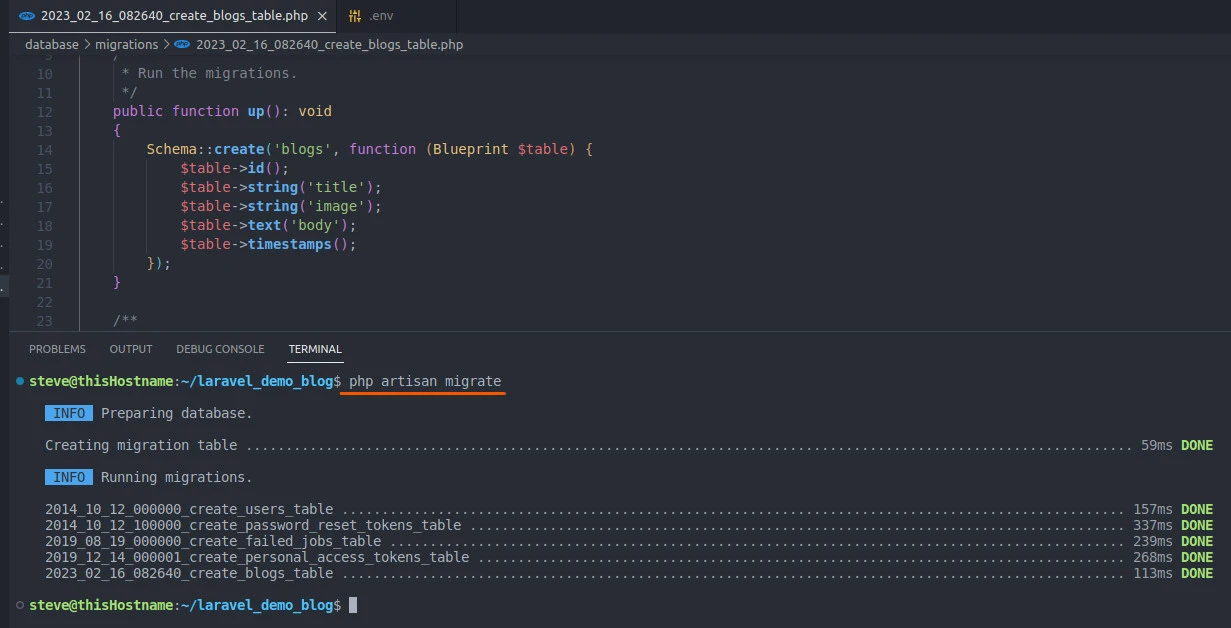
Migrations
Migrate the new changes to the MySQL database we just created.
php artisan migrate
View
We write the code to send the details to the server in the
resources/views/create.blade.php file.
<x-layout>

<form action="{{ url('store') }}" method="post" enctype="multipart/form-data" class="w-2/4 mx-auto">
    @csrf
    <div class="mb-4">
        <label for="title" class="block mb-2">Title:</label>
        <input type="text" name="title" class="w-full bg-gray-100 text-gray-700 p-2 rounded focus:outline-none sm:w-4/5">
    </div>
    <div class="w-full mb-4">
        <label for="body" class="block mb-2">Body:</label>
        <textarea name="body" id="body" rows="7" class="w-full bg-gray-100 text-gray-700 p-2 rounded focus:outline-none sm:w-4/5"></textarea>
    </div>
    <div class="mb-4">
        <input type="file" name="file">
    </div>
    <div class="mb-4">
        <button class="bg-cyan-800 hover:bg-cyan-900 rounded px-8 py-2 ">Store</button>
    </div>
</form>

</x-layout>
The form sends the details to the store route using the HTTP post
method. The enctype attribute enables image upload.
The form grabs the data and attaches it to the respective name attribute on clicking the Storebutton.
Controller
Laravel receives the form data via the routes/web.php file.
<?php

use App\Http\Controllers\BlogController;
use Illuminate\Support\Facades\Route;

Route::get('/', [BlogController::class, 'index']);
Route::get('create', [BlogController::class, 'create']);
Route::post('store', [BlogController::class, 'store']);
Route::get('show/{id}', [BlogController::class, 'show']);
Route::get('edit/{id}', [BlogController::class, 'edit']);
Route::patch('update/{id}', [BlogController::class, 'update']);
Route::delete('destroy/{id}', [BlogController::class, 'destroy']);
The form data is sent to the store route. The route looks for further
instructions in the store function in the BlogController class, as
defined in the app\Http\Controllers\BlogController folder.
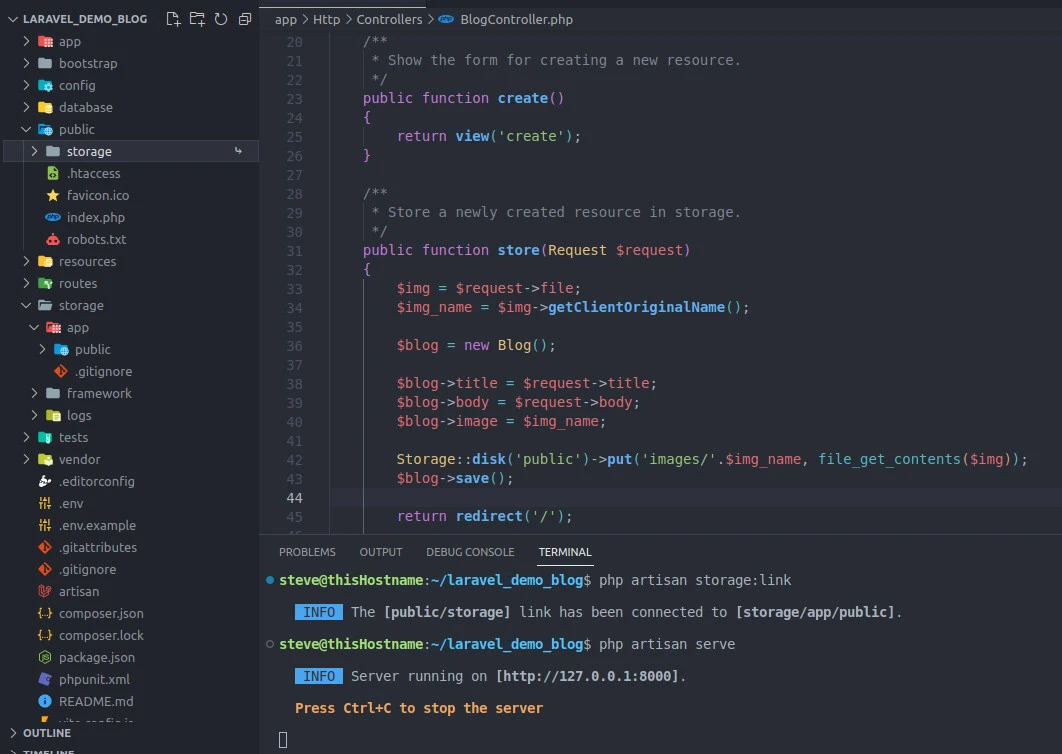
   public function store(Request $request)
    {
        $img = $request->file;
        $img_name = $img->getClientOriginalName();

        $blog = new Blog();

        $blog->title = $request->title;
        $blog->body = $request->body;
        $blog->image = $img_name;

        Storage::disk('public')->put('images/'.$img_name, file_get_contents($img));
        $blog->save();

        return redirect('/');

    }
As soon as the form details reach the store function, they are received
by the $request object. From there, you can decide how to store the
image in Laravel storage::disk as well in the database.
We hold the file object in the $img container. Next, we get the image
name from the temporary container and store it in the $img_name.
We then create an instance of the Blog class and attach the
$request->title, $request->body, and the $img_name to its title,
body, and image attributes, respectively.
Before saving the new blog, we upload the image to the images folder in
the public Storage::disk. Then,
create a
symbolic link in the (root) public folder.
Input
php artisan storage:link
Output
steve@thisHostname:~/laravel_demo_blog$ php artisan storage:link
   INFO  The [public/storage] link has been connected to [storage/app/public].
In Layman’s terms, we have said, “Hey, Laravel. Open the
storage/app/public folder and store a new image in the images
folder. Also, make it possible for us to access the images as a public
asset. Do that by creating a link between the two file paths:
storage/app/public and public/storage folders.”
Finally, we save the details to the database and redirect the user to the landing page.
We should then see all blogs or read a single blog as specified in the index and show views, respectively.
Example-2: Upload file to Amazon S3 Storage
Here’s an example that demonstrates how to use Laravel’s storage::disk
to upload a file to Amazon S3 and retrieve its public URL:
use Illuminate\Http\Request;
use Illuminate\Support\Facades\Storage;

public function uploadToS3(Request $request)
{
    $file = $request->file('file');

    // Get an instance of the S3 disk
    $s3 = Storage::disk('s3');

    // Generate a unique file name
    $filename = uniqid() . '.' . $file->getClientOriginalExtension();

    // Upload the file to S3
    $s3->putFileAs('uploads', $file, $filename);

    // Get the public URL of the uploaded file
    $url = $s3->url('uploads/' . $filename);

    // Return the URL to the client
    return response()->json(['url' => $url]);
}
In this example, we first retrieve the uploaded file from the request
using the file method. We then get an instance of the S3 disk using
Storage::disk('s3'). Next, we generate a unique file name and upload
the file to the S3 bucket under the uploads directory using the
putFileAs method.
Finally, we retrieve the public URL of the uploaded file using the url
method and return it to the client as a JSON response.
Cheat Sheet Commands
| Command | Description |
|---|---|
Storage::disk('local')->delete('example.txt') |
Delete a file on local disk |
Storage::disk('local')->deleteDirectory('path/to/directory') |
Delete all files in a directory on the local disk |
$files = Storage::disk('local')->files('path/to/directory') |
Retrieve a list of all files in a directory on the local disk |
Storage::disk('local')->exists('example.txt') |
Check if a file exists on a specific disk |
Storage::disk('s3')->exists('path/to/file') |
Check if a file exists on the S3 disk |
Storage::disk('local')->copy('path/to/file', 'new/path/to/file') |
Copy a file from one disk to another |
Storage::disk('s3')->move('path/to/file', 'new/path/to/file') |
Move a file from one disk to another |
$contents = Storage::disk('local')->get('example.txt') |
Retrieve the contents of a file on a specific disk |
$size = Storage::disk('local')->size('path/to/file'); |
Get the size of a file on the local disk |
Storage::disk('local')->put('path/to/file', 'This is a test file.'); |
Write a string to a file on the local disk |
$time = Storage::disk('local')->lastModified('path/to/file'); |
Retrieve the last modified time of a file on the local disk |
$contents = Storage::disk('local')->get('path/to/file'); |
Get the contents of a file on the local disk |
Storage::disk('local')->makeDirectory('path/to/new_directory'); |
Create a new directory on the local disk |
$directories = Storage::disk('local')->directories('path/to/directory'); |
Retrieve a list of all directories in a directory on the local disk |
$type = Storage::disk('local')->mimeType('path/to/file'); |
Get the MIME type of a file on the local disk |
Storage::disk('local')->append('path/to/file', 'This is some new text.'); |
Append a string to a file on the local disk |
Storage::disk('s3')->delete('path/to/file'); |
Delete a file on the S3 disk |
if (Storage::disk('local')->allFiles('path/to/directory') === []) {// The directory is empty} |
Check if a directory is empty on the local disk |
$contents = Storage::disk('local')->allFiles('path/to/directory'); |
Retrieve a list of all files and directories in a directory on the local disk |
Conclusion
Laravel’s storage::disk provides a unified API for working with
different storage systems in Laravel, including local disk, Amazon S3,
and FTP. It allows developers to interact with these storage systems
using a single, consistent syntax. You can use storage::disk to
create, delete, check for the existence of, and retrieve the contents of
files on a specific disk. Overall, it simplifies file system management
in Laravel applications.