![Laravel Sail and Docker [In-Depth Tutorial]](/laravel-sail-tutorial/laravel-sail.jpg)
Are you a Laravel developer looking to streamline your local development environment? Laravel is one of the most popular PHP frameworks out there, and for good reason. It’s powerful, flexible, and easy to use.
However, setting up a local development environment for Laravel applications can be a pain. You need to install and configure a web server, database, and other dependencies, and even then, things don’t always work as expected. That’s where Laravel Sail comes in - a lightweight CLI that makes setting up a development environment for Laravel applications a breeze.
With Laravel Sail, you can create a Docker-based development environment in just a few simple steps. Sail comes with everything you need to get started with Laravel development, including a pre-configured web server, database, and other essential tools. This means you can spend less time setting up your environment and more time building great applications.
This tutorial walks you through how Laravel Sail implements Docker, installing Docker and Laravel, managing Sail containers, and executing commands. Let’s get started.
How Laravel Sail implements Docker
docker-compose.yml file that defines
Docker containers. The containers build your Laravel application. Each
container is an entry within the services configuration.
laravel.test is the primary container. MySQL and Redis database
services are pre-configured.
Sail comes with the sail script that
provides a CLI for interacting with the
Docker
containers defined by the docker-compose.yml file. The sail commands
are invoked using the vendor/bin/sail script. The script comes with a
new Laravel installation. You can create an alias for the script in your
home directory. Open ~/.zshrc or ~/.bashrc file and write this
line.
alias sail='[ -f sail ] && sh sail || sh vendor/bin/sail'
Now restart the shell. After that,
you can manage docker containers with sail instead of
vendor/bin/sail command. Let’s start by installing Docker and Laravel
Sail.
Install Docker
Let’s install the Docker desktop on Ubuntu 22.04 (LTS). The system should be a 64-bit version of Ubuntu Jammy Jellyfish 22.04 (LTS) or Ubuntu Impish Indri 21.10. You can check the version using the following command.
cat /etc/*release*
Update your machine’s package index
before installing the required packages. Updating the package index
allows apt to use repositories over HTTPS.
sudo apt-get update

sudo apt-get install \
apt-transport-https \
ca-certificates \
curl \
gnupg-agent \
software-properties-common
Add Docker’s official GPG keys.
sudo install -m 0755 -d /etc/apt/keyrings
curl -fsSL https://download.docker.com/linux/ubuntu/gpg | sudo gpg --dearmor -o /etc/apt/keyrings/docker.gpg
sudo chmod a+r /etc/apt/keyrings/docker.gpg
Now add Docker repository to the system.
echo \
 "deb [arch="$(dpkg --print-architecture)" signed-by=/etc/apt/keyrings/docker.gpg] https://download.docker.com/linux/ubuntu \
  "$(. /etc/os-release && echo "$VERSION_CODENAME")" stable" | \
 sudo tee /etc/apt/sources.list.d/docker.list > /dev/null
Update package index then install Docker. Lastly verify whether the service is running.
sudo apt-get update
sudo apt-get install docker-ce docker-ce-cli containerd.io docker-buildx-plugin docker-compose-plugin
sudo systemctl status docker
Good, docker is active and running!
steve@alila:~$ sudo systemctl status docker
● docker.service - Docker Application Container Engine
   Loaded: loaded (/lib/systemd/system/docker.service; enabled; vendor preset: enabled)
   Active: active (running) since Fri 2023-04-21 13:10:03 EAT; 1min 0s ago
TriggeredBy: ● docker.socket
    Docs: https://docs.docker.com
  Main PID: 6830 (dockerd)
    Tasks: 9
   Memory: 24.6M
   CGroup: /system.slice/docker.service
       └─6830 /usr/bin/dockerd -H fd:// --containerd=/run/containerd/containerd.sock
...
Now you should be able to pull the
hello-world image and run it (requires internet connection).
sudo docker run hello-world
We have prefaced the above command with the sudo command because the docker user group does not have users. You can run the docker commands without sudo by running the following commands.
# create the docker group if does not exist.
sudo groupadd docker
# add the current user to the new group then log out and back into the machine to effect the changes. Restart a virtual machine instead.
sudo usermod -aG docker $USER
# activate the changes to the new group
newgrp docker
You may run into an error on
re-running the hello-world container without the sudo command:
WARNING: Error loading config file: /home/user/.docker/config.json
-stat /home/user/.docker/config.json: permission denied
Get rid of the error by changing the ownership and permissions of the docker file.
sudo chown "$USER":"$USER" /home/"$USER"/.docker -R
sudo chmod g+rwx "$HOME/.docker" -R
Alternatively, you can install docker using the convenience script.
curl -fsSL https://get.docker.com -o get-docker.sh
sudo sh get-docker.sh
Now that Docker is up and running, let’s install Laravel Sail and use it with Docker.
Install Laravel Sail
Installation with a new application
Launch the terminal and create a new Laravel application.
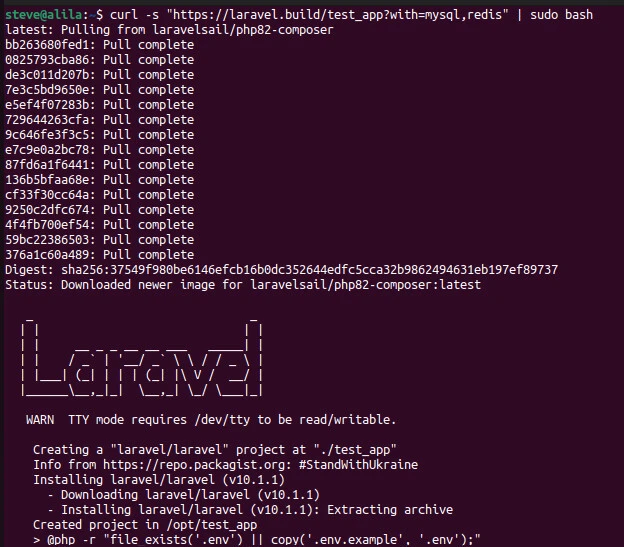
curl -s https://laravel.build/test_app | sudo bash
The command installs test_app and
configures the docker-compose.yml file with mysql, pgsql,
mariadb, redis, memcached, meilisearch, minio, selenium, and
mailpit services. You can choose the services to configure using the
with query string. For example, you can configure only MySQL and
Redis, as follows.
curl -s "https://laravel.build/test_app?with=mysql,redis" | sudo bash
The command creates test_app
project and pulls mysql and redis services.
Installation in an existing application
composer require laravel/sail --dev
php artisan sail:install
Composer installs Laravel Sail as a
dev dependency. Next, publish docker-compose.yml file to the root of
the application using the sail:install command.
Using Laravel Sail Interface
Start and stop containers
Navigate to the new project and power
it up using the up Sail command.
Input
cd test_app && ./vendor/bin/sail up
# OR (if you have created an alias)
cd test_app && sail up
Output
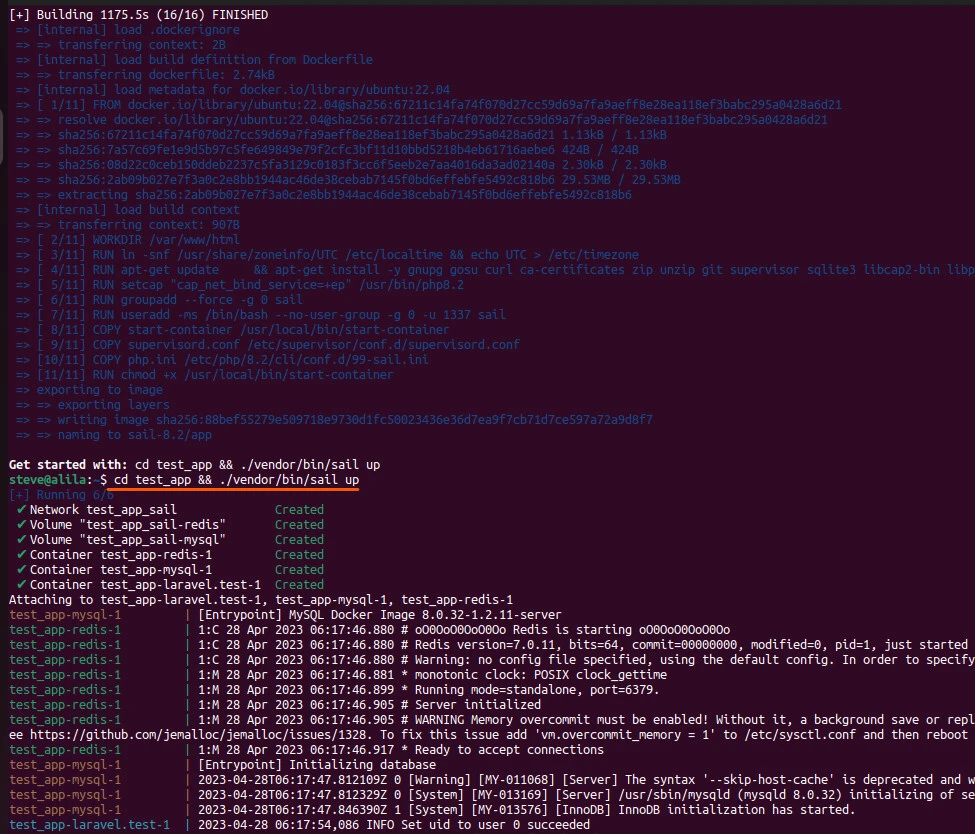
You should be able to start the
application on localhost. The startup may fail with a message stating
the permission to storage is denied. Run the following commands in the
working directory to solve the error.
sudo chown -R $USER:www-data storage
sudo chmod -R 775 storage
sail up -d
The -d, for detached, starts the
container in the background.
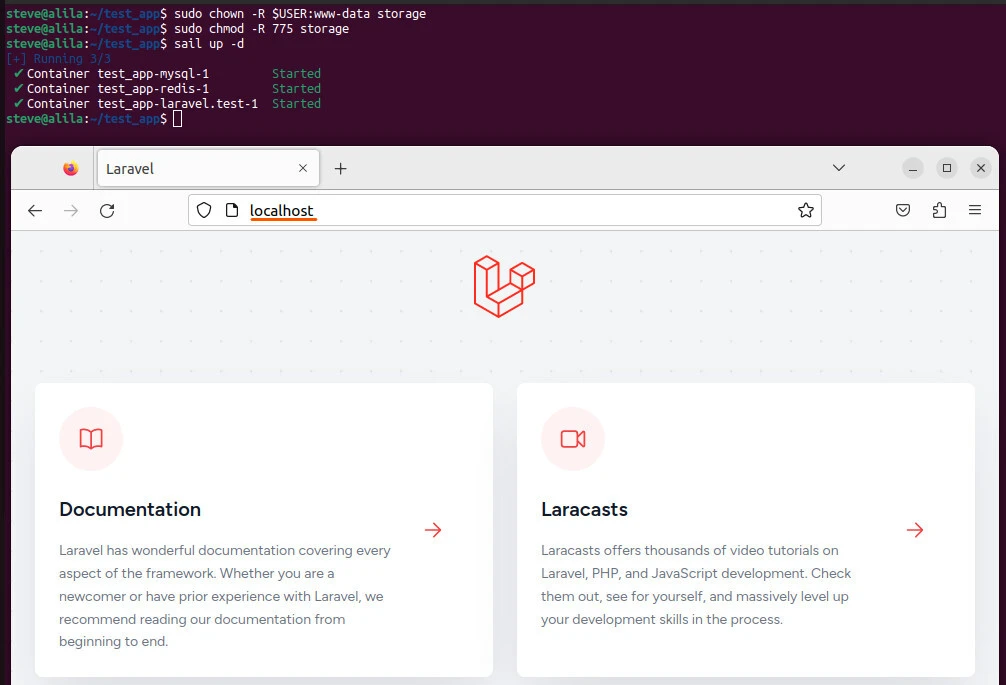
cd test_app && ./vendor/bin/sail up -d
Stop the container using Control +
C if the container runs in the foreground or stop command if it runs
in the background.
sail stop
Executing commands
Use sail, instead of php to run
commands with Laravel Sail.
# Running Artisan commands locally
php artisan queue:work

# Running Artisan commands within Laravel Sail
sail artisan queue:work
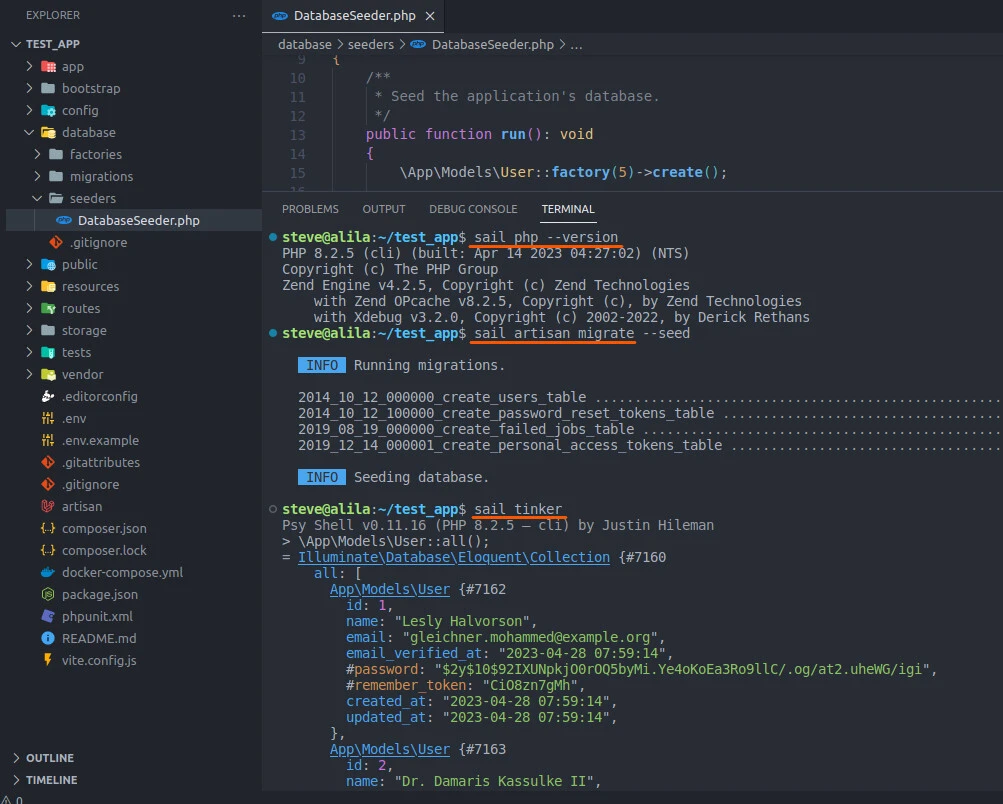
Precede PHP, Node or Composer commands with sail when running them with Laravel Sail.
sail php --version
sail npm run dev
sail composer require laravel/sanctum
Sail supports PHP 7.4 onwards, with
the current default being 8.2. You can change default PHP version by
customizing the laravel.test container’s build definition.
context: ./vendor/laravel/sail/runtimes/<php_version>
# e.g
context: ./vendor/laravel/sail/runtimes/8.0
Likewise, you can update Node’s build version from the default 18.
build:
   args:
     WWWGROUP: '${WWWGROUP}'
     NODE_VERSION: '<node_version>'
After that, you should update the
docker-compose.yml
sail build --no-cache
and rebuild the container images.
sail up
What if you wish to start a bash
session with the application’s container? Use the shell command to
connect to the application’s containers. Then, you can inspect files and
installed services and execute arbitrary shell commands.
sail shell
sail root-shell
You can also start a new Tinker session.
sail tinker
Lastly, you can share your application.
sail share
You get a random laravel-sail.site
URL to access your application. Configure your application’s trusted
proxies with the TrustProxies middleware in the
app/Http/Middleware/TrustProxies.php file.
/**
 * The trusted proxies for this application.
 *
 * @var array|string|null
 */
protected $proxies = '*';
You can choose domain for your shared
site and provide subdomain when executing the share command.
sail share --subdomain=your-sail-site
Lastly, you can migrate changes using
the migrate command.
sail artisan migrate
Key Takeaway
If you’re a Laravel developer looking to streamline your local development workflow, Laravel Sail is the solution you’ve been searching for. With Sail, you can easily create a Docker-based development environment that includes a pre-configured web server, database, and other essential tools. This means you can spend less time setting up your environment and more time building great applications.
One of the best things about Laravel Sail is its simplicity - even if you’re new to Docker or server administration, you can get up and running with Sail in just a few simple steps. And if you’re an experienced developer, Sail is fully customizable, so you can tailor the environment to your specific needs and preferences.