
Introduction to lvextend command
lvextend command extends the size of a logical volume in Linux. Sometimes, your LVM partition might be running out of space and you need to increase the size of it. That’s where lvextend becomes very useful.
Are you new to LVM and still learning how it works?
We have written detailed articles covering different areas of managing logical volumes, which you can follow using the below links:
Manage
Logical Volume in Linux - One STOP Solution
Understand
LVM Architecture
Create
LVM during installation RHEL/CentOS 7/8
How
to use LVM Snapshot for Backup and Restore
Create
Mirrored Logical Volume
Create
Striped Logical Volume
Do I need to reboot to extend my root or data logical volume?
NO, you don’t need to reboot or go into single user mode or resuce mode. You can perform a LIVE expansion of root or any other data logical volume without having to reboot your system
Pre-requisites before you plan logical volume size expansion
Your volume group must have enough free space to increase logical volume size
You must have root level access to the server
Take backup of the respective partition. Be prepared for the worst - always.
Different examples to use lvextend command
The syntax for lvextend command is as follows:
# lvextend option LV_path
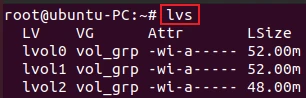
To use lvextend command, you should already have created a logical
volume on your system. You can run lvs command to list the logical
volumes.
If there is no output, you can use lvcreatecommand to create a new
logical volume in the volume group. For detailed instructions, see 10+
lvcreate command examples in Linux [Cheat
Sheet].
It is necessary to know the free space in the volume group so, you can
extend the size of the logical volume accordingly. You can view the
information about volume group using vgs or vgdisplay command.
root@ubuntu-PC:~# vgs
  VG      #PV #LV #SN Attr   VSize   VFree
  vol_grp   1   3   0 wz--n- 508.00m 356.00m
1. Extend the logical volume in units of megabytes
The -L or --size option of lvextend command extends the logical
volume in units of megabytes. You can specify how much you want to
extend the size or how large you want it to be.
For example, with + sign, the size is added to the actual size of the
logical volume.
# lvextend -L +48M /dev/vol_grp/lvol
Sample Output:

Without + sign, the given size is set as the new size of the logical
volume. The size should be larger than the existing size.
The following command extends the size of the logical volume lvol2 to
100M in the volume group vol_grp.
# lvextend -L 100M /dev/vol_grp/lvol2
Sample Output:

2. Extend the logical volume in units of logical extents
You can extend the size of the logical volume in the number of extents
by using -l or --extents option.
The following command adds 10 extents to the logical volume lvol0 on
the volume group vol_grp.
# lvextend -l +10 /dev/vol_grp/lvol0
OR
# lvextend --extents +10 /dev/vol_grp/lvol0
Sample Output:

Without + sign, the specified extents will be the new actual size of
the logical volume.
3. Extend the logical volume by using a percentage as the size
The -l or --extents option also allows you to specify a percentage
of the total space in the volume group with the suffix %VG.
For example, using +10%VG will extend the logical size by adding 10%
of the total size of the volume group. The resulting size is rounded
upward to a full physical extent.
# lvextend -l +10%VG /dev/vol_grp/lvol0
Sample Output:

4. Extend the logical volume using the remaining space in the volume group
You can also use -l or --extents argument to specify a percentage of
the remaining free space in the volume group.
The following command extends the logical volume lvol1 by using all of
the unallocated space in the volume group vol_grp.
# lvextend -l +100%FREE /dev/vol_grp/lvol1
Sample Output:
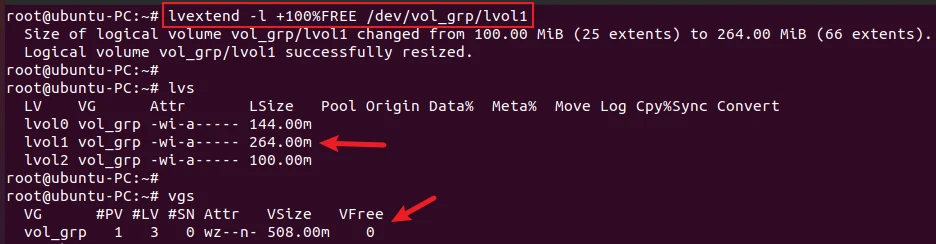
As you can see, there is no free space remaining on the volume group
vol_grp.
How to properly extend Logical Volume? [Step-by-Step]
lvextend uses the space from the volume group and adds it to the logical volume. After extending the logical volume, it is necessary to increase the file system to match the size.
We will take you through step-by-step guides to extend the logical volume properly in Linux.
Step-1: Check LV and VG size
You can check the size of logical volume using the lvs command. You
also have to make sure whether there is free space available in the
volume group. To display volume group information, you can use vgs or
vgdisplay command.
root@ubuntu-PC:~# lvs vol_grp/lvol1
  LV    VG      Attr       LSize  Pool Origin Data%  Meta%  Move Log Cpy%Sync Convert
  lvol1 vol_grp -wi-a----- 60.00m
root@ubuntu-PC:~#
root@ubuntu-PC:~# vgs
  VG      #PV #LV #SN Attr   VSize   VFree
  vol_grp   1   4   0 wz--n- 508.00m 328.00m
The VSize column shows the total size and the VFree shows the free
space in the volume group. In the next section, we will increase the
logical volume lvol1 to 200MiB. The current size of lvol1 is
60MiB.
Step-2: Extend the logical volume using lvextend command
The following command extends the logical volume lvol1 to 200MiB in
the volume group vol_grp.
root@ubuntu-PC:~# lvextend -L 200M /dev/vol_grp/lvol1
  Size of logical volume vol_grp/lvol1 changed from 60.00 MiB (15 extents) to 200.00 MiB (50 extents).
  Logical volume vol_grp/lvol1 successfully resized.
Step-3: Resize the partition using resize2fs/xfs_growfs command
It is necessary to resize the extended partition and update the file
system. You can use the resize2fs command to resize the partition for
an ext3 or ext4 partition and xfs_growfs for an XFS partition.
Sometimes, you might get an error like this as I have got.
root@ubuntu-PC:~# resize2fs /dev/vol_grp/lvol1
resize2fs 1.45.5 (07-Jan-2020)
Please run 'e2fsck -f /dev/vol_grp/lvol1' first.
In that case, you need to run e2fsck -f /dev/vol_grp/lvol1 command
first. It forcefully checks the filesystem for errors, even if the
filesystem is clean.
root@ubuntu-PC:~# e2fsck -f /dev/vol_grp/lvol1
e2fsck 1.45.5 (07-Jan-2020)
Pass 1: Checking inodes, blocks, and sizes
Pass 2: Checking directory structure
Pass 3: Checking directory connectivity
Pass 4: Checking reference counts
Pass 5: Checking group summary information
/dev/vol_grp/lvol1: 11/15360 files (0.0% non-contiguous), 1518/15360 blocks
Then run resize2fs /dev/vol_grp/lvol.
root@ubuntu-PC:~# resize2fs /dev/vol_grp/lvol1
resize2fs 1.45.5 (07-Jan-2020)
Resizing the filesystem on /dev/vol_grp/lvol1 to 51200 (4k) blocks.
The filesystem on /dev/vol_grp/lvol1 is now 51200 (4k) blocks long.
Step-4: Check the logical volume size and mount it back
You can verify the extended size of the logical volume using lvs or
lvdisplay command.
root@ubuntu-PC:~# lvs /dev/vol_grp/lvol1
  LV    VG      Attr       LSize   Pool Origin Data%  Meta%  Move Log Cpy%Sync Convert
  lvol1 vol_grp -wi-a----- 200.00m
As you can see, the current size of lvol1 is 200MiB.
Now, you can mount the LV back using the mount command as shown below.
root@ubuntu-PC:~# mount /dev/vol_grp/lvol1 /test
root@ubuntu-PC:~#
root@ubuntu-PC:~# df -h /test
Filesystem                 Size  Used Avail Use% Mounted on
/dev/mapper/vol_grp-lvol1  193M   52K  183M   1% /test
Conclusion
We hope this article gave you an idea of how to extend the logical volume size using the lvextend command. This article also shows the step-by-step instructions to extend the logical volume.
If you still have any confusion, please let us know in the comment section below.
What’s Next
10+ lvchange command examples in Linux [Cheat
Sheet]
How to PROPERLY rename Logical Volume
[Step-by-Step]
Further Reading
man page for
lvextend command
How
to extend/resize Logical Volume and Volume Group in Linux