
Git switch and git checkout let you create and move into a branch. The
main difference between the two git commands is that git switch focuses
on branches while git checkout targets commits.
Failure to deeply understand the boundary between the two commands could
make it hectic to choose the right command for a task. Also, other
commands such as git restore, git rm and git reset could confuse you
further when picking the best command for the task.
This tutorial simplifies usage of the confusing commands. Let’s dive right in.
Similarities between git switch and git checkout
(a) Both commands move the HEAD
For instance, you can switch from the main branch to another branch.
Using git switch
git switch <another branch>
Using git checkout
git checkout <another branch>
(b) Both commands create a branch
Using the switch command
git switch -c <new branch>
where the -c option tells git to create a branch and check it out.
Using the checkout command
git checkout -b <new branch>
Where the -b option tells git to create a new development line
(branch) and move the HEAD into it.
Those are the primary similarities between the two git commands. Explore more in the following sections of this tutorial.
Know the difference between git switch and git checkout
This section focuses on git HEAD and branching and how they relate to git switch vs git checkout.
Working with git is all about managing commits: create, undo and group. A commit is an object with metadata about versions of changes.
You make a commit by creating a file, staging and committing its changes. You can undo the changes from history, staging area or the working tree. Finally, grouping commits occurs through branching.
Branching is creating and moving into independent development lines. Technically, a branch is a named reference to the latest commit in the workflow.
The latest commit is also known as the HEAD. You can check the HEAD’s pointer by logging the history
git log
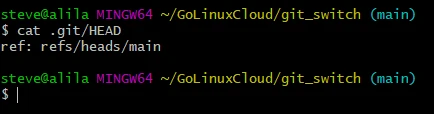
or manually checking the .git subdirectory.
cat .git/HEAD
You see something like
ref: refs/heads/<branch name>
For example, if you are on the main branch, the contents of the
.git/HEAD file will be
ref: refs/heads/main
Here, the ref tells git to refer to the specified path to know the
location of the latest commit in the repository. refs (branches and
tags) is simply a naming system for commits.
heads is another name for branches, while tags, as you may guess,
denotes tags. main is where the latest commit lies.
git switch targets heads: creating and moving into them. On the other
hand, the checkout command affects the HEAD file.
Since the HEAD (the latest commit) is known by peeking the active branch, git checkout can do the roles of git switch: create and navigate branches.
Apart from the latest commit, git checkout undoes changes on other commits along the git workflow: working tree, index and history.
Is git switch alternate to git checkout command?
Knowing the best command per task is the key to unlocking speed and chopping off errors when handling a project.
Before git version 2.23, git checkout was an overworked command. It undid changes on a file, committed and switched branches. The multi-tasking led to confusion when deciding on the best situation to apply the command.
To prevent confusion, the git team decided to introduce more commands, each tied to a specific role. The notable introductions of git version 2.23 were git switch, and git restore.
Use git switch to create and navigate branches, and git restore to unstage files. Manipulate commits using git checkout and git reset.
For instance, you can use git checkout to detach the HEAD by checking out a commit.
git checkout <commit>
As a result, git checkout is helpful when restoring changes lost during a hard git reset.
You can use git rm as the alternative to git restore on undoing changes. Unlike git restore that returns changes to the working tree, git rm unstages and deletes a file from the filesystem. Replace git reset with git revert when handling pushed changes.
Let’s practically distinguish the commands.
Set up a lab and practice git switch vs git checkout and related commands
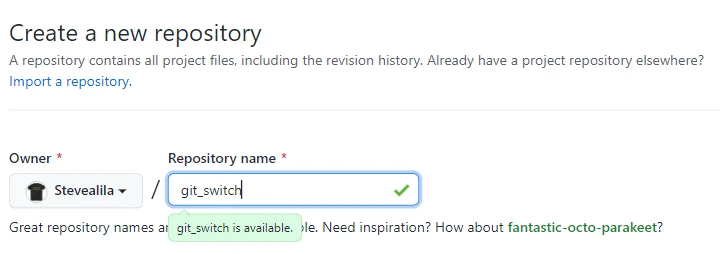
I am creating a repository on GitHub called git_switch,
copy its URL and git clone it on the command line.

cd into the cloned repository and create two commits, totaling three
commits because git made the initial commit on creating a repo with a
README.md.
Second commit:
cd git_switch

touch file1.txt

git add .

git commit -m "Second commit"
Third commit:
echo "Modify text file" >> file1.txt

git add .

git commit -m "Third commit"
Confirm the commits’ creation.
git log --oneline
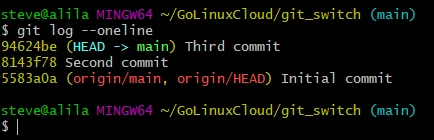
We have three commits to practice git switch and related commands. Let’s do that right away.
Scenario-1: Using git switch command
Let’s use the switch command to create a branch and relocate the HEAD.
Create a branch
git switch -c secondBranch
Git informs us that we are into a new branch. Also, we have two branches.
git branch
Navigate between multiple branches
We can return to the main branch and delete the newly created branch.
git switch main

git branch -d secondBranch
Let’s now apply git checkout.
Scenario-2: Using git checkout command
Create a branch
Let’s reintroduce the secondBranch.
git checkout -b secondBranch
Here, we have created a branch to divert the HEAD from the main branch
to the secondBranch.
Navigate branches
Let’s return to the main branch and delete the secondBranch.
git checkout main

git branch -d secondBranch
Detach the HEAD
Detaching a commit makes it impossible for git to account for the
changes made at that state. You can detach the HEAD to inspect its
changes or restore it after a hard reset. Let’s go with the latter.
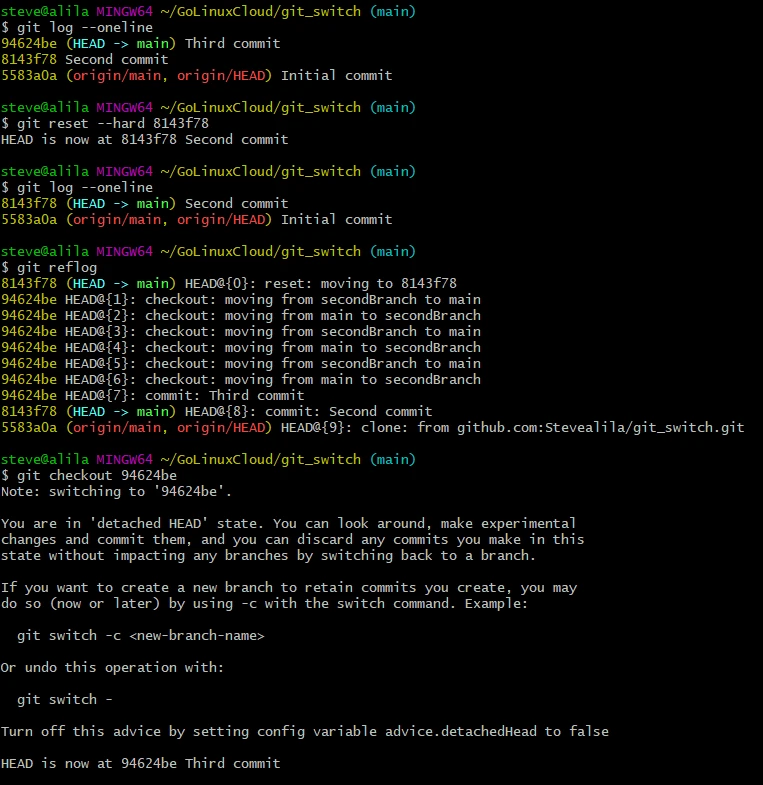
Check history.
git log --oneline
Hard reset the HEAD from 94624be to 8143f78.
git reset --hard 8143f78
Then, recheck history.
git log --oneline
The 94624be commit no longer exists in history. However, git reflog
still has information about the discarded objects before
garbage collection.
git reflog
So, we can detach the HEAD from there.
git checkout 94624be
Then create a branch from the detached HEAD. That returns the deleted commit to the workflow.
git checkout -b recoveryBranch
Move to the main branch and rebase the recoveryBranch.
git checkout main

git rebase recoveryBranch
Recheck the history.
git log --oneline
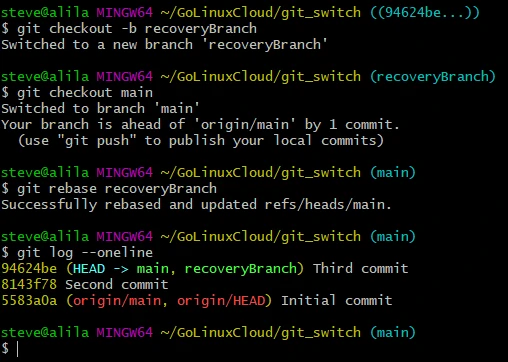
And voila, our reset commit is back to history! We can now delete the recovery branch because it has served its purpose.
git branch -d recoveryBranch
The above illustration shows that git reset is a disruptive command, discarding files and commits. That is why you should use git revert on pushed changes to avoid a conflict error on subsequent pushes.
git revert <commit>
Let’s now look at the difference between git switch, checkout, restore and rm.
Scenario-3: Practice git switch vs git checkout vs git restore vs git rm
Git restore discards a staged file using the --staged option. Let’s
modify the text file, stage and undo its changes.
echo "Second text file modification" >> file1.txt

git stage file1.txt

git status

git restore --staged file1.txt

git status
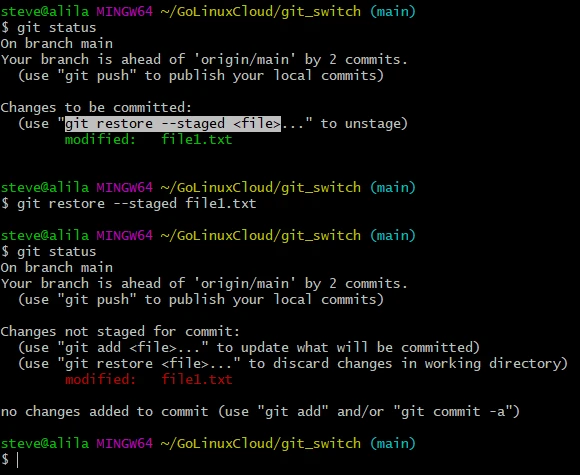
The file is untracked. Similarly, we could undo the changes using git checkout.
git checkout HEAD file.txt
Alternatively, git rm helps remove the files from the index as
follows.
Stage the file.
git add .
Delete it from the staging area and filesystem.
git rm --cached file1.txt
This time around, git expects us to commit the changes before completely updating the index. Otherwise, you will keep seeing the message about the taken action on running git status.
git status
Let’s wrap it up by committing and pushing the changes.
git commit -m "Record the undo operation"

git push

Conclusion
Although git switch and git checkout seem to perform the same operation,
you can spot their differences by understanding the relationship between
git HEAD and the refs.
Lastly, as explained in this tutorial, it would help to distinguish the two commands from git reset, git restore, and git rm.