
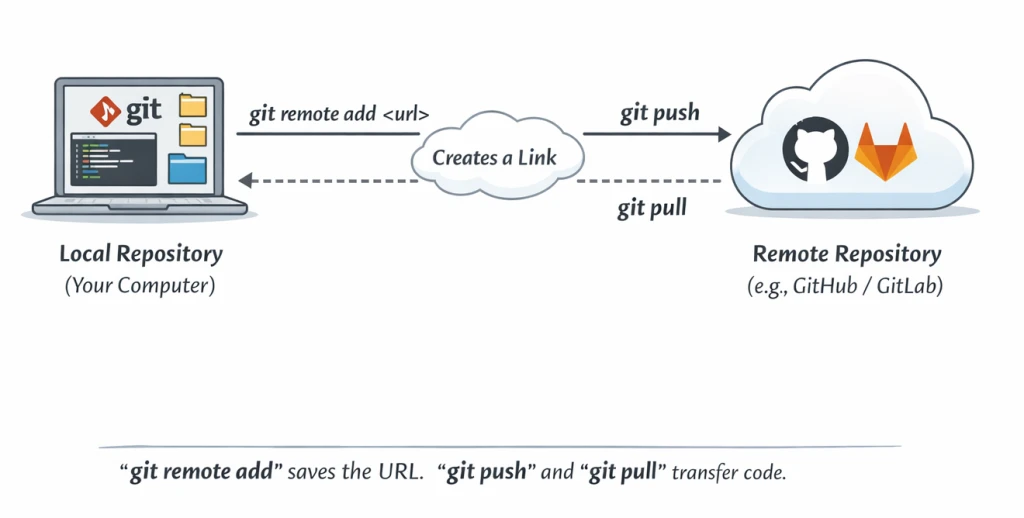
The git remote add command connects your local Git repository to a
remote repository such as GitHub or GitLab.
In simple terms:
- Your local repository lives on your system
- A remote repository lives on a Git hosting service
git remote addcreates the link between them
Once the remote is added, you can push and pull code using git push
and git pull.
This guide explains how git remote add works, how to use it
correctly, and how to recover from common mistakes that break Git
workflows.
What is a Git remote?
A Git remote is a named reference to another Git repository, usually hosted on a remote server such as GitHub or GitLab.
Think of a Git remote as a bookmark for a repository URL.
Instead of typing a long repository URL every time, Git allows you to
assign it a short name like origin or upstream.
Git remotes are used to:
- Push commits to another repository
- Fetch and pull changes from other repositories
- Track relationships between local and remote branches
A Git remote does not store code locally.
It only stores the location (URL) of the remote repository.
How git remote add works?
When you run git remote add, Git stores the remote repository URL in
its local configuration.
This allows your local repository to:
- Fetch changes from the remote repository
- Push commits to the remote repository
- Track branches between local and remote
No data is transferred when you run git remote add. It only creates a
reference to the remote repository.
Syntax to use git remote add command
git remote add <remote-name> <remote-url>
Where:
<remote-url>is the Git repository URL (HTTPS or SSH)<remote-name>is a local alias (commonlyorigin)
Basic example: Add a remote repository (HTTPS or SSH)
You can add a remote repository using either HTTPS or SSH.
Both methods work the same with Git commands like git push and
git pull.
The difference is only in how authentication is handled.
Using HTTPS
git remote add origin https://github.com/username/repo.git
- Easier for beginners
- Requires username and password or a personal access token
- Works without SSH key setup
Using SSH
git remote add origin git@github.com:username/repo.git
- More secure and recommended for long-term use
- Uses SSH keys instead of passwords
- Avoids repeated authentication prompts
Verify the remote configuration
After adding the remote, verify it using:
git remote -v
Example output:
origin  git@github.com:username/repo.git (fetch)
origin  git@github.com:username/repo.git (push)
Tip: Most development teams prefer SSH-based remotes to simplify authentication and automation.
Step-by-step: Add a remote repository correctly
Step 1: Initialize a Git repository
If Git is not initialized, you will see this error:
fatal: Not a git repository (or any of the parent directories): .git
Fix it by initializing Git:
git init
Step 2: Add the remote repository
git remote add origin git@gitlab.com:golinuxcloud/git_examples.git
Step 3: Verify the remote configuration
git remote -v
Step 4: Pull from a remote branch
git pull origin test
This fetches and merges changes from the test branch of the remote
repository.
Common mistakes with git remote add (and how to fix them)
This section helps recover broken Git setups, which is a very common search intent.
Error: Not a git repository
fatal: Not a git repository (or any of the parent directories): .git
Fix:
git init
git remote add origin <url>
Error: remote origin already exists
fatal: remote origin already exists.
Fix option 1: Change the existing URL
git remote set-url origin <new-url>
Fix option 2: Remove and re-add the remote
git remote remove origin
git remote add origin <url>
Error: The current branch has no upstream branch
fatal: The current branch has no upstream branch
Fix:
git push -u origin <branch-name>
This sets the upstream branch so future pushes work without extra arguments.
Quick recovery checklist for Git remotes
Use this checklist when git push or git pull suddenly stops working:
git status                      # Confirm you are inside a Git repository
git remote -v                   # Verify remote name and URL
git branch                      # Check current branch
git push -u origin <branch>     # Set upstream and push
This checklist helps quickly identify missing remotes, wrong URLs, or unset upstream branches.
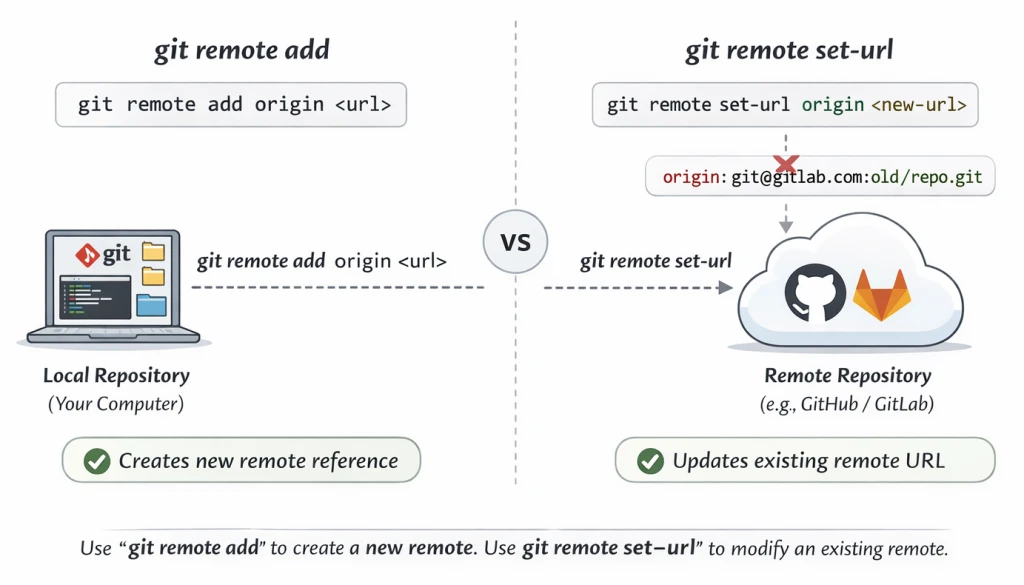
git remote add vs git remote set-url
These two commands are often confused.
git remote add→ adds a new remotegit remote set-url→ changes the URL of an existing remote
If the remote already exists, git remote add will fail. In that case,
you must use git remote set-url.
Example:
git remote set-url origin git@gitlab.com:golinuxcloud/new_repo.git
How to rename a remote repository
You may want to rename a remote for clarity.
git remote rename old-name new-name
Verify the change:
git remote -v
If required, update the upstream branch:
git branch --set-upstream-to=new-name/<branch>
How to delete a remote repository
To remove a remote reference from your local repository:
git remote remove <remote-name>
Verify:
git remote -v
This does not delete the actual remote repository — it only removes the local reference.
Summary
The git remote add command links your local Git repository to a remote
repository such as GitHub or GitLab.
It does not transfer any data but enables push and pull operations.
Common issues such as existing remotes or missing upstream branches can
be fixed using git remote set-url and git push -u.
