![git branch management with examples [Beginners]](/git-branch-examples/git_branch.jpg)
Introduction to git branch
A branch refers to a specific line of code that programmer’s collaborating on a project employ to make new commits. Git identifies the original branch as the master/main branch/default branch. When creating additional commits, the master/main branch will always connect you to the last changes that you will make.
Are you in doubts about how to create a git branch while working on a
shared repository?
Do not worry because in this tutorial we will walk you through how to
work with git branch. While using examples, we will demonstrate how to
create a branch and push it, create a git branch from another branch or
a commit, and delete a git branch.
Git branch syntax
You can check the official doc for the supported list of options with git branch
$ git branch [OPTIONS]
Understanding git branch workflow
Git branching enables a team of developers to develop copies of the production they are working on. While working in the git environment, they can add new features and also fix bugs. Once they are satisfied with the changes, git will allow merging the changes into the main production.
- To identify the initial branch from other branches, you will use
the
$ git initcommand. - Whenever you create a new commit, git identifies it with a unique identifier code to track the changes.
- Note that while working in git space the head will always point to the
latest commit unless you switch it to another using
git checkout <branch>command.
The diagram below is an illustration of the git branch concept.
![git branch management with examples [Beginners]](/git-branch-examples/git-branch.webp)
From the diagram above, we have the main/master branch pointing to the
last commit C in the sequences of events.
If you make an additional commit, it will be added according to your active branch i.e the branch of focus when you ran the new commit as illustrated below:
![git branch management with examples [Beginners]](/git-branch-examples/git-head.webp)
Git uses the HEAD to know the active branch within your
repository. The head doesn’t automatically point to a new branch created
as it does with new commits. We will illustrate how this works using an
example further in the tutorial.
The advantage of working in a git environment is that your codes are secure and intact for easy tracking even when you collaborate with other developers.
Getting the lab environment ready
We will begin with the basics by setting up a project that we will use
for practice to demonstrate how to effectively work with git branch as
the topic for this tutorial.
I will set up a remote repository git_prac and clone it to my local
workstation windows 10 pro bearing in mind that I will be collaborating
with other programmers. Also, I will add a few files that we can work
with for this experiment.
$ git clone https://github.com/git-tes/git_prac.git
Sample output

Now that we are set with our local repository we will be making changes
using the terminal to understand how to work with git branch.
Note that it is through git branching that you will be able to get snapshots of the different changes that take place in all the production.
Create a new branch in git
There are 5 methods to create a new branch using git CLI.
# Using git branch  <branch>
# Using git checkout -b <branch>
# Using git branch <branch name> <commit identifier>
# Using git stash <branch name>
# using git checkout -b <remote branch>
Method-1: Using git branch command
Using our local project git_prac, we will create a new branch called
bug_fix.
First, we will use git branch –a command to see all the available
branches in our main branch.
$ git branch –a
* main
  remotes/origin/HEAD -> origin/main
  remotes/origin/hotfix
  remotes/origin/main
From the sample output, we only have remote branches apart from the main
which already has a local one by default. git branch –a command
usually samples out both remote and local branches in an active repo.
Next, we will now use git branch command to create a local branch
bug_fix:
$  git branch bug_fix
$ git branch
  bug_fix
* main
We have successfully created a new local branch called bug_fix.
Understand that when you use git branch to create a new one, git
will not switch to the new branch automatically. In this experiment,
we see that the main branch has a steric before it which shows that it
is the active branch. In git, the active branch is identified using a
different colour and a steric.
To see where the head is pointing, you will use $ git log --oneline
command as illustrated below. Remember we earlier said that the HEAD
will always point to the latest commit.
$ git log –-oneline
0630d89 (HEAD -> main, origin/main, origin/HEAD, bug_fix) Update README.md
b5db3ff Initial commit
Here we have the HEAD pointing to the last commit just as expected.
Method-2: Using git checkout -b command
This method will allow you to create a new branch and concurrently
switch to it, unlike the git branch command.–b is an alert that
communicates with git to first run the new branch followed by git
checkout.
Let’s illustrate how that works using an example. We shall create a new
branch called hotfix-1 using git checkout -b <branch> command.
$ git checkout –b <branch>
Sample output:
$ git checkout -b hotfix-1
Switched to a new branch 'hotfix-1'
We have created a new branch hotfix-1 and automatically switched to it
as shown above.
Method-3: Create a new branch from existing commit
Commits as simply snapshots of the events taking place in a branch
history. You can create a branch from a past commit in case there’s a
need for working on that particular commit. The first step you will take
is to run git log command. That will display the list of all the
commits in the specified branch for you to choose which one to work on.
Let us implement this first step after adding a few files in the
new branch hotfix-1:
$ git log –-oneline
2939eb3 test commit-three (HEAD -> hotfix, origin/hotfix-1) added another new file
22a2d98 test commit-two added new file
0630d89 test-commit-one (origin/main, origin/HEAD, main, bug_fix) Update README.md
b5db3ff Initial commit
Next, you will use git branch command with the appended code for the
commit that you would like to turn into a new branch. For this example,
we will use test-commit-two-22a2d98 to turn it into a
new branch hotfix-now. See below:
$ git branch <branch name> <commit identifier>
Sample output
$ git branch hotfix-now 22a2d98
Next, you will use git log to view all commits in our
active branch hotfix-1 including our latest commit. Not that the HEAD
is pointing to the last commit and not the active branch bug_fix. The
reason for this was explained earlier under our first method.
$ git log –oneline
2939eb3 (HEAD -> hotfix-1, origin/hotfix-1) added another new file
22a2d98 (hotfix-now) added new file
0630d89 (origin/main, origin/HEAD, main, bug_fix) Update README.md
b5db3ff Initial commit
Lastly, run git branch to see your newly created branch hotfix-now
from a commit-two-22a2d98 as shown below.
Sample output
$ git branch
  bug_fix
* hotfix-1
  hotfix-now
  main
Method-4: Create a branch using git stash
A stash is simply temporary storage in git for the changes that you make in your active directory before committing them. It is most helpful if you are running a series of tests on your code and you are not sure which one will work out. You can always store such tests in a stash to later review and pick what you feel comfortable applying in your project.
You can learn more about git stash at git stash explained in detail with examples, we will now create a stash that we will later turn into a branch.
You can perform some changes in your local repo and then execute
git stash to stash the changes. We will create the new stash in our
bug_fix branch in the local repo using git stash command as
expected.
$ git stash
Saved working directory and index state WIP on bug_fix: 1137b2d added newest file
As you can see, we now have created a stash in our working directory
shown above, let’s progress to create a new branch bug_fix-a from the
stash. You can do this by using either git stash <branch name> or
git stash branch <branch name> stash@{stash-index} command for this
process.
$ git stash branch bug_fix-a stash@{1}
Sample output:
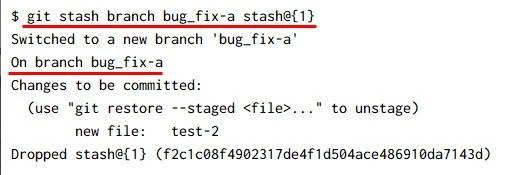
We now have our new branch bug_fix-a created from the stash
illustrated in the example. You also can tell from the output that there
are some changes stored to be committed later. That further explains the
importance of using git stashing as we mentioned in the introduction of
this section.
Method-5: Create a git branch on remote repository
To create a remote branch you will first clone a remote repo which you
will be working on just we did when preparing our lab environment for
this tutorial.
$ git clone https://github.com/git-test/git_prac.git
Sample Output:
We will create a new branch using either git branch or
git checkout –b <branch-name> command. For this section, we are going
to use git checkout <branch-name> command to demonstrate the process.
Let us create a new branch test-r-branch which we will later push to
create a remote copy.
$ git checkout -b test-r-branch
Switched to a new branch 'test-r-branch'
We now have the new remote branch created known as test-r-branch
To create a remote branch from our local workstation. We will need to
use git push --set-upstream origin <branch-name> command. For this
case, let’s push the newly create test-r-branch so that we can have a
remote copy of it.
$ git push --set-upstream origin test-r-branch
Sample output:
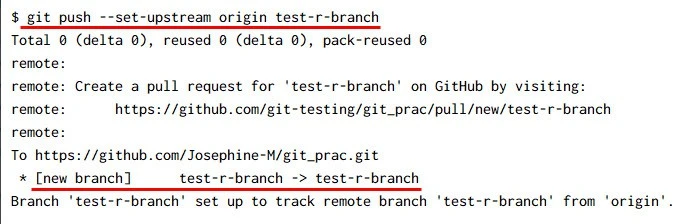
The process was successful as we now have a
remote branch test-r-branch set up in our remote repo git_prac
How to identify a remote branch in git
How do you check if a branch already exists remotely? The direct way for
you to check remote branches only will be to use git branch –r
command. Running the git branch –r command will show you all the
available remote branches after cloning the respective repo to your
local workstation.
Let’s practice that in our git_prac experiment by running the
git branch –r command.
Sample output
$ git branch –r
  origin/HEAD -> origin/main
  origin/hotfix
  origin/main
We have three remote branches inclusive of the main/master branch from
our local repo git_prac.
Delete a git branch
It is fine to delete a branch once you finish working and merge the changes into the main branch both local and remote. In this section, we will practice how to delete a local branch and a remote branch.
How to delete a local branch
To delete a local branch in git, you will use
git branch -d <branch name> command. It is essential that you merge
your changes successfully into the main branch. That will enable you to
run the delete command without conflicts/errors.
We will illustrate this process using an example as shown in the steps below;
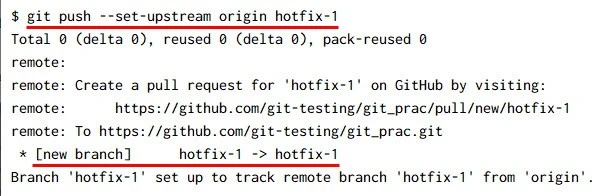
Step 1: Creating a remote copy of the local branch
In this example, we will delete the hotfix-1 branch from our active
repo git_prac after pushing it remotely using
git push --set-upstream origin <branch name> command.
Let’s start with git push --set-upstream origin <branch name>
Sample output:
If we run git branch -d <branch name> command at this point we will
run into an error. Why? It is because we still have it as our active
local branch. We will first switch to the main/master branch and then
run the delete command.
Step 2: Deleting the local branch
In this step, we can proceed to delete the branch after successfully switching to the main branch as shown below.
Sample output
$ git checkout main
Switched to branch 'main'
Your branch is up to date with 'origin/main'.

$ git branch -d hotfix-1
Deleted branch hotfix-1 (was 0630d89).
Git delete is implemented as shown in the output. To confirm let’s run
the git branch –a command to view all our remaining branches.
Sample output
$ git branch –a
  bug_fix
  bug_fix-a
* main
  testing-stash
  remotes/origin/HEAD -> origin/main
  remotes/origin/hotfix
  remotes/origin/hotfix-1
  remotes/origin/main
How to delete a remote branch
It is also permissible to delete your remote branch once you merge the
changes into the main project. However, you will use a different command
which is git push origin --delete <remote-branch-name>
Let use an example to illustrate the process.
Step 1: Identifying all the remote branches
You will use the git branch -r command to see all the available remote
branches for the current local repo git_prac for this scenario.
Sample output
$ git branch –r
  origin/HEAD -> origin/main (remote A)
  origin/hotfix (remote B)
  origin/hotfix-1 (remote C)
  origin/main (remote D)
  origin/test-r-branch (remote E)
Step 2: Deleting the remote branch
We will proceed using the git push origin --delete <your_branch>
command to delete a specified remote branch. For this practice, we will
choose to delete remote E after pushing it remotely using the
git push command. It is important to push the changes to our remote
repo first before deleting them. That will help you to avoid having an
error/conflict. Remember git is always keeping copies of all the history
of commits in a branch both locally and remotely.
$ git push origin : Remote E
Sample output
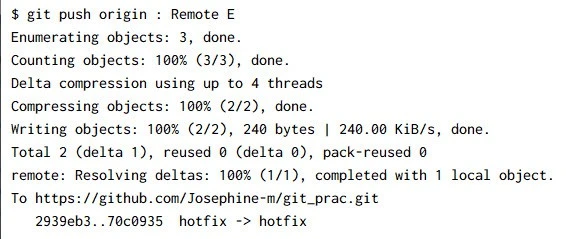
Push the changes to remote repository
$ git push origin --delete test-r-branch
To https://github.com/Josephine-M/git_prac.git
 - [deleted]         test-r-branch (remote E)
We were able to delete the remote branch E without an error as you can tell from the output
Tips for labelling git branches
It’s alright to label your branches with any name that you prefer. However, practising naming them according to the various stages of the project makes it easier to make references while working with others.
- Label according to the name of the team member and function in the project eg user_function
- Label according to the branch role e.g. bugfix_statement, hotfix_statement, feature_description
- Label according to the rising needs in the project development cycle
Summary
- Git branch syntax
- Understanding the git branching workflow
- Getting the lab environment ready
- Creating a new git branch
- How to identify a remote branch in git
- Delete a git branch
- Tips for labelling git branches
