
In this tutorial we will cover the following topics:
- Introduction to Flask
- Creating a Virtual Environment with Python 3
- Installing Flask packages with pip
- Create a simple Flask Python Web App blog
- Setting up a sqlite3 database to save our blog posts
- Creating a simple crud interface.
What is flask
- Flask is a lightweight python framework for web development that provides the basic tools that a developer would need to develop a fully functioning website. It gives the developer more freedom than other frameworks as it does not enforce a certain type of work flow.
- Flask is easy to set up and getting an app up and running with it takes no time.
- Flask comes with a development server which makes it easy to debug the web app. It also comes with a template engine called jinja2.
- Flask has built in objects such as a request object and a session object, most of which will be used in this article where we will walk you through the process of creating a simple blog web app using flask and a sqlite3 database.
Lab environment:
Before getting started I would like to let let you know the environment that I work in:
- Operating system: CentOS 8 Linux distro
- Python version: 3.8.10
- Code editor: VS code
- Browser: Firefox 89.0.2
Step 1: Create Virtual Environment with Python3
Flask can be simply installed using pip/pip3 or easy_install
globally, but it’s preferable to set up an application environment
using. This prevents the global Python installation from being affected
by a custom installation, as it creates a separate environment for the
application. The virtual environment manages this in separate
environments and does not let the libraries of different versions
overwrite each other.
In this command we are creating our virtual environment , we are going
to name it blog-venv.
~]# python3 -m venv blog-venv

~]# ls -l blog-venv/
total 16
drwxr-xr-x 2 root root 4096 Jul 8 08:48 bin
drwxr-xr-x 2 root root 4096 Jul 8 08:48 include
drwxr-xr-x 3 root root 4096 Jul 8 08:48 lib
lrwxrwxrwx 1 root root 3 Jul 8 08:48 lib64 -> lib
-rw-r--r-- 1 root root 69 Jul 8 08:48 pyvenv.cfg
After running the above command, you will notice that a directory named
blog-venv was created, this directory contains the script that would
activate the virtual environment, let’s activate the virtual
environment:
~]# source blog-venv/bin/activate
After you activate the venv, your command prompt should look something
like this:
(blog-venv) [root@server-1~]#
Notice the (blog-venv) at the beginning of the prompt. If you face any
problems, please refer to the
python docs.
To exit the virtual environment you can use deactivate command:
(blog-venv) [root@server-1 ~]# deactivate
[root@server-1 ~]#
Step 2: Installing Flask
Now you are ready to install the flask package using the following command:
(blog-venv) [root@server-1~]# pip3 install Flask
This will activate our environment and install Flask inside it. Now, we can create blog with Flask within this virtual environment, without affecting any other Python environment.
We will create a new directory to store all our flask blog related files:
(blog-venv) [root@server-1 ~]# mkdir flask-blog && cd flask-blog/
Step 3: Create your first flask python web application
Now since Flask is successfully installed, we will create our first
python web application using flask. We will start by creating a python
file and naming it “app.py”:
from flask import Flask

app = Flask(__name__)

@app.route("/")
def main():
    return "Blog web app"

if __name__ == "__main__":
    app.run(debug=True)
Lets break down the above bit of code.
- Line number 1: we imported the Flask class.
- Line number 3: we created an instance of this class called
appand give it the special variable__name__as an argument. You need this because flask sets up the static folder paths behind the scenes. - Line number 5: we used the
route()decorator to specify the URL that should launch our function. - Finally we used an
ifstatement to see whether our module is imported by another application or is it ran directly, in case the module is ran directly and the flask development server will run on port 5000. Thedebug=truekeyword argument adds more verbosity when displaying errors to make debugging easier.
Now let’s run the flask web app:
(blog-venv) [root@server-1 flask-blog]# python3.8 app.py
* Serving Flask app 'app' (lazy loading)
* Environment: production
WARNING: This is a development server. Do not use it in a production deployment.
Use a production WSGI server instead.
* Debug mode: on
* Running on http://127.0.0.1:5000/ (Press CTRL+C to quit)
* Restarting with stat
* Debugger is active!
* Debugger PIN: 743-919-156
You flask blog is up and running, if you open your browser and visit the
URL 127.0.0.1:5000/ you will be greeted with this page:
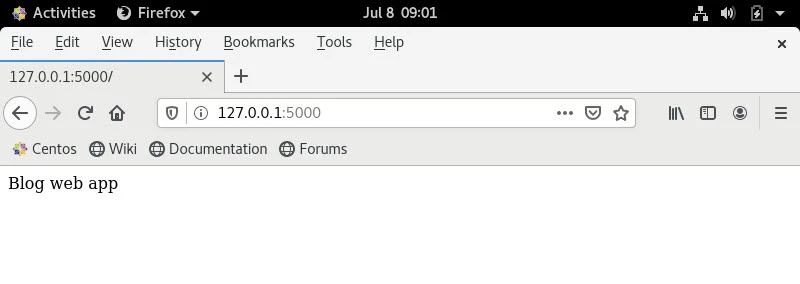
At this point, you have a basic web app that displays the text “Blog web app”, now is time to add some HTML to your web app.
Step 4: Using Flask templates
Using flask render_template()
In order to display HTML files using flask, you will need to use the
render_template() function, it only takes the name of the HTML file
and the variable that you would like to pass to the template engine if
any (We will discuss the variables later in this article).
Since our main terminal is running the flask blog app, we will open
another terminal and activate our virtual environment. Next let us
update the code of app.py to use render_template():
from flask import Flask, render_template

app = Flask(__name__)

@app.route("/")
def main():
    return render_template("index.html")

if __name__ == "__main__":
    app.run(debug=True)
We imported the render_template() function and used it. Now the
main() view function returns the result of the render_template
function.
We gave render_template() function the name of the HTML file
index.html as an argument. By default flask looks for the template
files in the templates directory, so now we need to create a
templates directory in the same directory as our app, and then create
a file named index.html inside this templates directory.
Move to the directory in which your flask app is and enter this command:
(blog-venv) [root@server-1 flask-blog]# mkdir templates && touch templates/index.html
At this point, our directory structure should look like this:
.
├── app.py
└── templates
    └── index.html

1 directory, 2 files
We will place some dummy HTML data inside our index.html file as
below:
<!DOCTYPE html>
<html lang="en">
<head>
        <meta charset="UTF-8">
        <meta http-equiv="X-UA-Compatible">
        <meta name="viewport" content="width=device-width, initial-scale=1.0">
        <title>Document</title>
</head>
<body>
        <h1>Flask Blog app</h1>
</body>
</html>
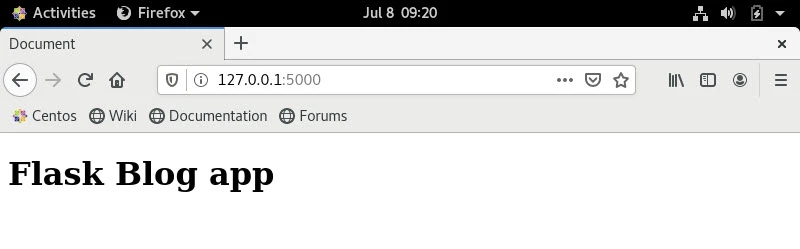
Save the file and refresh your browser and visit 127.0.0.1:5000/, you
should find your HTML file:
When debug is set to true, the flask development server will notice
the changes in code, so you don’t need to rerun the server after you
modify the code, just refresh the page.
 * Detected change in '/root/app.py', reloading
 * Restarting with stat
 * Debugger is active!
 * Debugger PIN: 743-919-156
Using jinja2 templates
There are two ways to style HTML in flask, the first one would be adding
the CSS in the <style> tag and the javascript in the <script> tag
and keeping everything in the same HTML file. But this would be
inefficient in case you have multiple HTML templates and you want to
change the CSS in all of them, you will need to change the CSS in each
HTML file one at a time.
The second and more efficient way that utilizes the jinja2
template engine would be by creating separate CSS and javascript files
and then linking them to your base HTML file and overriding only
specific parts of the base file, this will be way more clear once you
see an example. Lets create our base HTML file, we will call it
base.html:
<!DOCTYPE html>
<html lang="en">
<head>
        <meta charset="UTF-8">
        <meta http-equiv="X-UA-Compatible" content="IE=edge">
        <meta name="viewport" content="width=device-width, initial-scale=1.0">
        <title>{% block title %} {% endblock %}</title>
        <link rel="stylesheet", href="{{ url_for('static', filename='style.css') }}">
</head>
<body>
      {% block body %} {% endblock %}
</body>
Here we linked CSS file to base.html file using the url_for()
method that comes with flask, the url_for() method looks for the
static files in a directory called static, it should be in the same
level as the flask app and the templates directory. Navigate to your
app directory, and create a directory called static and inside it,
a file named style.css:
(blog-venv) [root@server-1 flask-blog]# mkdir static && touch static/style.css
At this point, your directory structure should look like this:
 .
├── app.py
├── blog-venv
│ └── .....
├── static
│    └── style.css
└── templates
        ├── base.html
        └── index.html
Now we will place following CSS selectors in our style.css file:
body
{
    background-color: #8A2BE2;
}

.main-container
{
    background-color: white;
    color: black;
    border-radius: 10px;
    width: 70%;
    margin: auto;
    margin-top: 10%;
    padding: 5px;
    padding-left: 10px;
}
Displaying dynamic data in our template
Now lets talk about {% block title %}, {% block body %} and
{% endblock %} .These are just placeholders for the actual content
that you want to display in the HTML page, they will be overridden with
your content and the content will be displayed exactly where you placed
them, here is an example, lets create a file called posts.html and
make it inherit from base.html, this file will later display all of
our blog posts
{% extends 'base.html' %}
{% block title %} Posts {% endblock %}
{% block body %}
        <div class="main-container">
                         <h1>First post</h1>
                         <div> posted on: 5th of june</div>
                         <div>this is  the first blog post</div>
                         <hr>
       </div>
{% endblock %}
We start by extending base.html, this tells jinja2 to add all the HTML
code before, after and between the placeholder, this includes the CSS
and javascript links, so all the styling in the style.css file is
applied to this file as well.
Now let’s add an endpoint called /posts to our flask app that returns
the posts.html file that we just created:
from flask import Flask, render_template

app = Flask(__name__)

@app.route("/")
def main():
    return render_template("index.html")

@app.route("/posts")
def display_posts():
        return render_template("posts.html",)

if __name__ == "__main__":
        app.run(debug=True)
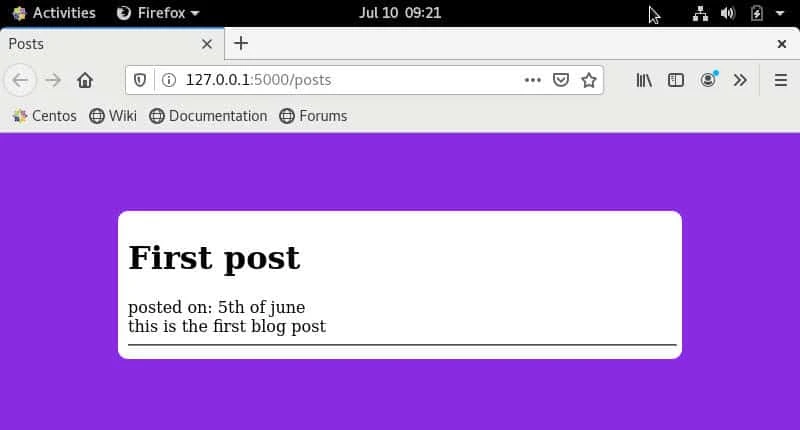
Once you visit 127.0.0.1:5000/posts, posts.html should be returned,
here is how my posts.html looks like:
Step 5: Setup Sqlite3 database for Python Web App
Before creating posts, we need to set up our database, flask allows you
to use any kind of database any way you want, if you want to communicate
with the database directly you can do so, if you want to use an object
relational mapper (ORM) then you can install
<a href="https://www.golinuxcloud.com/flask-sqlalchemy/" title="Flask SQLAlchemy [In-Depth Tutorial]" target="_blank" rel="noopener noreferrer">flask-sqlalchemy</a>
which is one of the best ORMs out there. In this tutorial we will use
the sqlite3 database, and we will communicate directly with it:
from flask import Flask, render_template
import sqlite3
import os

if  "mydb.db" not in os.listdir():

        conn = sqlite3.connect("mydb.db")
        db = conn.cursor()

        db.execute("CREATE TABLE posts (title TEXT, content TEXT, date TIMESTAMP NOT NULL DEFAULT CURRENT_TIMESTAMP)")
        conn.commit()
        conn.close()

app = Flask(__name__)

@app.route("/")
def main():
        return render_template("index.html")

@app.route("/posts")
def display_posts():
        return render_template("posts.html")

if __name__ == "__main__":
    app.run(debug=True)
Let’s break down the code snippet above,
Firstly, we imported sqlite3, which is the sqlite3 API for python, and
then we used an if statement to check whether the database already
exists, if it doesn’t then we create a database called “mydb.db” first
and secondly we connect to it and create a table inside called posts
that has three fields, the first one is the title of the post, the
second one is the content of the post, its name is content, and the
third one is the time in which the post was created and it defaults to
the time of the post creation, so there will be no need to manually fill
it every time a post is created, finally we commit the changes and close
the connection with the database.
Step 6: Create CRUD interface for Flask Blog
CRUD stands for Create, Read, Update and Delete, these are the four basic operations of a persistent storage, and now we will perform them on our blog posts. Until now, there no way to create a post other than connecting to the sqlite3 database and adding one manually, so let’s add a way to add a post from the web app itself.
We are going to create an endpoint called /create_post, it is going to
contain a form that consists of two fields, a title field and a content
field, when a user fills the form, we will take the data in the filled
form and save it to our sqlite3 database to later display them in the
/posts endpoint.
Creating posts
Lets start by creating the HTML form, we will name the HTML file
create.html (Remember that all HTML files should be in the templates
directory):
{% extends 'base.html' %}

{% block title %} Create Post {% endblock %}

{% block body %}
    <div style="text-align: center;" class="main-container">
        <form method="POST">
            Title: <input type="text"name="title">
            <hr>
            Content:
            <br>
            <textarea name="content"></textarea>
            <hr>
            <button type="sumbmit">
            POST
            </button>
        </form>
    </div>
{% endblock %}
Now let’s create the flask endpoint to create post:
from flask import request, Flask, render_template, url_for, flash, redirect   # Import these flask functions
import sqlite3
import os

if  "mydb.db" not in os.listdir():
        conn = sqlite3.connect("mydb.db")
        db = conn.cursor()
        db.execute("CREATE TABLE posts (title TEXT, content TEXT, date TIMESTAMP NOT NULL DEFAULT CURRENT_TIMESTAMP)")
        conn.commit()
        conn.close()

app = Flask(__name__)

@app.route('/create', methods=["GET", "POST"]) # Allowing Post requests

def create_post():
    if request.method.upper() == "POST":
        title = request.form.get("title")
        content = request.form.get("content")
        conn = sqlite3.connect("mydb.db")
        cur = conn.cursor()
        # Adding the post to the database
        cur.execute("INSERT INTO posts (title, content) VALUES(?, ?)", (title, content))
        conn.commit()
        cur.close()
        conn.close()
        return redirect(url_for("display_posts")) # redirect user
    return render_template("create.html")

@app.route("/")
def main():
        return render_template("index.html")

@app.route("/posts")
def display_posts():
        return render_template("posts.html")

if __name__ == "__main__":
    app.run(debug=True)
The create_post() function checks if the method of the request is post
request and if so, it takes the data from the field and saves them to
the sqlite3 database and then redirects the use to the /posts endpoint
where all the posts are displayed, if the fields of the form are empty,
then we flash a message to let the user know that all the fields of the
form should be filled. The date field is filled automatically.
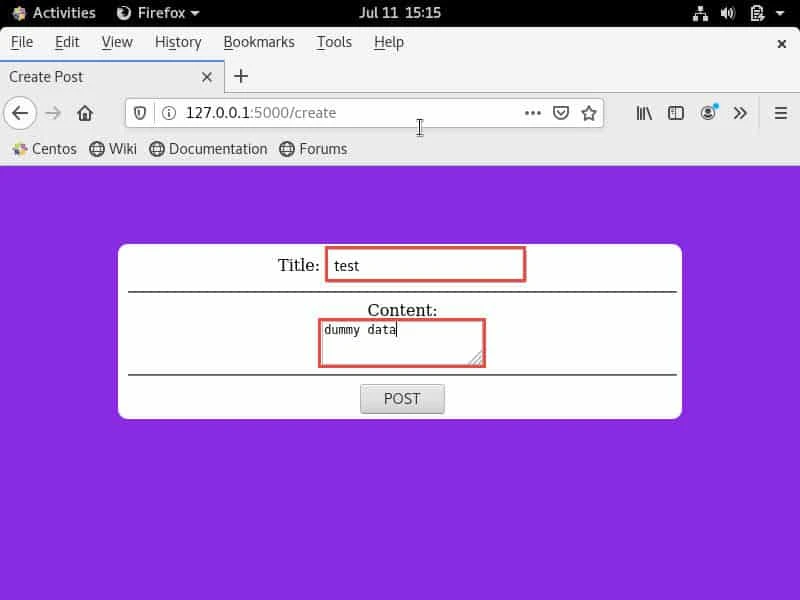
Now if you visit 127.0.0.1:5000/create:
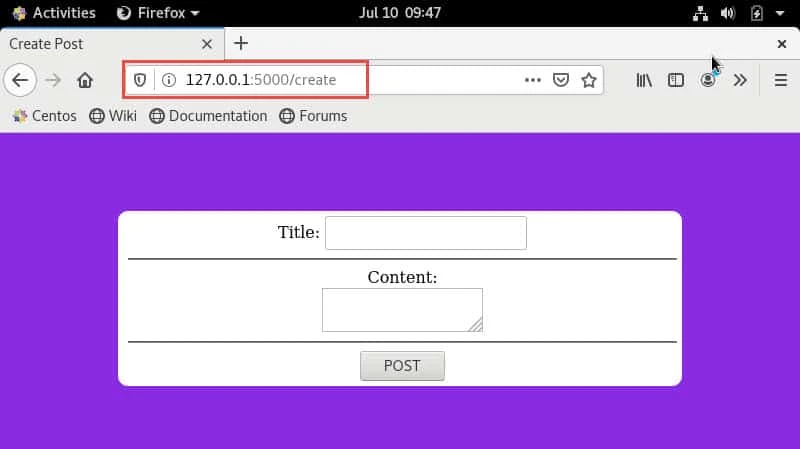
We will create a dummy post with some test Title and dummy data as
content.
Display Flask messages
Now lets add the ability to display messages to base.html based on
field’s value. Here we will make sure all the provided fields are
mandatory and if any field is left empty then the blog will display a
message.
We will update our base.html to print flask message:
<!DOCTYPE html>
<html lang="en">
<head>
        <meta charset="UTF-8">
        <meta http-equiv="X-UA-Compatible" content="IE=edge">
        <meta name="viewport" content="width=device-width, initial-scale=1.0">
        <title>{% block title %} {% endblock %}</title>
        <link rel="stylesheet", href="{{ url_for('static', filename='style.css') }}">
</head>
<body>

      {% with messages = get_flashed_messages() %}
      {% if messages %}
       <div class=flashes>
         {% for message in messages %}
         <h2>{{ message }}</h2>
         {% endfor %}
      </div>
      {% endif %}
      {% endwith %}

      {% block body %} {% endblock %}
</body>
The {% with %} and {% for %} along with {% if %} are control
structures offered by jinja2 to facilitate the control flow of the
program and add support from the front-end.
Next we update our create_post() function in app.py to check for
TITLE and CONTENT field. If any of the field is left empty then we will
use flask message to print a message on the screen:
from flask import request, Flask, render_template, redirect   # Import these flask functions
import sqlite3
import os
from flask.helpers import flash, url_for

if  "mydb.db" not in os.listdir():
        conn = sqlite3.connect("mydb.db")
        db = conn.cursor()
        db.execute("CREATE TABLE posts (title TEXT, content TEXT, date TIMESTAMP NOT NULL DEFAULT CURRENT_TIMESTAMP)")
        conn.commit()
        conn.close()

app = Flask(__name__)
app.config["SECRET_KEY"] = "secret key"

@app.route('/create', methods=["GET", "POST"]) # Allowing Post requests

def create_post():
    if request.method.upper() == "POST":
        title = request.form.get("title")
        content = request.form.get("content")

        if title == None or content == None or title.strip() == "" or content.strip() == "":
            # flashes a message to tell the user to fill all the fields
            flash("Please fill all the fields")
            return render_template("create.html")

        conn = sqlite3.connect("mydb.db")
        cur = conn.cursor()
        # Adding the post to the database
        cur.execute("INSERT INTO posts (title, content) VALUES(?, ?)", (title, content))
        conn.commit()
        cur.close()
        conn.close()
        return redirect(url_for("display_posts")) # redirect user
    return render_template("create.html")

@app.route("/")
def main():
        return render_template("index.html")

@app.route("/posts")
def display_posts():
        return render_template("posts.html")

if __name__ == "__main__":
    app.run(debug=True)
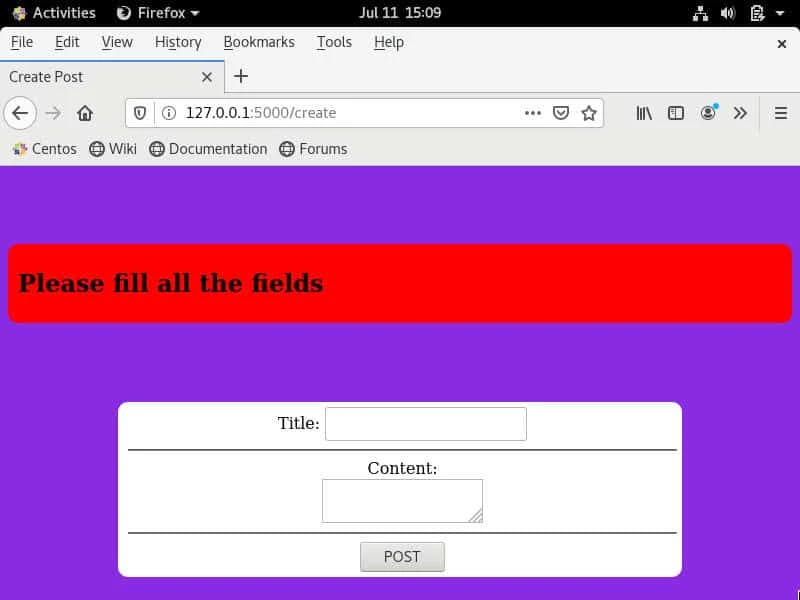
Now try to click on “POST” without providing any value in TITLE or CONTENT field and you should get a flash message:
Displaying posts
Now let’s display our posts in the /display endpoint of our app:
...
@app.route("/posts")
def display_posts():
        conn = sqlite3.connect("mydb.db")
        cur = conn.cursor()
        cur.execute("SELECT *, rowid FROM posts") # Getting all the posts from the sqlite3 database
        posts = cur.fetchall() # fetching all the posts from the database and assigning them to the posts variable

        cur.close()
        conn.close()
        return render_template("posts.html", posts=posts)  # Passing the posts variable ( which is a list ) to the front-end so that jinja2 can loop over it and display all the posts
...
Here we connected to the database and fetched all the posts from it. and
put it in a normal python list (thanks to the cur.fetch() function),
then we passed that list to the jinja2 template engine to loop over it
and display all the posts.
Now let’s loop over the post’s list that in the HTML file using jinja2
and render all the posts, let’s open posts.html and modify it:
{% extends 'base.html' %}
{% block title %} Posts {% endblock %}

{% block body %}

<div class="main-container">
    {% for post in posts %}
        <h1>{{ post[0] }}</h1>
        <div> posted on:{{ post[2] }}</div>
        <div>{{ post[1] }}</div>
        <hr>
    {% endfor %}

</div>

{% endblock %}
Notice how we can access the members of the posts list that same way we
would in a normal python list. Now all the posts that you create from
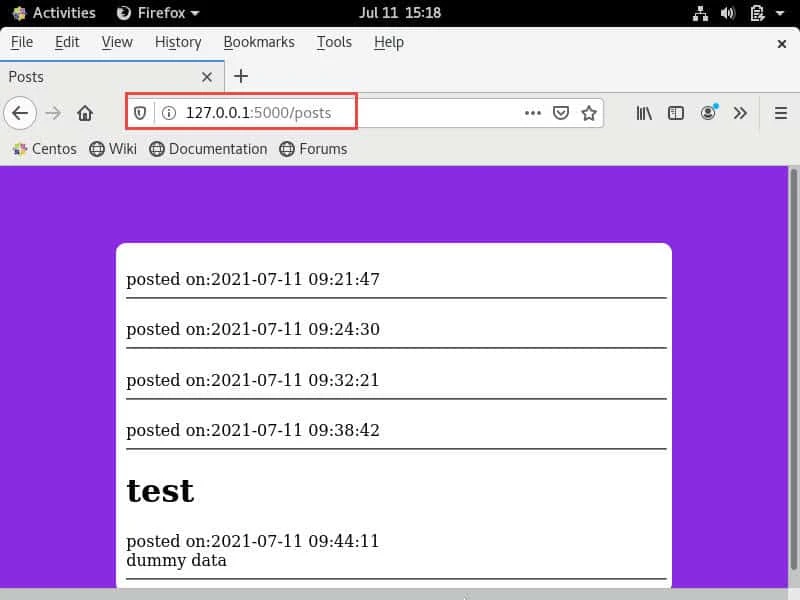
the /create will be displayed in /posts.
Now let’s display only one post when a user navigates to its id. Let’s
create the HTML file first, we will call it post.html:
{% extends 'base.html' %}
{% block title %} Posts {% endblock %}

{% block body %}

<div class="main-container">
    <h1>{{ post[0] }}</h1>
    <div> posted on:{{ post[2] }}</div>
    <div>{{ post[1] }}</div>
    <hr>
</div>

{% endblock %}
Now lets create the flask endpoint, we will call it
/post/<int:post_id> where int:post_id is a placeholder for any
number:
@app.route("/posts/<int:post_id>")
def display_post(post_id):
    conn = sqlite3.connect("mydb.db")
    cur = conn.cursor()
    post = cur.execute("SELECT * FROM posts WHERE rowid = ?", (str(post_id))).fetchone() # Notice the fetchone() fucntion

    return render_template("post.html", post=post, post_id=post_id)
When a post is created it gets its own ID automatically from sqlite3,
the first post has an ID of 1 and the second post 2, the third 3 etc.
Now we are fetching the post with the ID that will be specified in the
URL, and we will get only one post because there can only be one post
with a given ID. When we were getting all the posts, we used the
fetchall() function which returns a list with all the posts, now we
are using the fetchone() function which returns only one post. not a
list. We can also use the fetchall() function if we want, but it would
return a list that contains only one post (the post with ID in the URL).
So the difference is in the data structure that is returned to us, not
in the items inside the data structure, the items in the data structure
are determined by the ID. So we used fetchone() because it is more
convenient when we are getting only one item not a list of items.
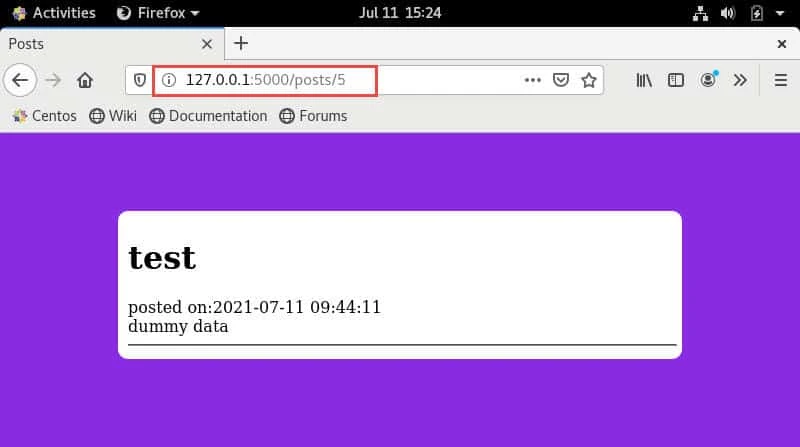
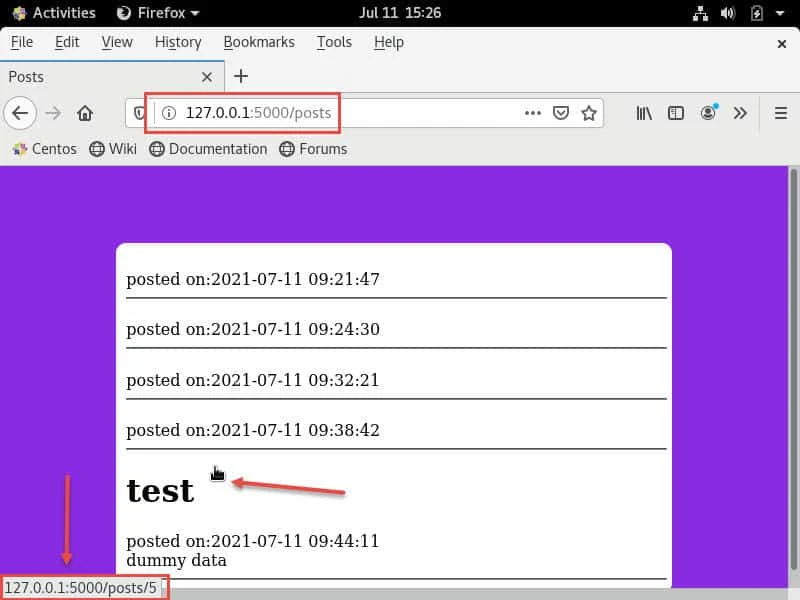
Now if you visit 127.0.0.1:5000/posts/5 , you will see only the fifth
post.
Now instead of manually navigating through different posts, let’s add a
link to each post the leads to the post on its own from
127.0.0.1:5000/posts. Modify posts.html:
{% extends 'base.html' %}

{% block title %} Posts {% endblock %}

{% block body %}

<div class="main-container">
{% for post in posts %}
    <a style="text-decoration: none; color: black;"href="{{ url_for('display_post', post_id=post[3]) }}"><h1>{{ post[0] }}</h1></a>
    <div> posted on:{{ post[2] }}</div>

    <div>{{ post[1] }}</div>
    <hr>
{% endfor %}
</div>

{% endblock %}
Now you can click on any of the post from 127.0.0.1:5000/posts to
access the respective post:
Deleting posts
Now we let’s add the functionality to delete a post. this will only need an endpoint as there will be no need to create a template, we will only add a deletion button to each post.
from flask import request, Flask, render_template, redirect   # Import these flask functions
import sqlite3
import os
from flask.helpers import flash, url_for

if  "mydb.db" not in os.listdir():
        conn = sqlite3.connect("mydb.db")
        db = conn.cursor()
        db.execute("CREATE TABLE posts (title TEXT, content TEXT, date TIMESTAMP NOT NULL DEFAULT CURRENT_TIMESTAMP)")
        conn.commit()
        conn.close()

app = Flask(__name__)
app.config["SECRET_KEY"] = "secret key"

@app.route('/create', methods=["GET", "POST"]) # Allowing Post requests

def create_post():
    if request.method.upper() == "POST":
        title = request.form.get("title")
        content = request.form.get("content")

        if title == None or content == None or title.strip() == "" or content.strip() == "":
            # flashes a message to tell the user to fill all the fields
            flash("Please fill all the fields")
            return render_template("create.html")

        conn = sqlite3.connect("mydb.db")
        cur = conn.cursor()
        # Adding the post to the database
        cur.execute("INSERT INTO posts (title, content) VALUES(?, ?)", (title, content))
        conn.commit()
        cur.close()
        conn.close()
        return redirect(url_for("display_posts")) # redirect user
    return render_template("create.html")

@app.route("/")
def main():
        return render_template("index.html")

@app.route("/posts")
def display_posts():
        conn = sqlite3.connect("mydb.db")
        cur = conn.cursor()
        cur.execute("SELECT *, rowid FROM posts") # Getting all the posts from the sqlite3 database
        posts = cur.fetchall() # fetching all the posts from the database and assigning them to the posts variable
        cur.close()
        conn.close()
        return render_template("posts.html", posts=posts)  # Passing the posts variable ( which is a list ) to the front-end so that jinja2 can loop over it and display all the posts

@app.route("/posts/<int:post_id>")
def display_post(post_id):
    conn = sqlite3.connect("mydb.db")
    cur = conn.cursor()
    post = cur.execute("SELECT * FROM posts WHERE rowid = ?", (str(post_id))).fetchone() # Notice the fetchone() fucntion

    return render_template("post.html", post=post, post_id=post_id)

@app.route("/posts/<int:post_id>/delete")
def delete_post(post_id):
    conn = sqlite3.connect("mydb.db")
    cur = conn.cursor()
    cur.execute("DELETE FROM posts WHERE rowid = ?", (str(post_id)))
    conn.commit()

    return redirect(url_for("display_posts"))

if __name__ == "__main__":
    app.run(debug=True)
We connect to the database like before, and then we use the DELETE
statement, which is another SQL statement. Now lets add the deletion
button in the post.html template:
{% extends 'base.html' %}
{% block title %} Posts {% endblock %}

{% block body %}

<div class="main-container">
    <h1>{{ post[0] }}</h1>
    <div> posted on:{{ post[2] }}</div>
    <div>{{ post[1] }}</div>
    <hr>
    <a style="text-decoration: none; color: red;" href="{{ url_for('delete_post', post_id=post_id) }}">DELETE</a>
</div>

{% endblock %}
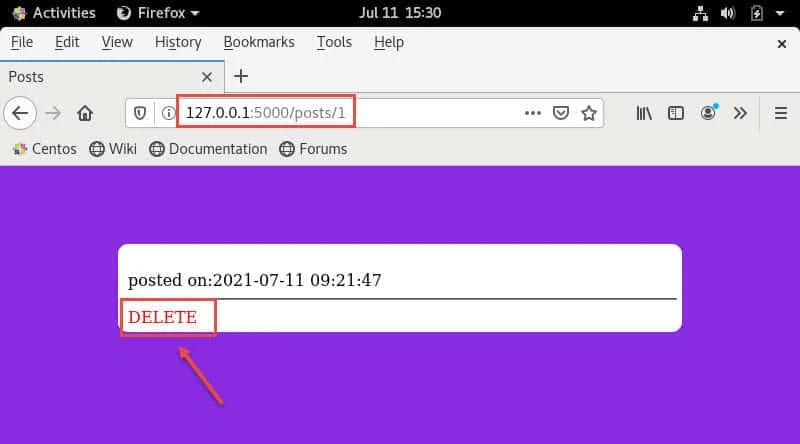
Now if you visit 127.0.0.1:5000/posts/1 , you will see the post and
the DELETE button:
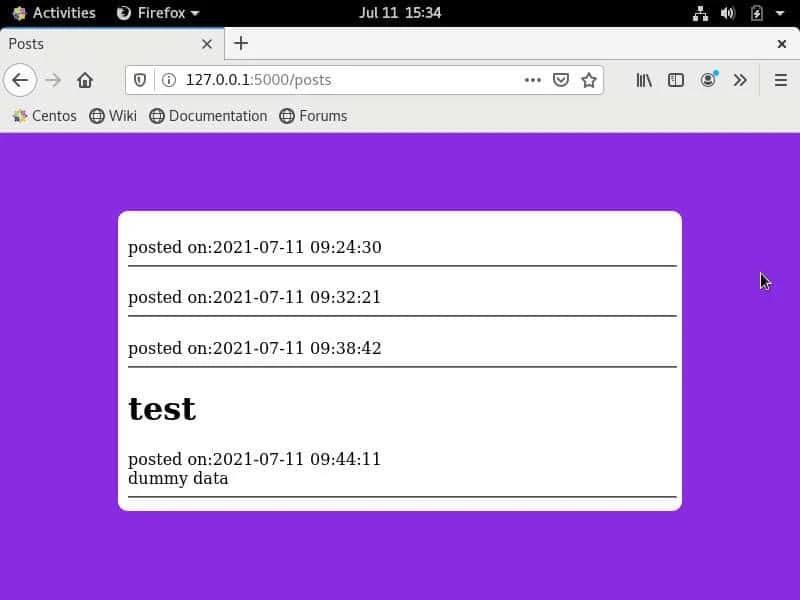
Once you click on the DELETE button, the post will be deleted and you will be redirected to the posts page. Here we have deleted first post so now we only have 4 more posts:
Editing posts
Lastly we need to add a way to edit posts. This is going to be similar
to creating posts, lets start by creating the flask endpoint, we will
call it /posts/<int_id>/edit :
@app.route("/posts/<int:post_id>/edit", methods=["POST", "GET"])
def edit_post(post_id):
    conn = sqlite3.connect("mydb.db")
    cur = conn.cursor()
    post = cur.execute("SELECT * FROM posts WHERE rowid = ?", (str(post_id))).fetchone()

    if request.method.upper() == "POST":
        title = request.form.get("title")
        content = request.form.get("content")

        if title == None or content == None or title.strip() == "" or content.strip() == "":
            flash("Please fill all the fields")
            return render_template("edit.html", post=post)

        cur.execute("UPDATE posts SET title = ?, content = ? WHERE rowid = ?", (title, content, post_id))
        conn.commit()

        return redirect(url_for("display_posts"))

    return render_template("edit.html", post=post)
We connected to the database, then we checked whether the request
method is POST or GET, if the method is POST we get the data filled by
the user in the form and then we use the UPDATE statement to overwrite
the data saved in the sqlite3 database and save the newly added data. If
the method is GET, then we return the edit.html template (in the
templates directory) which we will create now:
{% extends 'base.html' %}

{% block title %} Create Post {% endblock %}

{% block body %}

<div style="text-align: center;" class="main-container">
    <form method="POST">
        Title: <input value={{ post[0] }} type="text" name="title">
       <hr>
       Content:
       <br>
       <textarea name="content">{{ post[1] }}</textarea>
       <hr>
       <button type="submit">
             POST
        </button>
    </form>
</div>

{% endblock %}
Here we used the value attribute in the <input> HTML tag to set the
default value to be the current title of the post, and then we added the
current value for the post content between the <textarea> HTML tag, we
did this so that the user can edit the old values of the fields.
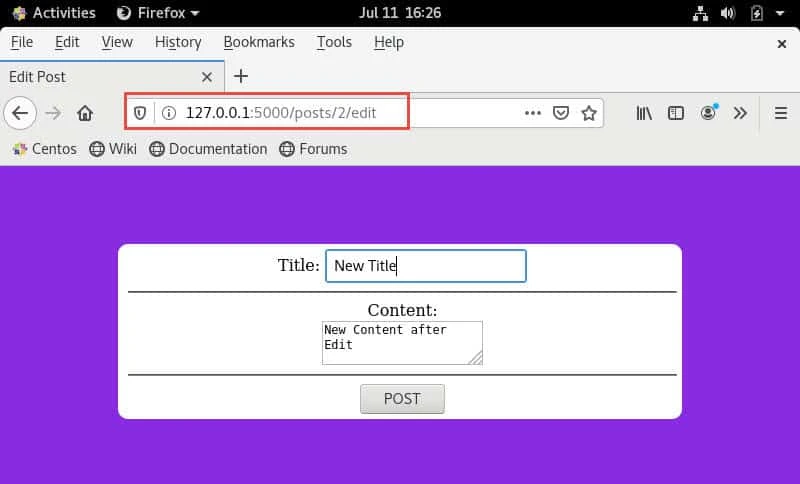
You can visit 127.0.0.1:5000/posts/2/edit and provide the updated
Title and Content:
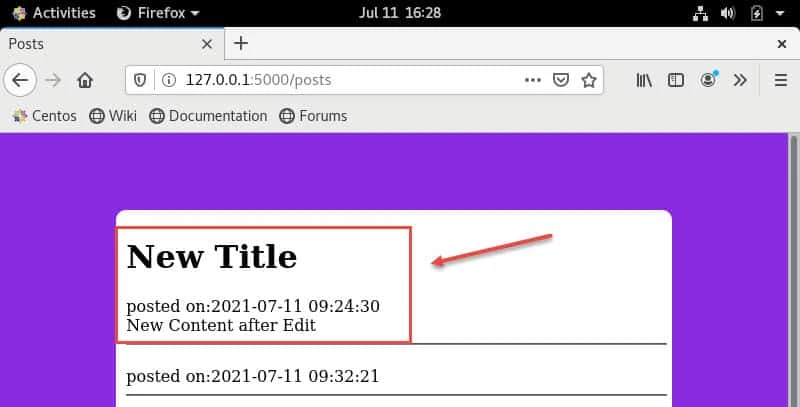
Once you click on POST, you will be redirected to 127.0.0.1:5000/posts
where you can verify the updated Title and Content:
Conclusion
In this article, we walked through the whole life cycle of creating a python web app that allows user to create, edit and delete blog posts. We used flask for the back-end, jinja2 engine that comes with flask and sqlite3 as a database for our python web app, we used the sqlite3 python API to communicate with the database. You are now ready to create your own flask app.
References
Related Searches: Python flask web page example, html to python flask, how to use flask python, create web app with python flask, flask tutorial python3, build web app with flask, flask application, flask web app tutorial, how to write web application in python, python web development using python, how to create web apps in python, web development using flask, simple web application using python, python flask step by step tutorial
