This guide will lead you on how to create a Python package which includes setup, configuration, building and publishing. You will learn how to include more files, test locally and version control for successful publication in PyPI.
A Python package is just a folder containing some python modules and
__init__.py file. An empty file with the name __init__.py should be
there for python recognize that as a directory that holds a package.
This arrangement helps in organizing Python code hierarchically hence
easily manageable and reusable. With Python 3.3, you no longer need
__init__.py to have packages as long as you have namespace packages.
These allow you to split a package across directories or distributions.
However, for traditional package layouts __init__.py is still a
crucial file and it’s very common in the python packaging conventions
used today.
Pre-requisites: Setting up Environment
Before you can successfully create Python package, there are some fundamental prerequisites you’ll need to have in place.
Install Python3
Your first step is to make sure you have Python installed on your system. If you don’t already have it, download it from the official Python website. To check if Python is installed, open your command line (cmd on Windows, Terminal on macOS or Linux) and type the following command:
python3 --version
You should see the Python version displayed. If not, it means Python isn’t installed, and you’ll need to download and install it using package managers or from GitHub.
# For Debian-based systems like Ubuntu:
sudo apt update
sudo apt install python3

# For Red Hat-based systems like CentOS:
sudo dnf install python3
Install pip3
pip is Python’s package installer, and you’ll need it to install
various Python packages from the Python Package Index (PyPI) to create
python package. If you’ve installed Python 3 from the official website
or using a package manager, pip3 is likely already installed.
To check if pip3 is installed:
pip3 --version
If pip3 is not installed, you can install it using the following
command:
# For Ubuntu and other Debian-based distributions
sudo apt update
sudo apt install python3-pip

# For Red Hat-based systems like CentOS:
sudo dnf install python3-pip
Install dependent packages required for package development
We will be using setuptools and wheel package to create a python package so make sure these are also installed on your setup.
pip3 install setuptools
pip3 install wheel
1. Create Simple Python Package from Scratch - For Beginners
Follow these steps to create, build and publish a Python package.
We will make everything simpler with steps starting from the initial setup to publishing on PyPI (Python Package Index) which is an official online repository for packages. This section aims to help beginners and explain how you can design a basic text analyzer package using Python. Among the functions that our package will have are counting how many words, sentences, and characters there are in a given text.
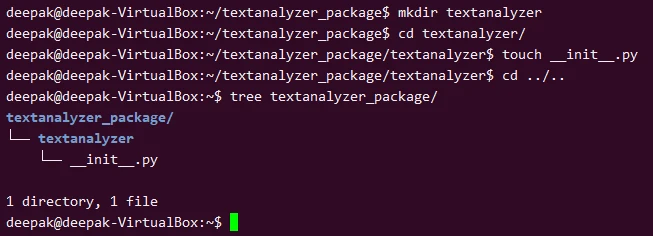
1.1 Setup Your Package Directory
Create the root directory of your package and name it something related
to your package’s functionality, such as textanalyzer_package. Inside
this directory, create a subdirectory with the name of your package
(textanalyzer).
textanalyzer_package/
└── textanalyzer/
    └── __init__.py
1.2 Write Your Module Code
Inside the textanalyzer directory, create a Python file named
analysis.py. In this file, you will define functions for analyzing
text.
# analysis.py

def count_words(text):
    return len(text.split())

def count_sentences(text):
    # Simplistic sentence counting
    return text.count('.') + text.count('!') + text.count('?')

def count_characters(text):
    return len(text)
Make sure to create an __init__.py file within the textanalyzer
directory to include your module’s functionality. This file should
import the functions you want to expose.
# __init__.py

from .analysis import count_words, count_sentences, count_characters
1.3 Create a setup.py File
In the textanalyzer_package root directory, create a setup.py file
with the necessary metadata about your package.
from setuptools import setup, find_packages

setup(
    name="textanalyzer",
    version="1.0",
    author="Your Name",
    author_email="your.email@example.com",
    description="A simple text analysis package",
    packages=find_packages(),
    classifiers=[
        "Programming Language :: Python :: 3",
        "License :: OSI Approved :: MIT License",
        "Operating System :: OS Independent",
    ],
)
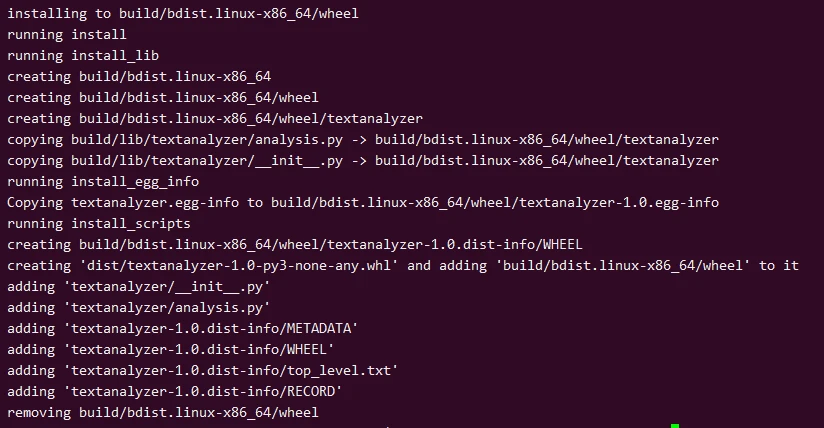
1.4 Building the Package
Ensure you have setuptools and wheel installed, then navigate to
your package’s root directory and run:
python3 setup.py sdist bdist_wheel
1.5 Publish Your Package to PyPI
First, if you haven’t already, install twine:
pip install twine
Next, use twine to upload your package to PyPI:
twine upload dist/*
Remember, you need a PyPI account to do this step.
1.6 Install and Use Your Package
Now, you or anyone can install your package using pip:
pip3 install textanalyzer
And use it in Python:
from textanalyzer import count_words, count_sentences, count_characters

text = "Hello world! Python packaging is fun. Let's share our package with the world."
print(f"Words: {count_words(text)}")
print(f"Sentences: {count_sentences(text)}")
print(f"Characters: {count_characters(text)}")
Congratulations, You’ve made a textanalyzer package which can count words, sentences, and characters in some given text. This guide helped you get an understanding of the basics of Python package creation and distribution. It also got you started with a practical example. However, keep in mind that more complex projects will require additional steps such as including a more complicated set of dependencies, automated testing being done, or comprehensive documentation to be written which we will cover in next section.
2. Create Complex Python Package from Scratch - For Advanced Users
If you’re itching to level up your Python skills, creating a complex Python package will force you to figure out packaging, organization, dependencies, tests and documentation. We’re only going to cover these topics in the context of experienced users looking to create robust packages. COME!
2.1 Planning Your Package
When planning to create python package, deciding whether it will be a single module or consist of multiple modules is crucial. A single module is generally easier to manage but might become cluttered as the package grows, while multiple modules are more organized but might make the package more complex.
For our DataValidator package, we decide to go with multiple modules
to separate different validation functionalities, such as:
string_validator.py: For validating string dataemail_validator.py: For validating email addressesphone_validator.py: For validating phone numbers
2.2 Creating Your Package Directory Structure
Creating a well-organized directory structure is an essential step to create Python package processes that are both maintainable and scalable. It’s important to group related files together and to give files and folders names that reflect their purpose.
This is the structure of DataValidator package from my setup:
DataValidator/
├── data_validator/
│   ├── __init__.py
│   ├── string_validator.py
│   ├── email_validator.py
│   └── phone_validator.py
├── tests/
│   ├── __init__.py
│   └── test_validators.py
├── setup.py
└── README.md
Here:
- The
data_validatorfolder contains the actual Python modules. - The
testsfolder will contain all your unit tests. setup.pywill help in packaging your Python code.README.mdfor documenting your package.
2.3 Setting Up Development Environment
The virtual environment is important for cleaning the slate. It ensures
that you have an isolated package so you can start developing. Open your
command line and find the folder for your DataValidator project. If
you haven’t made a directory yet, do it now:
mkdir DataValidator
cd DataValidator
Now, let’s create the virtual environment before we create python package. The command to create a virtual environment may differ depending on your operating system.
# On Windows
python -m venv venv

# On macOS and Linux
python3 -m venv venv
This will create a new folder named venv inside your DataValidator
project folder, containing the virtual environment.
Before you can start installing packages or running Python code, you need to activate the virtual environment.
# On Windows:
.\venv\Scripts\Activate

# On macOS and Linux:
source venv/bin/activate
Once activated, your command line should show the name of the activated
environment, in this case, venv.
(venv) deepak@deepak-VirtualBox:~/DataValidator$
You can verify that you’re using the Python interpreter from within the virtual environment by checking its location:
which python3  # On macOS and Linux
where python3  # On Windows
It should point to the Python executable inside the venv folder.
/home/deepak/DataValidator/venv/bin/python3
Now your environment is ready to create python package.
2.4 Let’s get to code writing
In this section, we will discuss Python best practices when we create Python package, the importance of docstrings, and how to manage version control with Git while creating your DataValidator package.
string_validator.py: This module validates strings based on length or
content.
# string_validator.py

def is_string_empty(s):
    """
    Checks if the given string is empty.

    Parameters:
        s (str): String to check.

    Returns:
        bool: True if empty, False otherwise.
    """
    return len(s.strip()) == 0

def has_special_characters(s):
    """
    Checks if the given string has special characters.

    Parameters:
        s (str): String to check.

    Returns:
        bool: True if has special characters, False otherwise.
    """
    return any(not c.isalnum() for c in s)
email_validator.py: This module validates email addresses.
# email_validator.py

def validate_email(email):
    """
    Validates if the input is an email.

    Parameters:
        email (str): The email address to validate.

    Returns:
        bool: True if valid email, False otherwise.
    """
    return "@" in email and "." in email
phone_validator.py: This module validates phone numbers based on a
simple rule: they must be numeric and 10 digits long.
# phone_validator.py

def validate_phone(phone):
    """
    Validates if the input is a phone number.

    Parameters:
        phone (str): The phone number to validate.

    Returns:
        bool: True if valid phone number, False otherwise.
    """
    return phone.isdigit() and len(phone) == 10
2.5 Dependency Management
To cook up a mean Python package, managing dependencies is key.
Dependencies, ya know. The third-party libraries or modules that your
package relies on to function correctly. Now that you know what they are
we can get into how to manage them effectively. Especially for your
DataValidator package.
Using requirements.txt or Pipfile - Which on to use?
We have two popular ways to manage package dependencies when we create
Python package: either through a requirements.txt file or a
Pipfile.
The former, requirements.txt, is an easy way to write all of your
project’s third-party packages in a plain text file.
While the latter, Pipfile, works with Pipenv and has more advanced
features compared to requirements.txt.
Let’s assume that our DataValidator package will require the following third-party packages:
validatorsfor advanced validation.pytestfor running tests.requestsfor some future features that will require HTTP requests.
2.5.1 Using requirements.txt
In this example, create a requirements.txt file in the root directory
of your project where we create python package. Populate this file as
follows:
validators==0.18.2
pytest==6.2.5
requests==2.26.0
This explicitly defines which versions of the dependencies your package relies on.
End-users can install all the dependencies at once using:
pip3 install -r requirements.txt
2.5.2 Using Pipfile
If you use Pipenv to create python packages, a Pipfile is generated when
you install packages using “pipenv install.”
Head over to your terminal and locate your project directory.
Run these commands:
pip3 install pipenv
pipenv install validators
pipenv install pytest
pipenv install requests
A Pipfile will be generated in your project directory, and it will
look something like:
[[source]]
url = "https://pypi.org/simple"
verify_ssl = true
name = "pypi"

[packages]
validators = "==0.18.2"
pytest = "==6.2.5"
requests = "==2.26.0"

[dev-packages]

[requires]
python_version = "3.9"
2.5.3 Managing Third-party Libraries
There are times when you have to use outside libraries that already have
dependencies. It’s very important to make sure that the embedded
dependencies do not clash with each other.
For example, if the validators package requires a certain version of
another package called six. You’ll need to make sure that if your
package also needs six, both dependencies require the exact same
version. If they don’t, you’ll have to decide which version is crucial
and possibly find other packages that won’t interfere with each other.
To see what dependencies your third-party libraries have for the python packge you’re using, just run:
pip3 show validators
This will list all the dependencies that validators relies on,
allowing you to manage them effectively.
2.6 Writing Unit Tests using unittest
Python’s built-in unittest framework is commonly used for writing
robust tests.
Let’s assume we’re writing unit tests for our DataValidator package.
Create a test_validators.py file in the tests directory of your
package, and add the following example code:
import unittest
from data_validator import validate_email, validate_phone, is_string_empty

class TestDataValidator(unittest.TestCase):

    def test_email_validator(self):
        self.assertTrue(validate_email("test@example.com"))
        self.assertFalse(validate_email("testexample.com"))

    def test_phone_validator(self):
        self.assertTrue(validate_phone("1234567890"))
        self.assertFalse(validate_phone("123-456-7890"))

    def test_string_empty(self):
        self.assertTrue(is_string_empty("   "))
        self.assertFalse(is_string_empty("Not empty"))

if __name__ == "__main__":
    unittest.main()
In this test suite, we have three tests:
test_email_validator: Validates thevalidate_emailfunction from our package.test_phone_validator: Validates thevalidate_phonefunction from our package.test_string_empty: Validates theis_string_emptyfunction from our package.
To run these tests, navigate to the root directory of your project where you create python package and run:
python3 -m unittest tests/test_validators.py
2.7 Create Documentation (README)
The README. It’s the file people see first when they encounter your package. It’s an overview of what your package does, how to install it and basic usage examples. So you should include it
# DataValidator

## Overview

DataValidator is a Python package that provides various validation utilities for strings, emails, and phone numbers.

## Installation

To install DataValidator, run the following command:
pip install DataValidator
## Usage

Here are some quick examples:

```python
from data_validator import validate_email, validate_phone

print(validate_email("test@example.com"))  # True
print(validate_phone("1234567890"))  # True
Contributing
Feel free to open an issue or submit a pull request if you find a bug or have a feature request.
License
MIT
### 2.8 Packaging Your Code

While you're looking to create your Python package, there are several
ways to go about packaging code. This is where the setuptools library
comes in and it’s one of the most common methods people choose to use
when getting things done. In this write up we’ll show you how to put
together a setup.py file which will generate distribution packages.
Essentially, the setup.py file is a build script for setuptools. It
holds metadata concerning your package and contains instructions for
everything related to packaging, distributing, and installing modules.

Below is the simple setup.py file that we’ve used on our `DataValidator`
package:
from setuptools import setup, find_packages
setup( name=‘DataValidator’, version=‘0.1’, packages=find_packages(), install_requires=[ ‘validators==0.18.2’, ‘pytest==6.2.5’, ‘requests==2.26.0’, ], author=‘Your Name’, author_email='your.email@example.com’, description=‘A utility package for validating data’, )
This `setup.py` file specifies the package name, version, dependencies,
and other information. When you run this script, `setuptools` will use
this information to create a distributable package.

Once you have a `setup.py` file, you can generate different types of
distribution packages:

- Source Distribution (`sdist`)
- Built Distribution (`bdist_wheel`)

Run the following commands:
python3 setup.py sdist python3 setup.py bdist_wheel
This will generate a `dist` directory where you create python package
containing your distribution packages, for example:

- `DataValidator-0.1.tar.gz` (sdist)
- `DataValidator-0.1-py3-none-any.whl` (bdist_wheel)

#### install_requires Vs requirements.txt - Are they dependent?

When constructing your python package, the `install_requires` parameter
of the `setup.py` file is used to specify which dependencies need
installing for it to function properly. These are automatically
installed when a user installs your package.
The list of dependencies within this parameter often looks like the list
of packages in your `requirements.txt` file, another way that people
commonly manage project dependencies. To install them you need to run
`pip install -r requirements.txt`.

- **Common Source**: The same packages are usually found in both
  `install_requires` and `requirements.txt`; although there might be
  additional ones in the text file which help with development but
  aren't necessary for running the package.
- **Version Pinning**: You can pinpoint versions in both places if you
  want. If for example your code depends on version 0.18.2 of a package
  called validators, you would include '`validators==0.18.2`' in both
  `install_requires` and `requirements.txt`.
- **Flexibility**: Using operators such as `>=`, `<=` etc., helps make
  version specification more flexible within `install_requires`, a trait
  particularly useful when packaging libraries. This can also be done
  with `requirements.txt` but it's more common that dependencies are
  pinned to particular versions when developing applications.
- **Automatic Installation**: Dependencies listed in `install_requires`
  will get installed automatically once someone installs your package.
  With `requirements.txt` things work differently; first you need to
  manually run `pip install -r requirements.txt` to actually do anything
  with its contents

Let's say your `requirements.txt` file looks like this:
validators==0.18.2 pytest==6.2.5 requests==2.26.0
And your `setup.py` contains:
install_requires=[ ‘validators==0.18.2’, ‘pytest==6.2.5’, ‘requests==2.26.0’, ],
As soon as users download your `DataValidator` package, the linked
packages in `install_requires` will be automatically downloaded too.
Developers of your DataValidator package can use `requirements.txt` to
create a virtual environment with all the necessary dependencies.
Now, even though they both specify dependencies, while one is for the
user and the other is for developers, probably requiring more technical
knowledge.

### 2.9 Publishing Your Package

After we create python package, the Python Package Index (PyPI) is the
go-to repository for Python packages, and we'll be using it as our
example.

Uploading Your Package to PyPI

Before you can upload your package, you need to have an account on PyPI.

- Navigate to the
  <a href="https://pypi.org/" target="_blank" rel="noopener">PyPI
  website</a>.
- Click on "Register" and follow the steps to create your account.

To upload your package to PyPI, you'll first need to install a tool
called `twine`.
pip3 install twine
Once `twine` is installed, navigate to your project directory (where the
`dist` directory resides) and execute the following:
twine upload dist/*
**Example for `DataValidator`**

Let's say your `dist` directory contains:

- `DataValidator-0.1.tar.gz` (sdist)
- `DataValidator-0.1-py3-none-any.whl` (bdist_wheel)

After running `twine upload dist/*`, these files will be uploaded to
PyPI, making your `DataValidator` package publicly available.

Versioning Your Package

When you create a Python package, it’s crucial to keep in mind that you
will probably update it later. That's why you should have a versioning
strategy for your package. As we know, semantic versions are common for
Python packages. What does this mean? Well the version number is usually
specified in the `setup.py` file.
setup( name=‘DataValidator’, version=‘0.1’, … )
And don’t forget! When you update your package don’t just do the changes
and stop there. Remember to also update the version number from setup.py
to reflect the changes according to your versioning strategy (e.g.,
major, minor, or patch updates).

For instance: If you make a small change which is still
backward-compatible with previous code versions then we could change the
version number from '0.1' to '0.1.1'. But if there’s a breaking change,
I’d recommend updating it to '0.2' or even '1.0'. Just think about how
much impact these new changes could have!

### 2.10 Testing and Verifying your Python Package

You can install the package locally either directly from the source code
or by using the distribution files you created earlier (`sdist` or
`bdist_wheel`).

**Direct Installation from Source Code**

Navigate to the project directory and run:
pip3 install .
**Installation Using Distribution Files**

If you've created a `dist` directory that contains your package files
(`DataValidator-0.1.tar.gz`, `DataValidator-0.1-py3-none-any.whl`), you
can install from them as follows:
pip3 install dist/DataValidator-0.1-py3-none-any.whl
or
pip3 install dist/DataValidator-0.1.tar.gz
After installing your package locally, you should verify its
functionality to ensure it behaves as expected.

**Import the Package:**

Open a Python interpreter and try importing your package.
import DataValidator
**Run Some Basic Tests**

Use the functions and classes in your package to make sure they are
working as intended.
from DataValidator import validate_email, validate_phone
print(validate_email(“test@example.com”)) # Should return True print(validate_phone(“1234567890”)) # Should return True
**Check Dependencies**

Ensure that all dependencies listed in `install_requires` or
`requirements.txt` are installed correctly. You can list installed
packages with `pip freeze`.

**Uninstall and Reinstall**

It may also be useful to uninstall the package and reinstall it to make
sure the installation process is seamless.
pip3 uninstall DataValidator pip3 install .
**Check README and Documentation**

Ensure that your README file and any other documentation you may have
are included in the package and are accessible to the users.

---

## Let's also cover some more advanced topics

### Creating Executable Scripts

Python packages often come with executable scripts that users can run
from the command line. These scripts can simplify complex tasks or serve
as utilities related to your package.

Suppose you want to add a script that validates an email and a phone
number from the command line. You would:

Create a new Python script named `validate_data.py` in your package
directory.
from DataValidator import validate_email, validate_phone import argparse
def main(): parser = argparse.ArgumentParser() parser.add_argument(’–email’, help=‘Email to validate’) parser.add_argument(’–phone’, help=‘Phone number to validate’) args = parser.parse_args()
if args.email:
    print("Email validation:", validate_email(args.email))

if args.phone:
    print("Phone validation:", validate_phone(args.phone))
if name == “main”: main()
In your `setup.py`, add an `entry_points` section.
setup( … entry_points = { ‘console_scripts’: [‘validate-data=DataValidator.validate_data:main’], } … )
After installing your package, users can run
`validate-data --email test@example.com --phone 1234567890` directly
from the command line.

### Multi-Python Version Support

If you want your package to be used, it’s best to support as many Python
versions as possible. People like having options after all! And of
course you need to make sure the code is compatible with each version
and then specify which ones your package supports in the metadata.

**Testing**: Use tools like `tox` to test your package against different
Python versions.
pip3 install tox
Create a `tox.ini` file with the Python versions you want to support.
[tox] envlist = py36, py37, py38, py39
[testenv] deps = pytest commands = pytest
**Specify Versions in `setup.py`**: In your `setup.py` file, specify
which Python versions your package is compatible with.
setup( … classifiers=[ … ‘Programming Language :: Python :: 3.6’, ‘Programming Language :: Python :: 3.7’, ‘Programming Language :: Python :: 3.8’, ‘Programming Language :: Python :: 3.9’, … ], python_requires=’>=3.6, <4’, … )
This ensures that your package will only be installable on compatible
versions of Python.

---

## Summary and Conclusion

Creating a Python package from nothing can seem super intimidating. But
hopefully, you have found this comprehensive guide to be helpful and
easy to follow. We have covered so many different elements of Python
package creation, starting with basic prerequisites to more advanced
topics. All in all, these steps make up a guide on how to create an
effective Python package.
From creating a development environment to coding, testing, documenting,
and publishing your new package. Going through each of these steps will
lead you towards making a robust and user-friendly package that’s also
easily distributable.

If you’re someone who is brand new at coding or even experienced
developer looking for tips on how to refine your packaging skills, we’ve
got you covered. These guidelines are meant to provide you with a
step-by-step roadmap on how to build the best Python package possible.

By following all of these steps properly and ensuring that each task is
completed thoroughly, there’s no doubt that your new Python package will
meet your needs and be beneficial to the larger community as well

---

## Further Additional Resources

- <a href="https://www.pypa.io/en/latest/" target="_blank"
  rel="noreferrer noopener" data-schema-attribute="about mentions">Python
  Packaging Authority (PyPA)</a>
- <a href="https://packaging.python.org/" target="_blank"
  rel="noreferrer noopener" data-schema-attribute="about mentions">Python
  Packaging User Guide</a>
- <a href="https://pypi.org/" target="_blank" rel="noreferrer noopener"
  data-schema-attribute="about mentions">Python Package Index (PyPI)</a>
- <a href="https://setuptools.pypa.io/en/latest/" target="_blank"
  rel="noreferrer noopener"
  data-schema-attribute="about mentions">setuptools Documentation</a>
- <a href="https://tox.readthedocs.io/en/latest/" target="_blank"
  rel="noreferrer noopener" data-schema-attribute="about mentions">tox
  Documentation</a>
- <a href="https://docs.python.org/3/library/unittest.html"
  target="_blank" rel="noreferrer noopener"
  data-schema-attribute="about mentions">unittest Documentation</a>
