
In this article I will share the steps to create custom ISO using original RHEL/CentOS image. The original DVD of RHEL/CentOS is quiet huge (around 9Gb for RHEL 8.3), in production environment we normally create our own custom ISO with reduced number of packages and deliver the same to our clients and customers.
The steps from this article are verified for CentOS 8 but the same will also work for RHEL 8. But if you want to create custom ISO for RHEL/CentOS 7 then I would recommend to followHow to create customized bootable ISO image in RHEL/CentOS 7
Step 1: Access the original ISO Image
First of all you would need access to the original ISO DVD image which
we will further customise and generate a small version of the same image
with lesser rpm count. I will be using CentOS 8.2 for the demonstration
of this article. I have already added the image on my Oracle VirtualBox
VM and have mounted it on /mnt:
~]# mount /dev/sr0 /mnt
mount: /mnt: WARNING: device write-protected, mounted read-only.
Step 2: Generate directory structure
Next we need to have same directory structure as used in the original DVD. But since we don’t want to copy all the rpms from the original DVD, so we will exclude the folders which contains packages.
BaseOS/Packages and AppStream/Packages. So make sure you
update your configuration based on your environment.
I will create a base directory /data/custom_iso under which I will
copy the ISO content:
~]# mkdir /data/custom_iso
Since we are using CentOS 8, we will copy everything except BaseOS and
AppStream directory from the original DVD.
~]# rsync -av --progress /mnt/ /data/custom_iso/ --exclude BaseOS --exclude AppStream
This will copy all the files and folders from ISO mounted on /mnt into
/data/custom. But there are also some hidden files in the root
folder of the ISO which also must be copied or else your ISO will never
work.
~]# cp -vf /mnt/.??* /data/custom_iso/
'/mnt/.discinfo' -> '/data/custom_iso/.discinfo'
'/mnt/.treeinfo' -> '/data/custom_iso/.treeinfo'
These are the final content under my custom_iso directory
at this stage:
~]# ls -al
total 48
drwxr-xr-x. 7 root root 4096 Feb 25 01:32 .
drwxr-xr-x. 4 root root 4096 Feb 25 00:09 ..
-r--r--r--. 1 root root   44 Feb 25 00:36 .discinfo
dr-xr-xr-x. 3 root root 4096 Jun  9  2020 EFI
dr-xr-xr-x. 3 root root 4096 Jun  9  2020 images
dr-xr-xr-x. 2 root root 4096 Feb 24 23:18 isolinux
-r--r--r--. 1 root root   87 Jun  9  2020 media.repo
-r--r--r--. 1 root root  664 Jun  9  2020 TRANS.TBL
-r--r--r--. 1 root root 1520 Feb 25 00:36 .treeinfo
Step 3: Create package list
This is the most tricky part unless you are planning to use all the
rpms from the original DVD (in which case you can copy the entire
directory into /data/custom_iso in the previous step). I know of two
methods which can be used to achieve this, you can add any more which
you felt was more easier using the comment section.
Method 1: Getting list of packages using DNF/YUM
In this method we will get the list of packages for an individual group using YUM or DNF and then copy those packages into BaseOS/AppStream directory respectively. First you must decide the list of group(s) which you plan to install as part of your custom ISO. To get the list of available groups you can use:
]# dnf grouplist
Last metadata expiration check: 0:00:06 ago on Thu 25 Feb 2021 11:15:49 AM IST.
Available Environment Groups:
   Server
   Workstation
   KDE Plasma Workspaces
   Virtualization Host
   Custom Operating System
Installed Environment Groups:
   Server with GUI
   Minimal Install
Installed Groups:
   Container Management
   Headless Management
   GNOME Desktop Environment
   Hardware Support
Available Groups:
   .NET Core Development
   RPM Development Tools
   Development Tools
   Graphical Administration Tools
   Legacy UNIX Compatibility
   Network Servers
   Scientific Support
   Security Tools
   Smart Card Support
   System Tools
   Fedora Packager
   Xfce
   Games and Entertainment
   Graphical Internet
   KDE (K Desktop Environment)
   Sound and Video
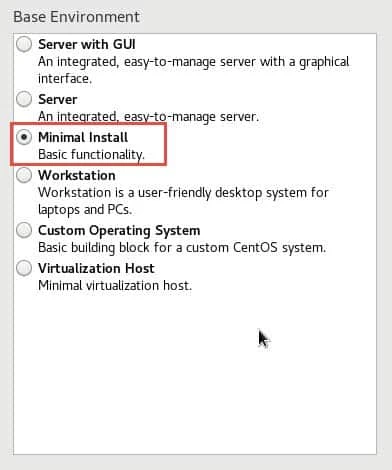
For example I want to have an ISO with rpms required to install
“Minimal Environment” group. So to get the list of rpms part of this
group we can use:
~]# dnf groupinfo "Minimal Install"
Last metadata expiration check: 0:02:31 ago on Thu 25 Feb 2021 11:15:49 AM IST.
Environment Group: Minimal Install
 Description: Basic functionality.
 Mandatory Groups:
   Core
 Optional Groups:
   Guest Agents
   Standard
So looks like this group is composed of different sub groups, so we need to query these individual groups to get the list of packages:
~]# dnf groupinfo "Core" "Guest Agents" "Standard"
This will give you a long output with the list of following types of packages for individual groups:
- Optional Packages
- Default Packages
- Mandatory Packages
You can write a small script to get the list of packages and then copy
those packages from the original DVD into respective folder of
custom_iso. As some of these packages will be part of BaseOS repo
while the others would be part of AppStream repo so you must maintain
the hierarchy.
Method 2: Bring up a new instance using respective ISO
I personally prefer this method as the success rate is much better to get a working list of packages. In this method we will install CentOS 8 on one of my VMs and then select the respective groups which you plan to include in your custom ISO.
Under the installation option stage:
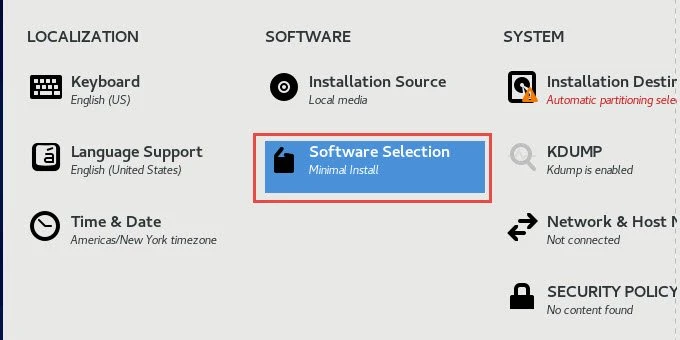
You can select your preferred group:
I would not recommend selecting any extra add-on packages at this stage unless you know what you are doing. You can always manually install the packages later once the node is UP based on your requirement.
dnf groupinstall ” once this node is installed. This
would install the packages and all the dependencies from the provided
group_name. But it is important that you use offline
repository for performing this step as if you use online
repositories then you may not have access to those rpms in the DVD. In
such case you can just download
the respective rpm and dependent rpms from online repositories.
Once this VM is installed with CentOS 8, you can go ahead and install any additional packages or groups based on your requirement:
# dnf install <pkg>
# dnf groupinstall <group>
Next query the list of rpms from this newly created VM and store the output in a file and copy this file to your original node where you were creating the custom ISO:
~]# rpm -qa --queryformat %{NAME}-%{VERSION}-%{RELEASE}.%{ARCH}'\n' > /tmp/rpms.txt
This will store the rpm along with the version, release and architecture
format into /tmp/rpms.txt. So without much hassle we have our list of
rpms with all the dependencies.
Step 4: Copy rpms based on package list
Now that we have our package list with the list of packages we want in
our custom ISO, we have to copy these rpms from the original DVD to our
custom ISO. It would have been very easy in RHEL/CentOS 7 where we had a
single location for all the packages but with RHEL/CentOS 8 now we have
BaseOS and AppStream directory for the packages so we must make sure
that rpms are copied to their respective directory.
At Step 2 we had skipped the copying of BaseOS and AppStream
directory so let us manually create these directories to store the
packages:
~]# mkdir -p /data/custom_iso/BaseOS/Packages /data/custom_iso/AppStream/Packages
Now to copy the rpms I have written a small script, this script assumes
that the original DVD is mounted on /mnt which contains all the rpms
and we are storing the output in /data/custom_iso
~]# cat /tmp/copy_rpms_to_myiso.sh
#!/bin/bash

RPM_FILE="/tmp/rpms.txt"
for pkg in `cat $RPM_FILE`; do
    RPM=`find /mnt/ -name $pkg*.rpm`
    if [[ $RPM =~ .*BaseOS.* ]];then
       cp -ap $RPM /data/custom_iso/BaseOS/Packages/
    elif [[ $RPM =~ .*AppStream.* ]];then
       cp -ap $RPM /data/custom_iso/AppStream/Packages/
    else
       echo "$pkg not found"
    fi
done
This script will check if the individual rpm is from BaseOS or
AppStream repository and then will copy the rpm into respective
directory. If the script fails to find the rpm in both the repository
then it will print the package name which was not found.
Let us execute this script:
~]# /tmp/copy_rpms_to_myiso.sh
If everything is correct then this step should copy all the packages into it’s respective folder.
Step 5: Create repodata for Custom ISO
Now that we have all the required rpms in place under respective repo
directory, next we must create repodata for this individual
repositories. To achieve this we will need createrepo tool which you
can install using
yum or dnf:
~]# dnf install createrepo
Next we would need Comps.xml file from the original DVD for both the
repositories. This comps.xml
contains the list of groups and the mapping packages for individual
group, this file is normally referred by the installation medium to
identify the available groups and add-on packages.
So copy the respective comps.xml and place it in your custom ISO
[root@centos8 custom_iso]# cp /mnt/BaseOS/repodata/*comps*.xml BaseOS/comps_base.xml
[root@centos8 custom_iso]# cp /mnt/AppStream/repodata/*comps*.xml AppStream/comps_app.xml
Next create repo using these group xml file for both BaseOS and
AppStream:
[root@centos8 custom_iso]# createrepo -g comps_app.xml AppStream/
Directory walk started
Directory walk done - 29 packages
Temporary output repo path: AppStream/.repodata/
Preparing sqlite DBs
Pool started (with 5 workers)
Pool finished

[root@centos8 custom_iso]# createrepo -g comps_base.xml BaseOS/
Directory walk started
Directory walk done - 360 packages
Temporary output repo path: BaseOS/.repodata/
Preparing sqlite DBs
Pool started (with 5 workers)
Pool finished
This step will create repodata directory with the required database
files under /data/custom_iso/BaseOS and /data/custom_iso/AppStream
directory:
[root@centos8 custom_iso]# ls -l BaseOS/repodata/ AppStream/repodata/
AppStream/repodata/:
total 808
-rw-r--r--. 1 root root  10856 Feb 25 02:02 231deccd5b8e4dc32047ccbe4f6b0b0683a6b0253cc3e3dc89093b6ae9e522da-other.xml.gz
-rw-r--r--. 1 root root  15238 Feb 25 02:02 39e06ef307b975417fcfd5ec9bc23c84495407c136e430837eda3508140e7964-other.sqlite.bz2
-rw-r--r--. 1 root root  19034 Feb 25 02:02 4d1f47a7d096fdbe9bdfccb84ea596be9a09ec6d51cf0b8b67f5c3663775261d-filelists.sqlite.bz2
-rw-r--r--. 1 root root 556980 Feb 25 02:02 636d97191c77227309938cd1eb97fce7139c880dd52a57d950d1094bd170ddfa-comps_app.xml
-rw-r--r--. 1 root root  18477 Feb 25 02:02 8b15e126c078293ffb47e38f32c73ebf5c19878f920b696fac81e37f974aafaf-primary.sqlite.bz2
-rw-r--r--. 1 root root   9714 Feb 25 02:02 9e9d9bfebabb219028fc2fb1b479b1868dc30aecfd07ce7da75935183a9ba644-primary.xml.gz
-rw-r--r--. 1 root root 116050 Feb 25 02:02 e9524923e26fe119880aa4929454fcff9ed8877f7e5ace47928805a5cbeeb920-comps_app.xml.gz
-rw-r--r--. 1 root root  10460 Feb 25 02:02 fbc30afdbd054a4868d5d3fa10f91d647e95d833ebe0452a8fb15167708a643f-filelists.xml.gz
-rw-r--r--. 1 root root   4316 Feb 25 02:02 repomd.xml

BaseOS/repodata/:
total 2680
-rw-r--r--. 1 root root 153383 Feb 25 01:38 38630dc278c0790d7a0ca019208c223dc9cdd384f265272e6b3489effa7ae63c-other.xml.gz
-rw-r--r--. 1 root root 347027 Feb 25 01:38 586a8e96ad3b73414e5c6ae94a5e4f128a087fcb0ca9837674573a8d6cac4a9c-comps_base.xml
-rw-r--r--. 1 root root 373357 Feb 25 01:38 77b091786d530232d4465543457fe73307a61d359dbd3704abb9656b38d3d339-filelists.sqlite.bz2
-rw-r--r--. 1 root root 426066 Feb 25 01:38 7c83828e61d655fa0908d64f69d9f0b88c72972efb880c5e0285d3f9dd7eb3ec-primary.xml.gz
-rw-r--r--. 1 root root 185860 Feb 25 01:38 ae1b59594f9141e982cf97cab724c4f2c454814740edde657791bf1f2f75a7d2-other.sqlite.bz2
-rw-r--r--. 1 root root  78056 Feb 25 01:38 c1437f9c1bd0a3940a7ef97288dbfc6247fa71f9fded4689cc3d16213ad78897-comps_base.xml.gz
-rw-r--r--. 1 root root 298383 Feb 25 01:38 d6b6730e96a51b83763e5e75109e603a5023b7237496fb3ee47567f65d700cfb-filelists.xml.gz
-rw-r--r--. 1 root root 857212 Feb 25 01:38 e1c8b7e4a5d8da239510f494f92cb156db3722dcf4b1bf7b24553ab3c3974cf7-primary.sqlite.bz2
-rw-r--r--. 1 root root   3873 Feb 25 01:38 repomd.xml
Next we need to create modules file for AppStream repository because
if you check the repodata in the original DVD, it will have one
additional file:
[root@centos8 custom_iso]# ls -l /mnt/AppStream/repodata/*modules*
-r--r--r--. 1 root root 46270 Aug 16  2019 /mnt/AppStream/repodata/f8cbb89b908e10e2e01b6b5555a116ba365f96cd4b5aa8414aa5465f82a021fd-modules.yaml.gz
So we must add the modular metadata (modulemd) using modifyrepo_c
inside the same repodata of our custom ISO. To achieve this we must copy
the original modules.xml from the source ISO:
[root@centos8 custom_iso]# cp /mnt/AppStream/repodata/*modules.yaml* AppStream/
Unzip the content of this file as it is in .gz format:
[root@centos8 custom_iso]# cd AppStream

[root@centos8 AppStream]# gunzip f8cbb89b908e10e2e01b6b5555a116ba365f96cd4b5aa8414aa5465f82a021fd-modules.yaml.gz

[root@centos8 AppStream]# ls -l *modules*.yaml
total 876
-r--r--r--. 1 root root 281029 Feb 25 02:01 f8cbb89b908e10e2e01b6b5555a116ba365f96cd4b5aa8414aa5465f82a021fd-modules.yaml
We will rename the file for easier usage:
[root@centos8 AppStream]# cp f8cbb89b908e10e2e01b6b5555a116ba365f96cd4b5aa8414aa5465f82a021fd-modules.yaml modules.yaml
Next to add the modular metadata (modulemd), run:
[root@centos8 custom_iso]# modifyrepo_c --mdtype=modules AppStream/modules.yaml AppStream/repodata/
This will create the respective modules.yaml file inside
AppStream/repodata directory:
[root@centos8 custom_iso]# ls -l AppStream/repodata/
total 808
-rw-r--r--. 1 root root  10856 Feb 25 02:02 231deccd5b8e4dc32047ccbe4f6b0b0683a6b0253cc3e3dc89093b6ae9e522da-other.xml.gz
-rw-r--r--. 1 root root  15238 Feb 25 02:02 39e06ef307b975417fcfd5ec9bc23c84495407c136e430837eda3508140e7964-other.sqlite.bz2
-rw-r--r--. 1 root root  19034 Feb 25 02:02 4d1f47a7d096fdbe9bdfccb84ea596be9a09ec6d51cf0b8b67f5c3663775261d-filelists.sqlite.bz2
-rw-r--r--. 1 root root 556980 Feb 25 02:02 636d97191c77227309938cd1eb97fce7139c880dd52a57d950d1094bd170ddfa-comps_app.xml
-rw-r--r--. 1 root root  18477 Feb 25 02:02 8b15e126c078293ffb47e38f32c73ebf5c19878f920b696fac81e37f974aafaf-primary.sqlite.bz2
-rw-r--r--. 1 root root   9714 Feb 25 02:02 9e9d9bfebabb219028fc2fb1b479b1868dc30aecfd07ce7da75935183a9ba644-primary.xml.gz
-rw-r--r--. 1 root root 116050 Feb 25 02:02 e9524923e26fe119880aa4929454fcff9ed8877f7e5ace47928805a5cbeeb920-comps_app.xml.gz
-rw-r--r--. 1 root root  46270 Feb 25 02:02 f8cbb89b908e10e2e01b6b5555a116ba365f96cd4b5aa8414aa5465f82a021fd-modules.yaml.gz
-rw-r--r--. 1 root root  10460 Feb 25 02:02 fbc30afdbd054a4868d5d3fa10f91d647e95d833ebe0452a8fb15167708a643f-filelists.xml.gz
-rw-r--r--. 1 root root   4316 Feb 25 02:02 repomd.xml
So finally our repository configuration is completed, so let’s move on to the next step.
Step 6: Add custom third party rpms (Optional)
Now you may have a requirement to also add some custom third party rpms into your custom CPIO which are not available in the vanilla DVD by default so let me show you the steps to add those to your custom ISO. But if you do not have any such requirement then you can skip this section.
It is strictly not recommended to modify default repos i.e. AppStream and BaseOS with custom rpms so we need to create a new repository for our custom rpms. Navigate inside custom_iso directory which we created earlier
[root@centos8 ~]# cd /data/custom_iso
Create a new directory with your repo name which you want to use, we
will call it ExtraPackages:
[root@centos8 custom_iso]# mkdir ExtraPackages; cd ExtraPackages
Now copy all your rpms to this path. Once you are done execute
createrepo to create all repodata content inside ExtraPackages. This
will create the required repository data files for perform installation
using this repo.
[root@centos8 ExtraPackages]# createrepo .
[root@centos8 ExtraPackages]# createrepo .
[root@centos8 ExtraPackages]#  # ls -l
total 112
-rw-r--r-- 1 root root 64492 Feb 11  2021 perl-WWW-Curl-4.17-21.el8.x86_64.rpm
-rw-r--r-- 1 root root 41932 Feb 11  2021 perl-Net-IP-1.26-20.el8.noarch.rpm
drwxr-xr-x 2 root root  4096 Feb 11  2021 repodata
repodata directory is inside the ExtraPackages
directory to consider that as a repo.
Step 7: Create kickstart configuration file
I hope you are aware that in RHEL/CentOS we
use kickstart to automate the installation procedure. I have already
written a detailed article on kickstart
configuration along with a sample kickstart file. Here you can use
the kickstart template from the VM which you might have created at
Step 3 (Method-2) under /root/anaconda-ks.cfg
I will not be able to explain all the individual section of the kickstart as that is out of scope for this article, I have just placed a sample kickstart from my working node where I verified these steps:
#platform=x86, AMD64, or Intel EM64T
#version=RHEL8
repo --name="AppStream" --baseurl=file:///run/install/repo/AppStream

# Add additional repo name where you have added custom rpm
repo --name="ExtraPackages" --baseurl=file:///run/install/repo/ExtraPackages
# Only use sda disk
ignoredisk --only-use=sda

# System bootloader configuration
bootloader --append="rhgb novga console=ttyS0,115200 console=tty0 panic=1" --location=mbr --driveorder="sda" --boot-drive=sda

# Clear the Master Boot Record
zerombr

# Partition clearing information
clearpart --all

# Reboot after installation
reboot

# Use text mode install
text

# Use CDROM
cdrom

# Keyboard layouts
keyboard --vckeymap=us --xlayouts=''

# System language
lang en_US.UTF-8

# Installation logging level
logging --level=info

# Network information
network --bootproto=dhcp --device=enp0s3 --noipv6 --activate --hostname server1.example.com

# Root password
rootpw --iscrypted $1$oXhMRzpse6FeGBc1uF2JmG2xTeSWPL9

# System authorization information
authselect --enableshadow --passalgo=sha512

# SELinux configuration
selinux --disabled

firstboot --disable

# Do not configure the X Window System
skipx

# System services
services --disabled="kdump,rpcbind,sendmail,postfix,chronyd"

# System timezone
timezone Asia/Kolkata --isUtc --ntpservers=10.43.12.34

# Disk partitioning information
autopart --type=lvm

%packages
@^minimal-environment
smartmontools
sysstat
tmux
tuned
zip
%end

%addon com_redhat_kdump --disable --reserve-mb='auto'
%end
You can also add %pre and %post section in the kickstart to add your custom scripts and configurations.
Place this kickstart file in the home folder of the custom ISO i.e.
/data/custom_iso in our example:
[root@centos8 custom_iso]# ls -l ks.cfg
-rw-------. 1 root root 1845 Feb 25 01:32 ks.cfg
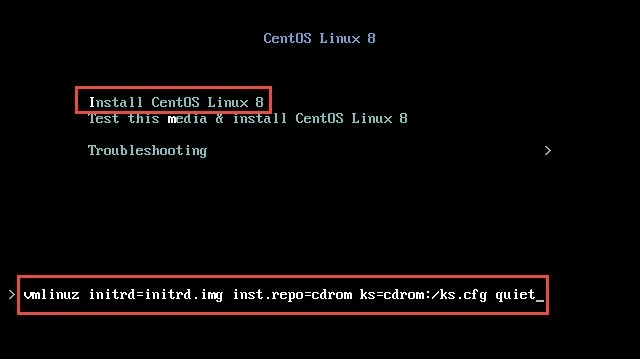
Step 8: Create/Modify the GRUB2 Menu
Next we will modify the GRUB2 splash screen which gives us the option to perform the installation, you could also modify the splash screen of the GRUB2 menu. We will use the default configuration file with little modification to support our customization.
Locate isolinux.cfg under isolinux directory of the custom ISO and
modify the highlighted section:
FROM:
label linux
  menu label ^Install CentOS Linux 8.0.1905
  kernel vmlinuz
  append initrd=initrd.img inst.stage2=hd:LABEL=CentOS-8-BaseOS-x86_64 quiet
TO:
label linux
  menu label ^Install CentOS Linux 8
  kernel vmlinuz
  append initrd=initrd.img inst.repo=cdrom ks=cdrom:/ks.cfg quiet
If you have placed you kickstart file at a different location then you can modify the above entry accordingly.
Step 9: Create custom ISO
So finally we are at the final stages of this article. You are just one
step away from having your own custom ISO. We require mkisofs tool to
create our custom ISO which is part of genisoimage in RHEL/CentOS 8 so
to install this you can use yum/dnf:
~]# dnf install genisoimage
Next use the following command to generate your ISO (assuming you are
under /data/custom_iso):
[root@centos8 custom_iso]# mkisofs -o /tmp/new.iso -b isolinux/isolinux.bin -c isolinux/boot.cat --no-emul-boot --boot-load-size 4 --boot-info-table -J -R -V "CentOS-8-2-2004-x86_64-dvd" .
Here this command will generate /tmp/new.iso with the LABEL
CentOS-8-2-2004-x86_64-dvd.
Step 10: Validating the ISO
Now that we have our custom ISO ready, it is time to create a new VM
using this image. Once the VM boots using the custom image, select the
option to “Install CentOS Linux 8” and press TAB which will show
you the isolinux.cfg content which we modified in Step 7
Hit Enter to start the installation:
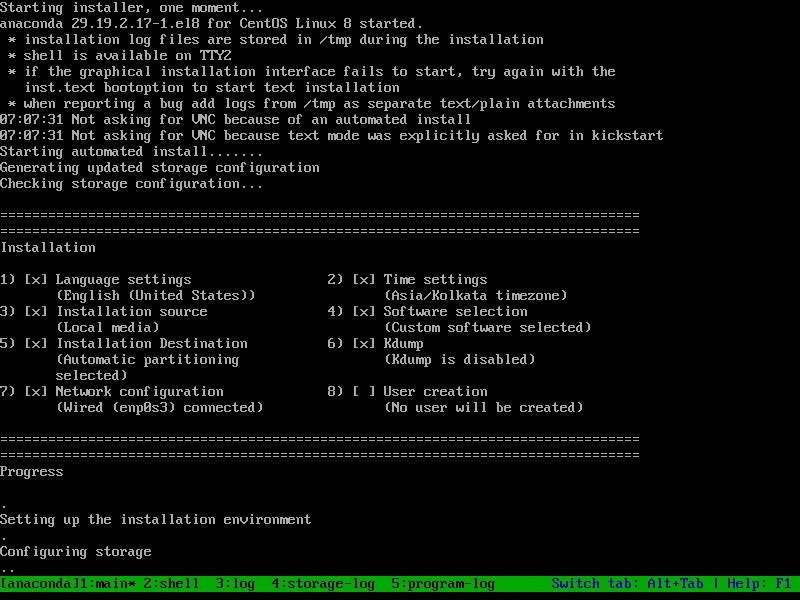
So as you see the installation has started successfully.
Summary
In this tutorial we learned how to create custom ISO with minimzed
package list in RHEL/CentOS 8. You may feel some parts of this article
complicate, specially the step where we generated our repodata. In such
case you can always choose to take the default repodata from the
original DVD for both BaseOS and AppStream and that should also work but
the repodata database will contain details of rpms which are actually
not present in the DVD. Although this will not impact the functioning of
the ISO. You can further enhance the steps by adding %pre scripts to
prompt of user password or network details which can then be parsed into
the kickstart.
