cpio (copy in / copy out) is a classic Linux/UNIX archiving utility used to create, list, and extract archives. Unlike tar, cpio does not take file names as arguments—it reads them from standard input, which makes it especially powerful when combined with find.
It is commonly used in:
- initramfs / initrd images
- full filesystem backups
- packaging pipelines
- copying directory trees while preserving metadata
How cpio Works (Mental Model)
Think of cpio as a pipeline processor, not a file picker.
find files → cpio → archive or directory
findis responsible for selecting filescpiois responsible for how those files are handled
In other words:
findanswers “which files?”cpioanswers “archive, extract, or copy?”
This separation is what makes cpio extremely flexible compared to tools
that require file paths as arguments.
Syntax and Operating Modes
cpio [mode] [options]
cpio always runs in one mode at a time.
| Mode | Option | Purpose |
|---|---|---|
| Copy-out | -o |
Create an archive |
| Copy-in | -i |
Extract or list an archive |
| Pass-through | -p |
Copy files between directories |
Quick Option Reference
| Option | Meaning |
|---|---|
-v |
Verbose output |
-d |
Create directories as needed |
-t |
List archive contents |
-m |
Preserve modification times |
-u |
Overwrite existing files |
-A |
Append to existing archive |
-L |
Follow symbolic links |
-F file |
Specify archive file |
-H format |
Archive format (newc, crc, tar, etc.) |
cpio vs tar (When to Use What)
Both cpio and tar are archiving tools, but they are designed for
different workflows.
| Feature | cpio | tar |
|---|---|---|
| Input method | Reads from standard input | Takes file arguments |
| File selection | Excellent with find |
Limited |
| initramfs usage | Native and common | Rare |
| Ease of use | Moderate | Easy |
| Flexibility | Very high | Medium |
Using tar (file list is fixed):
tar -cvf backup.tar file1.txt file2.txt file3.txt
You must explicitly list files (or rely on shell expansion).
Using cpio (file list is dynamic):
find . -name "*.txt" | cpio -ov > backup.cpio
Here, find dynamically selects files and cpio processes whatever it
receives.
When to use what:
- Use tar for simple, known file sets
- Use cpio when file selection depends on rules, pipelines, or system state
Creating Archives (Copy-out Mode)
In copy-out mode, the cpio command reads a list of file names from
standard input and creates an archive on standard output.
This mode is most commonly used with the find command to build backups,
initramfs images, or custom archives based on flexible file-selection
rules.
Create a cpio archive from a directory
find /home/golinux/complex | cpio -ov > complex.cpio
This command creates a .cpio archive containing the entire directory
structure along with all files under /home/golinux/complex.
Use this approach when you need a full directory backup while preserving file hierarchy and permissions.
Create an archive with specific file types
find . -name "*.txt" | cpio -ov > textfiles.cpio
Only files matching the given pattern (.txt) are included in the
archive. This method is useful when you want to back up or package
specific file types instead of the entire directory tree.
Append files to an existing archive
find new_files/ | cpio -oA -F archive.cpio
The -A option appends new files to an existing cpio archive without
recreating it. This is useful for incremental archive updates or
extending previously created backups.
Inspecting Archives (Safe Operations)
Before extracting any archive—especially one obtained from an external source—it is recommended to inspect its contents to avoid overwriting files or extracting unexpected paths.
List contents without extracting
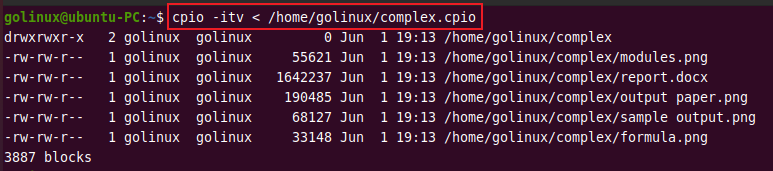
cpio -itv < archive.cpio
This command lists all files stored inside the archive without extracting them. It helps verify file paths, permissions, and directory structure before performing an actual extraction.
Extracting Archives (Copy-in Mode)
In copy-in mode, the cpio command reads an archive from
standard input and extracts its contents to disk. This mode is used
to restore files from backups, unpack initramfs images, or inspect
existing cpio and tar archives.
Extract into the current directory
cpio -iv < archive.cpio
This command extracts all files from the archive into the current working directory while displaying the extracted file names.
Use this when you are already positioned in the intended destination path.
Note:
If you see the message “newer or same version exists”, it means the file already exists on disk with a newer (or identical) timestamp. By default,cpiodoes not overwrite such files.
To force overwriting existing files, use the -u option:
cpio -ivu < archive.cpio
Extract into a specific directory
cpio -ivD /target/dir < archive.cpio
The -D option changes the destination directory before extraction.
This is useful when you want to restore files to a controlled or
isolated location without changing your current directory.
Preserve original timestamps
cpio -imv < archive.cpio
By default, extracted files receive the current timestamp. The -m
option preserves the original modification times stored in the archive.
This is especially important for build systems, backups, and source trees where timestamps matter.
Copying Directory Trees (Pass-through Mode)
In pass-through mode, cpio copies files directly from one
directory tree to another without creating an intermediate archive.
This mode combines copy-out and copy-in behavior in a single operation.
Copy one directory tree to another
find source_dir | cpio -pdv target_dir
This command copies the entire directory structure from source_dir to
target_dir, preserving permissions, ownership, and timestamps.
Use this instead of cp -a when you need pipeline control, complex
file selection, or consistent behavior across systems.
Working with tar Using cpio
Although tar is a separate utility, cpio can read and write tar
archives using the appropriate archive format. This can be useful in
automation pipelines where cpio is already in use.
Create a tar archive using cpio
find . | cpio -ov -H tar -F archive.tar
This creates a standard tar archive containing all files selected by
the find command.
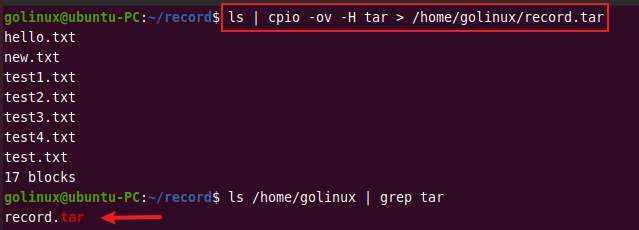
You can also use ls instead of find when working with a simple
directory structure:
ls | cpio -ov -H tar -F archive.tar
List tar archive contents
cpio -itv -F archive.tar
Lists the contents of the tar archive without extracting files. This is a safe way to verify archive structure and file paths.
Extract tar archive
cpio -iv -F archive.tar
Extracts all files from the tar archive into the current directory,
behaving similarly to tar -xvf.
Symbolic Links and File Behavior
By default, cpio stores symbolic links as links. In some scenarios—such
as container images or software packaging—you may want to archive the
actual files instead of the symlinks themselves.
Copy actual files instead of symlinks
find . | cpio -oLv > resolved.cpio
The -L option tells cpio to follow symbolic links and archive the
files they point to, rather than the symlink entries.
Frequently Asked Questions
1. What is the cpio command used for?
The cpio command is used to create, extract, and inspect archive files in Linux. It is commonly used for backups, initramfs images, and copying directory trees while preserving metadata.2. What is the difference between cpio and tar?
cpio reads file names from standard input, making it highly flexible when combined with find. tar accepts file arguments directly and is easier for simple archiving tasks.3. Does cpio support compression?
cpio does not compress files by itself. It is typically combined with compression tools such as gzip, xz, or zstd using pipelines.4. Is cpio still relevant today?
Yes. cpio is widely used for initramfs generation, system-level backups, and advanced file-selection workflows where tar is less flexible.Conclusion
The cpio command is a powerful, pipeline-friendly archiving tool that
shines when file selection and flexibility matter. While it has a
steeper learning curve than tar, it offers unmatched control when
combined with tools like find.
If you work with system images, backups, initramfs generation, or
complex directory structures, cpio is well worth mastering.