
In this article I will share thesteps to configure software raid 1 with and without spare diski.e. mirroring raid where the data is stored. I will explain this in more detail in the upcoming chapters. I have written another article with**comparison and difference between various RAID types using figures including pros and cons of individual RAID types**so that you can make an informed decision before choosing a RAID type for your system.
What is RAID 1?
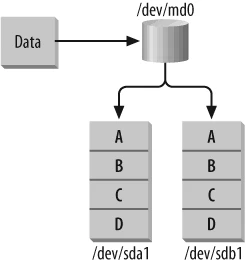
RAID-1 is usually referred to as “mirroring.” Each child object in a RAID-1 region contains an identical copy of the data in the region. A write to a RAID-1 region results in that data being written simultaneously to all child objects. A read from a RAID-1 region can result in reading the data from any one of the child objects. Child objects of a RAID-1 region do not have to be the same size, but the size of the region will be equal to the size of the smallest child object.
Step-by-Step Tutorial: Configure Software RAID 0 in Linux
Step-by-Step Tutorial: Configure Software RAID 4 in Linux
Step-by-Step Tutorial: Configure Software RAID 5 in Linux
Step-by-Step Tutorial: Configure Hybrid Software RAID 10 in Linux
Create Software RAID 1 without Spare Disk
The simplest RAID-1 configuration must contain at least two member
disks. In this example, /dev/sdb1 and /dev/sdc1 are member disks of
the RAID-1 at /dev/md0:
There are below certain steps which you must follow before creating software raid 1 on your Linux node. Since i have already perform ed those steps in my older article, I will share the hyperlinks here
**<a
href=“https://www.golinuxcloud.com/configure-software-linear-raid-linux/#Important_Rules_of_partitioning" target="_blank” rel=“noopener noreferrer” title=“Step-by-Step Guide to configure software Linear RAID 0 in Linux”>Important Rules of Partitioning**
**<a
href=“https://www.golinuxcloud.com/configure-software-linear-raid-linux/#Partitioning_with_fdisk" target="_blank” rel=“noopener noreferrer” title=“Step-by-Step Guide to configure software Linear RAID 0 in Linux”>Partitioning with fdisk**
Now we have our partitions available with us which we can validate using
lsblk
[root@node1 ~]# lsblk
NAME            MAJ:MIN RM  SIZE RO TYPE MOUNTPOINT
sda               8:0    0   30G  0 disk
├─sda1            8:1    0  512M  0 part /boot
└─sda2            8:2    0 27.5G  0 part
  ├─centos-root 253:0    0 25.5G  0 lvm  /
  └─centos-swap 253:1    0    2G  0 lvm  [SWAP]
sdb               8:16   0    2G  0 disk
└─sdb1            8:17   0    2G  0 part
sdc               8:32   0    2G  0 disk
└─sdc1            8:33   0    2G  0 part
sr0              11:0    1 1024M  0 rom
Configure software raid 1
Now since we have all the partitions with us, we will create software RAID 1 array on those partitions
chunk-size has no effect on RAID-1 because no disk striping is
involved. But chunk-size is still required as a placeholder. Note also
that the persistent-superblock isn’t needed for RAID-1.
[root@node1 ~]# mdadm -Cv -l1 -n2 /dev/md0 /dev/sd{b,c}1
mdadm: Note: this array has metadata at the start and
    may not be suitable as a boot device.  If you plan to
    store '/boot' on this device please ensure that
    your boot-loader understands md/v1.x metadata, or use
    --metadata=0.90
mdadm: size set to 2094080K
Continue creating array? y
mdadm: Defaulting to version 1.2 metadata
mdadm: array /dev/md0 started.
Here,
-C, --create
       Create a new array.

-v, --verbose
       Be  more  verbose about what is happening.

-l, --level=
       Set RAID level.  When used with --create, options are: linear, raid0,  0,  stripe,  raid1,  1,  mirror,
       raid4,  4,  raid5,  5, raid6, 6, raid10, 10, multipath, mp, faulty, container.  Obviously some of these
       are synonymous.

-c, --chunk=
       Specify chunk size of kilobytes.

-n, --raid-devices=
       Specify  the number of active devices in the array.
Verify the changes
Now since our software raid 1 array is created successfully. Verify the changes using below command
[root@node1 ~]# cat /proc/mdstat
Personalities : [raid1]
md0 : active raid1 sdc1[1] sdb1[0]
      2094080 blocks super 1.2 [2/2] [UU]
      [=======>.............]  resync = 38.1% (800128/2094080) finish=0.1min speed=200032K/sec

unused devices: <none>
Now /proc/mdstat reports information about the array and also includes
information about the resynchronization process. Resynchronization takes
place whenever a new array that supports data redundancy is initialized
for the first time. The resynchronization process ensures that all disks
in a mirror contain exactly the same data.
The resynchronization is about 40 percent done and should be completed in some time based on your software raid 1 array size.
[root@node1 ~]# cat /proc/mdstat
Personalities : [raid1]
md0 : active raid1 sdc1[1] sdb1[0]
      2094080 blocks super 1.2 [2/2] [UU]

unused devices: <none>
Create file-system
Now since our software raid 1 array is ready, we will create a filesystem on top of it so it can be used for storing data. For the sake of this article I will create an ext4 filesystem but you can create any other filesystem on your software raid 1 as per your requirement
[root@node1 ~]# mkfs.ext4 /dev/md0
mke2fs 1.42.9 (28-Dec-2013)
Filesystem label=
OS type: Linux
Block size=4096 (log=2)
Fragment size=4096 (log=2)
Stride=0 blocks, Stripe width=0 blocks
131072 inodes, 523520 blocks
26176 blocks (5.00%) reserved for the super user
First data block=0
Maximum filesystem blocks=536870912
16 block groups
32768 blocks per group, 32768 fragments per group
8192 inodes per group
Superblock backups stored on blocks:
        32768, 98304, 163840, 229376, 294912

Allocating group tables: done
Writing inode tables: done
Creating journal (8192 blocks): done
Writing superblocks and filesystem accounting information: done
To check the detail of the software raid 1 array you can use below command
[root@node1 ~]# mdadm --detail /dev/md0
/dev/md0:
           Version : 1.2
     Creation Time : Mon Jun 10 16:28:24 2019
        Raid Level : raid1
        Array Size : 2094080 (2045.00 MiB 2144.34 MB)
     Used Dev Size : 2094080 (2045.00 MiB 2144.34 MB)
      Raid Devices : 2
     Total Devices : 2
       Persistence : Superblock is persistent

       Update Time : Mon Jun 10 16:32:08 2019
             State : clean
    Active Devices : 2
   Working Devices : 2
    Failed Devices : 0
     Spare Devices : 0

Consistency Policy : resync

              Name : node1.golinuxcloud.com:0  (local to host node1.golinuxcloud.com)
              UUID : cdde32cb:6150eddb:35ab33ee:faba0154
            Events : 17

    Number   Major   Minor   RaidDevice State
       0       8       17        0      active sync   /dev/sdb1
       1       8       33        1      active sync   /dev/sdc1
Create mount point
Next we need a mount point to access the software raid 1 array file-system.
[root@node1 ~]# mkdir /raid1
[root@node1 ~]# mount /dev/md0 /raid1/
Now since we have our mount point and we have mounted our software raid 1 array on our mount point. Let us check the details of our software raid 1 array.
[root@node1 ~]# df -h /raid1/
Filesystem      Size  Used Avail Use% Mounted on
/dev/md0        2.0G  6.0M  1.9G   1% /raid1
So now this software raid 1 array can be used to store your data. But currently since we have temporarily mounted this filesystem, it will not be available after reboot.
To make the changes reboot
persistent, add the below content in your /etc/fstab
/dev/md0 /raid1 ext4 defaults 0 0
Next save your file and reboot your node.
Once the node is UP make sure your software raid 1 array is mounted on
your mount point i.e.
[root@node1 ~]# df -h /raid1/
Filesystem      Size  Used Avail Use% Mounted on
/dev/md0        2.0G  6.0M  1.9G   1% /raid1
Configure Software RAID 1 with Spare Disk
When a disk does fail, it’s useful to be able to automatically promote another disk into the array to replace the failed disk hence it is good to add a spare disk while configuring a software raid 1.
The spare disk parameter is combined with the device parameter to
define disks that will be inserted into the array when a member disk
fails. In this article I have added new virtual disk to demonstrate
creation of software raid 1 array with spare disk.
[root@node1 ~]# lsblk
NAME            MAJ:MIN RM  SIZE RO TYPE MOUNTPOINT
sda               8:0    0   30G  0 disk
├─sda1            8:1    0  512M  0 part /boot
└─sda2            8:2    0 27.5G  0 part
  ├─centos-root 253:0    0 25.5G  0 lvm  /
  └─centos-swap 253:1    0    2G  0 lvm  [SWAP]
sdb               8:16   0    2G  0 disk
└─sdb1            8:17   0    2G  0 part
sdc               8:32   0    2G  0 disk
└─sdc1            8:33   0    2G  0 part
sdd               8:48   0    2G  0 disk
└─sdd1            8:49   0    2G  0 part
sr0              11:0    1 1024M  0 rom
If you are using mdadm, the -x flag defines the number of spare
disks. Member disks are parsed from left to right on the command line.
Thus, the first two disks listed in this example (/dev/sdb1 and
/dev/sdc1) become the active RAID members, and the last disk
(/dev/sdd1) becomes the spare disk.
[root@node1 ~]# mdadm -Cv -l1 -n2 -x1 /dev/md0 /dev/sd{b,c,d}1
mdadm: Note: this array has metadata at the start and
    may not be suitable as a boot device.  If you plan to
    store '/boot' on this device please ensure that
    your boot-loader understands md/v1.x metadata, or use
    --metadata=0.90
mdadm: size set to 2094080K
Continue creating array? y
mdadm: Defaulting to version 1.2 metadata
mdadm: array /dev/md0 started.
If a disk in this array failed, the kernel would remove the failed drive
(either /dev/sdb1 or /dev/sdc1) from /dev/md0, insert /dev/sdd1
into the array and start reconstruction. In this case /dev/sdb1 has
failed (forcefully), as indicated by (F) in the following listing.
[root@node1 ~]# mdadm --fail /dev/md0 /dev/sdb1
mdadm: set /dev/sdb1 faulty in /dev/md0
The md driver has automatically inserted spare disk /dev/sdd1 and
begun recovery.
[root@node1 ~]# cat /proc/mdstat
Personalities : [raid1]
md0 : active raid1 sdd1[2] sdc1[1] sdb1[0](F)
      2094080 blocks super 1.2 [2/1] [_U]
      [===>.................]  recovery = 19.9% (418688/2094080) finish=0.1min speed=209344K/sec

unused devices: <none>
To check the detail of the software raid 1 array /dev/md0
[root@node1 ~]# mdadm --detail /dev/md0
/dev/md0:
           Version : 1.2
     Creation Time : Mon Jun 10 16:55:26 2019
        Raid Level : raid1
        Array Size : 2094080 (2045.00 MiB 2144.34 MB)
     Used Dev Size : 2094080 (2045.00 MiB 2144.34 MB)
      Raid Devices : 2
     Total Devices : 3
       Persistence : Superblock is persistent

       Update Time : Mon Jun 10 16:59:55 2019
             State : clean
    Active Devices : 2
   Working Devices : 2
    Failed Devices : 1
     Spare Devices : 0

Consistency Policy : resync

              Name : node1.golinuxcloud.com:0  (local to host node1.golinuxcloud.com)
              UUID : 89dd3976:5265ed93:8b595605:2b3aa122
            Events : 36

    Number   Major   Minor   RaidDevice State
       2       8       49        0      active sync   /dev/sdd1
       1       8       33        1      active sync   /dev/sdc1

       0       8       17        -      faulty   /dev/sdb1
Lastly I hope the steps from the article to configure software raid 1 array with and without spare disk on Linux was helpful. So, let me know your suggestions and feedback using the comment section.
References:
Managing RAID in Linux
