
In this article I will share the steps to configure PXE boot serverusing HTTP, Kickstart and DHCP / DNSMASQ service on a CentOS 7 node. The same list of steps will work on RHEL 7 as well. But to configure PXE boot server on RHEL you need an active subscription to be able to download the required rpms or you can also download these rpms by creating a local repository using the RHEL vanilla DVD image.
It is not mandatory to only use the services from this article to configure PXE boot server in Linux. You can also use other services like NFS, FTP etc to serve the purpose.

What is PXE boot server?
PXE, or Preboot eXecution Environment, allows you to instruct computers to boot using network resources. This allows you to control a single source to install servers without the need to physically insert some DVDs or USB sticks.
Design of the PXE network boot
- When a machine uses the PXE (Pre-eXecution Environment) to boot directly off the network, it needs to get an IP address from a DHCP server.
- The DHCP server can also give it the details of a TFTP server from
which to retrieve an executable file. Typically for a Linux client,
this file is called
pxelinux.0.
- Once the client retrieves and executes
pxelinux.0, it is hard-coded to look for a file from thepxelinux.cfg/subdirectory relative to wherepxelinux.0was found. - Here we have a PXE file which will contain PXE boot menu and the location of the repository which will be used for the installation.
Create kickstart file
When you install a Red Hat system, a file with the name
anaconda-ks.cfg is created in the home directory of the root user.
This file contains most settings that were used while installing your
computer. It is a good starting point if you want to try out an
automated Kickstart installation.
You can also use system-config-kickstart tool on the GUI to create
your own kickstart file. Follow the official CentOS page to get the
various options with this tool.
Since we plan to automate our installation using kickstart and network
boot PXE server so we will need a working kickstart file. I have written
another article which contains a sample kickstart
configuration file which you can use for reference. For this article
I will use kickstart file /root/kickstart.conf with below content.
# System authorization information
auth --enableshadow --passalgo=sha512

# Use Network installation media
url –url="http://10.0.2.20/rhel/"

# Use textual install
text

# Run the Setup Agent on first boot
firstboot --disable
ignoredisk --only-use=sda

# Keyboard layouts
keyboard --vckeymap=us --xlayouts='us'

# System language
lang en_US.UTF-8

# Network information
network --bootproto=dhcp --device=enp0s8 --onboot=off --noipv6 --activate
network --hostname=node2.example.com

# Root password
rootpw --iscrypted $6$CXxBapbzNlScWzBU$45c4bxK9/pDVls/aJcaT/9kENR0OFxMhohBf7k8RrBWtzTs42ljw4SER0AqYTDEdWHlDWE4BTTnQX8vkMWJ6l1

# System services
services --enabled="chronyd"

# System timezone
timezone Asia/Kolkata --isUtc

# System bootloader configuration
bootloader --append=" crashkernel=auto" --location=mbr --boot-drive=sda

# Partition clearing information
clearpart --none --initlabel
autopart --type=plain --fstype=ext4

%packages
@^infrastructure-server-environment
@base
@core
chrony
kexec-tools

%end
Configure HTTP
Loading kickstart files over the network from the kernel line during an install only supports NFS, HTTP, and FTP. In this recipe, I choose HTTP as it is a common technology within companies and easy to secure.
Install the Apache server rpm if not installed already
# yum -y install http
Create a directory to contain the kickstart file(s) by running the following command:
# mkdir /var/www/html/kickstart
# cp /root/kickstart.conf /var/www/html/kickstart
Give appropriate permission
# chown -R apache:apache /var/www/html/
Enable and start the httpd daemon, as follows:
# systemctl enable httpd
Created symlink from /etc/systemd/system/multi-user.target.wants/httpd.service to /usr/lib/systemd/system/httpd.service.

# systemctl start httpd
Next try to download the kickstart file to make sure it is accessible from the apache server
[root@node1 # wget http://10.0.2.20/kickstart/kickstart.conf
--2018-11-05 21:14:32-- http://10.0.2.20/kickstart/kickstart.conf
Connecting to 10.0.2.20:80... connected.
HTTP request sent, awaiting response... 200 OK
Length: 1491 (1.5K) [text/plain]
Saving to: ‘kickstart.conf’

100%[======================================>] 1,491 --.-K/s in 0s

2018-11-05 21:14:32 (319 MB/s) - ‘kickstart.conf’ saved [1491/1491]
Setup the source repository for network installation
The next step to set up an installation server is to configure a network server as installation server. This comes down to copying the entire installation DVD to a share on a network server, which makes the installation server an online repository. After doing this, you can use a client computer to access the installation files.
I have a vanilla Red Hat DVD which I will use as my repository for the installation via network but instead of copying, I will mount my image.
# mount /root/rhel-server-7.4-x86_64-dvd.iso /var/www/html/rhel/
mount: /dev/loop0 is write-protected, mounting read-only
Since we will use the repo over our HTTP server hence I will use mount
partition inside /var/www/html
Configure TFTP service
Now that you have set up a network installation server, it is time to
configure PXE boot. This allows you to boot a server you want to install
from the network card of the server. (You normally have to change
default boot order, or press a key while booting, to activate PXE boot
(Mostly F12) The PXE server next hands out a boot image that the
server you want to install uses to start the initial phase of the boot.
Install the RPMs
First of all you need to install all the rpms required to configure PXE boot server
[root@node1 # yum -y install syslinux tftp-server xinetd
Enable the tftp server’s xinetd daemon, as follows:
# sed -i '/disable/ s/yes/no/' /etc/xinetd.d/tftp
Now, enable and start the xinetd daemon by running the following:
# systemctl enable xinetd
# systemctl start xinetd
Copy the syslinux boot loaders to the tftp server’s boot directory by executing the following command:
# cp -r /usr/share/syslinux/* /var/lib/tftpboot
Copy initrd and kernel from the RHEL 7 installation media to
/var/lib/tftpboot/rhel7/, and run the following commands:
# mkdir /var/lib/tftpboot/rhel7
Since our DVD is already mounted on /var/www/html/rhel, we can copy
the required files from the same location
# cp /var/www/html/images/pxeboot/{initrd.img,vmlinuz} /var/lib/tftpboot/rhel7/
Next, create the PXE configuration directory using this command:
# mkdir /var/lib/tftpboot/pxelinux.cfg
Then, create the PXE configuration file, as follows:
/var/lib/tftpboot/pxelinux.cfg/default.
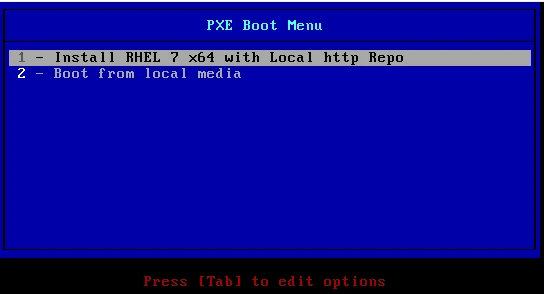
default menu.c32
prompt 0
timeout 300
ontimeout 2

menu title PXE Boot Menu
label 1
  menu label ^1 - Install RHEL 7 x64 with Local http Repo
  kernel rhel7/vmlinuz
  append initrd=rhel7/initrd.img showopts  method=http://10.0.2.20/rhel/ devfs=nomount ks=http://10.0.2.20/kickstart/kickstart.conf

label 2
  menu label ^2 - Boot from local media
  localboot 0x80
Here we are using menu.c32 to get the splash screen menu and defining
a timeout of 300 value and within the timeout value if there is no user
input then 2nd label will be called i.e. to boot from local disk.
In this file, make sure that the title of the menu label starts with a
^, which identifies it as a menu label title. Also make sure that the
append line is one line only that starts with append and ends with the
URL to the Kickstart file.
Next you can either use DNSMASQ or DHCP server, I have shared the steps to configure both but you can choose one as per your continence
Steps to configure PXE boot server using DNSMASQ server
In case you plan to use DNSMASQ instead of DHCP, then you can use the below steps to configure your DNSMASQ services
Install the RPMs
First of all you need to install all the rpms required to configure PXE boot server
[root@node1 # yum -y install dnsmasq
Configure DNSMASQ
Next configure the DNSMASQ server by editing /etc/dnsmasq.conf, as
follows:
# interfaces to bind to
interface=eth0,lo
# the domain for this DNS server
domain=example.com
# DHCP lease range
dhcp-range=eth0,10.0.2.200,10.0.2.220,10h
# PXE – the address of the PXE server
dhcp-boot=pxelinux.0,pxeserver,10.0.2.20
# Gateway
dhcp-option=3,10.0.2.2
pxe-prompt="Press F8 for menu.", 60
enable-tftp
tftp-root=/var/lib/tftpboot
Enable and start dnsmasq using the following:
# systemctl enable dnsmasq
# systemctl start dnsmasq
Steps to configure PXE boot server using DHCP server
In case you plan to use DHCP instead of DNSMASQ, then you can use the below steps to configure your DHCP services
Configure DHCP Server
On an installation server, the TFTP server cannot exist without a DHCP server. When making a PXE boot, the DHCP server is the first to answer with all the required IP-related configuration and information about the DHCP server that is to be used.
Install the RPMs
First of all you need to install all the rpms required to configure PXE boot server
[root@node1 # yum -y install dhcp
Next configure your /etc/dhcp/dhcpd.conf. Below is my sample config
file. Here you need to add separate entry for every host MAC Address (as
highlighted) to netboot using PXE server.
#
# DHCP Server Configuration file.
#   see /usr/share/doc/dhcp*/dhcpd.conf.example
#   see dhcpd.conf(5) man page
#

allow bootp;
allow booting;
max-lease-time 1200;
default-lease-time 900;
log-facility local7;

option ip-forwarding    false;
option mask-supplier    false;

   subnet 10.0.2.0 netmask 255.255.255.0 {

       option  routers   10.0.2.2;
       option  domain-name-servers  127.0.0.1;
       range 10.0.2.30 10.0.2.40;
       next-server 10.0.2.20;
       filename "pxelinux.0";
   }
In the DHCP configuration file, a subnet is specified. This is the
subnet where the PXE server should offer its services. In most
configurations, this would be a dedicated network, which is a good idea,
because you do not want workstations that perform a PXE boot to get
installed with Red Hat Enterprise Linux by accident. If you want to
offer PXE-based installation services on a network where also clients
are in use that rely on PXE boot, it is recommended to define a class
statement to define which machines should be allowed to use PXE boot and
which should not.
Within the subnet definition, the next-server statement gives the IP
address of the server that is configured with TFTP. Even if it is on the
same server that is offering DHCP, you should still specify the
next-server IP address. The filename statement defines the file that
should be offered to workstations that are making a PXE boot. Notice
that this filename is relative to the TFTP server root as defined in
the TFTP configuration file.
Open the firewall on your server using these commands (however, this may not be necessary):
# firewall-cmd --add-service=dns --permanent
# firewall-cmd --add-service=dhcp --permanent
# firewall-cmd --add-service=tftp --permanent
# firewall-cmd --reload
How the flow would work?
- Now we are all done with our configuration. It is time to boot your target node via NIC card.
- Once the target node boots from NIC card, it will search for available DHCP server.
- DNSMASQ/DHCPD daemon takes care of pointing booting systems to the
tftp server by providing the
enable-tftpoption in thednsmasqconfiguration ornext-serverin thedhcpd.conffile. - syslinux is needed to provide the necessary binaries to boot from the network.
- The tftp server itself provides access to the syslinux files, RHEL 7 kernel, and initrd for the system to boot from.
- The PXE configuration file provides the necessary configuration to boot a system, including a kickstart file that automatically installs your system.
On your server side in the /var/log/messages you can monitor the progress of the PXE boot
When using DHCP
Nov 6 00:26:01 node1 dhcpd: DHCPDISCOVER from 08:00:27:88:0b:f3 via eth0
Nov 6 00:26:02 node1 dhcpd: DHCPOFFER on 10.0.2.30 to 08:00:27:88:0b:f3 via eth0
Nov 6 00:26:04 node1 dhcpd: DHCPREQUEST for 10.0.2.30 (10.0.2.20) from 08:00:27:88:0b:f3 via eth0
Nov 6 00:26:04 node1 dhcpd: DHCPACK on 10.0.2.30 to 08:00:27:88:0b:f3 via eth0
Nov 6 00:26:04 node1 xinetd[1018]: START: tftp pid=8021 from=10.0.2.30
Nov 6 00:26:04 node1 in.tftpd[8022]: Client 10.0.2.30 finished pxelinux.0
Nov 6 00:26:04 node1 in.tftpd[8033]: Client 10.0.2.30 finished pxelinux.cfg/default
Nov 6 00:26:04 node1 in.tftpd[8034]: Client 10.0.2.30 finished menu.c32
Nov 6 00:26:04 node1 in.tftpd[8035]: Client 10.0.2.30 finished pxelinux.cfg/default
When using DNSMASQ
Nov 5 23:48:15 node1 dnsmasq-dhcp[7036]: DHCPDISCOVER(eth0) 08:00:27:88:0b:f3
Nov 5 23:48:15 node1 dnsmasq-dhcp[7036]: DHCPOFFER(eth0) 10.0.2.217 08:00:27:88:0b:f3
Nov 5 23:48:15 node1 dnsmasq-dhcp[7036]: DHCPREQUEST(eth0) 10.0.2.217 08:00:27:88:0b:f3
Nov 5 23:48:15 node1 dnsmasq-dhcp[7036]: DHCPACK(eth0) 10.0.2.217 08:00:27:88:0b:f3
Nov 5 23:48:21 node1 dnsmasq-dhcp[7036]: PXE(eth0) 10.0.2.217 08:00:27:88:0b:f3 pxelinux.0
Nov 5 23:48:21 node1 dnsmasq-tftp[7036]: sent /var/lib/tftpboot/pxelinux.0 to 10.0.2.217
Nov 5 23:48:21 node1 dnsmasq-tftp[7036]: file /var/lib/tftpboot/pxelinux.cfg/01-08-00-27-88-0b-f3 not found
Nov 5 23:48:21 node1 dnsmasq-tftp[7036]: file /var/lib/tftpboot/pxelinux.cfg/0A0002D9 not found
Nov 5 23:48:21 node1 dnsmasq-tftp[7036]: file /var/lib/tftpboot/pxelinux.cfg/0A0002D not found
Nov 5 23:48:21 node1 dnsmasq-tftp[7036]: file /var/lib/tftpboot/pxelinux.cfg/0A0002 not found
Nov 5 23:48:21 node1 dnsmasq-tftp[7036]: file /var/lib/tftpboot/pxelinux.cfg/0A000 not found
Nov 5 23:48:21 node1 dnsmasq-tftp[7036]: file /var/lib/tftpboot/pxelinux.cfg/0A00 not found
Nov 5 23:48:21 node1 dnsmasq-tftp[7036]: file /var/lib/tftpboot/pxelinux.cfg/0A0 not found
Nov 5 23:48:21 node1 dnsmasq-tftp[7036]: file /var/lib/tftpboot/pxelinux.cfg/0A not found
Nov 5 23:48:21 node1 dnsmasq-tftp[7036]: file /var/lib/tftpboot/pxelinux.cfg/0 not found
Nov 5 23:48:21 node1 dnsmasq-tftp[7036]: sent /var/lib/tftpboot/pxelinux.cfg/default to 10.0.2.217
Nov 5 23:48:22 node1 dnsmasq-tftp[7036]: sent /var/lib/tftpboot/menu.c32 to 10.0.2.217
Nov 5 23:48:22 node1 dnsmasq-tftp[7036]: sent /var/lib/tftpboot/pxelinux.cfg/default to 10.0.2.217
Here in the message as you see multiple messages withnot found.
Once the client retrieves and executespxelinux.0, it is hard-coded to
look for a file from thepxelinux.cfg/subdirectory relative to
wherepxelinux.0was found.
First, it will look for a file named after the MAC address, in the form
01-xx-xx-xx-xx-xx-xx; then, it will look for a file named by the IP
address as provided by the DHCP server. The IP address is looked up in
hexadecimal format. i.e. 10 in hexadecimal is 0x0A, 0 is 0x00,
2 is 0x02, and 217 is 0xD9, so 10.0.2.217 is 0x0A0002D9.
You can also get this value using printf in the below format
# printf "%02x%02x%02x%02xn" 10 0 2 217
0a0002d9
Below is a sample of the splash screen with “PXE Boot menu” which will be printed on that target node once booted from the NIC card.
Lastly I hope the steps from the article to configure PXE boot server on Linux was helpful. This is a very small part of what actually we can do when configuring a PXE boot server. There are various other options to customise the configuration or use other protocols like NFS. So, let me know your suggestions and feedback using the comment section.
