![Configure LDAP Client to Authenticate with LDAP server [Step-by-Step]](/configure-ldap-client-auth-ldap-server/golinuxcloud-default.jpg)
This is a multi-part article where I will cover different areas of configuration of OpenLDAP server in CentOS 7 Linux node. You can use below links to refer different parts of this tutorial
- Basics LDAP Tutorial for Beginners – Understanding Terminologies & Usage
- Step-by-Step Tutorial: Install and Configure OpenLDAP
- Step-by-Step Tutorial: Configure OpenLDAP with TLS certificates
- Step-by-Step Tutorial: Configure LDAP client to authenticate with LDAP server
First let us install all the required openldap client and dependent
packages
Since we plan to use authconfig to configure ldap client for our
RHEL/CentOS 7 Linux node, we only install SSSD and authconfig
packages. oddjob-mkhomedir is required to be able to create active
directory user’s home directory automatically.
[root@ldap-client ~]# yum install authconfig authconfig-gtk openldap-clients sssd oddjob-mkhomedir.x86_64 -y
nss-pam-ldapd, pam_ldap. We will only use SSSD hence
will not cover this part in our tutorial
Configure LDAP client to authenticate with LDAP server
Before you start make sure you copy /etc/openldap/cacerts/ca.cert.pem
from the ldap-server to ldap-client in the same location under
/etc/openldap/cacerts/ca.cert.pem. This key will be referred by the
authconfig tool
Method 1: Using authconfig-tui
Configuring a client system to use an LDAP directory for user
authentication is as easy as pie on a Fedora or RHEL system. Fedora has
command-line utilities as well as GUI tools (for example,
system-config-authentication, authconfig-gtk) that make it easy.
One of the command-line tools is provided by the package authconfig.
To launch the tool from the command line, type the following:
[root@ldap-client ~]# authconfig-tui
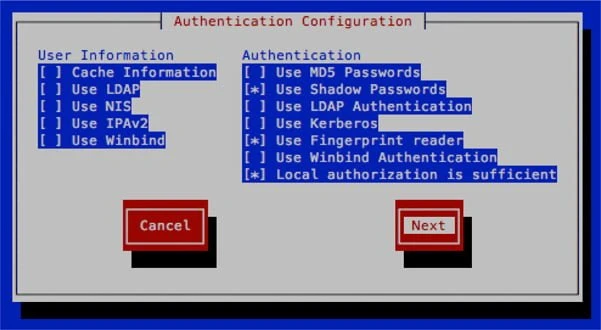
A screen similar to the one shown next will appear:
- In the Authentication Configuration screen, navigate to (using TAB on
your keyboard) and then select (using SPACEBAR on your keyboard) the
following:
Use LDAP→ Under theUser Informationsection
Use LDAP Authentication → Under theAuthenticationsection - Navigate to the Next button and press ENTER to select it.
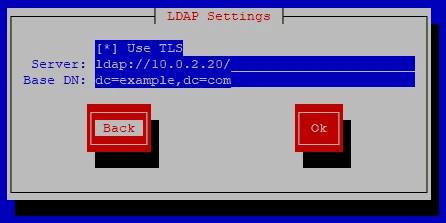
- Use the following information to complete the fields in the ensuing
LDAP Settings screen:
Server:ldap://10.0.2.20/
Base DN:dc=example,dc=com
- When we click OK, this will automatically change a series of files
that otherwise would have to be changed by hand. For example, it will
add the following lines to the
/etc/openldap/ldap.conffile:
URI ldap://10.0.2.20/
BASE dc=example,dc=com
TLS_CACERTDIR /etc/openldap/cacerts
TLS_CACERTDIR and add TLS_REQCERT never
Method 2: Using authconfig CLI
You can also configure ldap on the client using authconfig as shown
below
[root@ldap-client ~]# authconfig --enableldap --enableldapauth --ldapserver=10.0.2.20 --ldapbasedn="dc=example,dc=com" --enableldaptls --update
authconfig-tui, you
can skip the configuration using authconfig.
Configure OpenLDAP
Next configure your openldap client to communicate with the ldap
server and the communication method. Add the below content in
/etc/openldap/ldap.conf
BASE   dc=example,dc=com
URI    ldap://10.0.2.20
TLS_CACERTDIR /etc/openldap/cacerts
Could not start TLS encryption. TLS: hostname does not match CN in peer certificate”
error in /var/log/messages after restarting sssd then it means your
client’s hostname is not configured to use the CA certificate. In such
case you must have a proper certificate generated for this client of use
SAN
certificate on the ldap server. Alternatively you can disable TLS
check using TLS_REQCERT never in /etc/openldap/ldap.conf and also
ldap_id_use_start_tls = False in /etc/sssd/sssd.conf. But this will
disable the TLS communication hence making the system insecure.
Configure oddjob-mkhomedir to auto create home directories
We can use oddjob-mkhomedir to create home directories
automatically for any ldap user which logs into the client node.
This requires pam_mkhomedir.so provided by ddjob-mkhomedir which we
had already installed earlier.
Modify the PAM configuration to use pam_oddjob_mkhomedir. For example,
add this line at the bottom of /etc/pam.d/system-auth:
session required pam_oddjob_mkhomedir.so
Next enable and start oddjobd.service
[root@ldap-client ~]# systemctl enable oddjobd.service --now
/etc/pam.d/sshd) uses
/etc/pam.d/password-auth file instead of /etc/pam.d/system-auth.
Hence, it also required to append the above line in
/etc/pam.d/password-auth file, in order to create home directories
while logging via ssh.
Instead of manual editing, the authconfig command can be used:
[root@ldap-client ~]# authconfig --enablemkhomedir --updateall
Also restart sssd.service
[root@ldap-client ~]# systemctl restart sssd.service
Create LDAP user (Optional)
You can ignore this step if you already a ldap user.
In order to authenticate as an LDAP user, when we create the user, we
have to include a series of fields, such as shell, uid, gid, etc. As an
example, let’s
add the
user testuser1. We begin by creating the testuser1.ldif file,
with the following content:
[root@ldap-client ~]# cat testuser1.ldif
dn: uid=testuser1,ou=users,dc=example,dc=com
uid: testuser1
cn: testuser1
objectClass: shadowAccount
objectClass: top
objectClass: person
objectClass: inetOrgPerson
objectClass: posixAccount
userPassword: {SSHA}5rMM/3f8Ki13IyarGTtwzieoTu7KMgwc
shadowLastChange: 17016
shadowMin: 0
shadowMax: 99999
shadowWarning: 7
loginShell: /bin/bash
uidNumber: 1001
gidNumber: 1001
homeDirectory: /home/testuser1
sn: testuser1
mail: testuser1@example.com
testuser1 using
slappasswd on ldap-server node. My password for testuser1 is
test
Create LDAP group (Optional)
You can ignore this step if you already a ldap group.
Also we will need a group for this testuser1 so I will add it to our
existing OU “users”
[root@ldap-client ~]# cat groups.ldif
dn: cn=testuser1,ou=users,dc=example,dc=com
objectClass: posixGroup
objectClass: top
cn: testuser1
userPassword: {crypt}x
gidNumber: 1001
Add user and group to LDAP database (Optional)
Add the users and groups to the ldap directory using the below commands
[root@ldap-client ~]# ldapadd -f testuser1.ldif -x -D cn=admin,dc=example,dc=com -w redhat
adding new entry "uid=testuser1,ou=users,dc=example,dc=com"

[root@ldap-client ~]# ldapadd -x -D cn=admin,dc=example,dc=com -f groups.ldif -w redhat
adding new entry "cn=testuser1,ou=users,dc=example,dc=com"
If you are getting
ldap_add: Invalid syntax (21); additional info: objectClass: value #0 invalid per syntax
while executing above command then you must load nis.ldif using
# ldapadd -Y EXTERNAL -H ldapi:// -f /etc/openldap/schema/nis.ldif
SASL/EXTERNAL authentication started
SASL username: gidNumber=0+uidNumber=0,cn=peercred,cn=external,cn=auth
SASL SSF: 0
adding new entry "cn=nis,cn=schema,cn=config"
and then re-try the ldapadd command for user/group.
Validate the new user and group (Optional)
Run the ldapsearch command again and verify users and groups are
listed under the base DN to complete the configuration.
[root@ldap-client ~]# ldapsearch -x -D cn=admin,dc=example,dc=com -b dc=example,dc=com -w redhat
# extended LDIF
#
# LDAPv3
# base <dc=example,dc=com> with scope subtree
# filter: (objectclass=*)
# requesting: ALL
#

# example.com
dn: dc=example,dc=com
objectClass: dcObject
objectClass: organization
dc: example
o: example

# users, example.com
dn: ou=users,dc=example,dc=com
objectClass: organizationalUnit
ou: users

# scientists, users, example.com
dn: cn=scientists,ou=users,dc=example,dc=com
cn: scientists
objectClass: groupOfNames
member: cn=Archimedes of Syracuse,ou=users,dc=example,dc=com

# testuser1, users, example.com
dn: uid=testuser1,ou=users,dc=example,dc=com
uid: testuser1
cn: testuser1
objectClass: shadowAccount
objectClass: top
objectClass: person
objectClass: inetOrgPerson
objectClass: posixAccount
userPassword:: e1NTSEF9NXJNTS8zZjhLaTEzSXlhckdUdHd6aWVvVHU3S01nd2M=
shadowLastChange: 17016
shadowMin: 0
shadowMax: 99999
shadowWarning: 7
loginShell: /bin/bash
uidNumber: 1001
gidNumber: 1001
homeDirectory: /home/testuser1
sn: testuser1
mail: testuser1@example.com

# testuser1, users, example.com
dn: cn=testuser1,ou=users,dc=example,dc=com
objectClass: posixGroup
objectClass: top
cn: testuser1
userPassword:: e2NyeXB0fXg=
gidNumber: 1001

# search result
search: 2
result: 0 Success

# numResponses: 6
# numEntries: 5
Connect via LDAP User
Since we have installed oddjob, so we don’t need to create ldap user’s
home directory manually and it will created during the first login of
the user. Now we’ll be able to authenticate with an LDAP user
login as: testuser1
testuser1@10.0.2.13's password:
[testuser1@ldap-client ~]$
Conclusion
In this tutorial I shared the step by step instructions to configure LDAP client using RHEL/CentOS 7 Linux server. Additionally I have also shared the commands to create ldap user and group which you can use to verify your configuration. Since we are using oddjob, we don’t have the dependency to create ldap user’s home directory manually any more.
Lastly I hope the steps from the article to Configure LDAP client to authenticate with LDAP server on Linux was helpful. So, let me know your suggestions and feedback using the comment section.
References
I have used below external references for this tutorial guide
Learn CentOS Linux Network
Services