
In this article we will setup a PXE boot server using RHEL/CentOS 8 ISO Image. To perform network based installation we will also configure kickstart server. Below are the brief list of steps involved to setup PXE boot server
- Setup installation repo using Red Hat 8.1 ISO
- Setup PXE boot server environment
- Configure kickstart server to automate the installation
- Configure DHCP Server to assign IP Address
- Configure TFTP server to transfer PXE files
- Configure NFS server to share installation repo and kickstart file
Lab Environment
I have created two Virtual Machines using Oracle VirtualBox installed on my Linux server. We will perform VirtualBox PXE boot installation where first VM will be used to setup pxe boot kickstart server while we perform network based installation on the second VM.
Below are the server specifications:
| VM1 | VM2 | |
|---|---|---|
| Hostname | centos-8 | centos8-4 |
| IP Address | 10.10.10.12 | NIC1: eth0 - DHCP NIC2: eth1 - DHCP |
| Purpose | PXE Boot Server | VirtualBox PXE Boot Client |
Step 1: Setup Installation Repo
We will setup PXE boot server to install RHEL 8 using network based installation. Create a new directory where we will place all the RHEL image files
[root@centos-8 pxelinux]# mkdir /images
I have virtually mounted RHEL 8 ISO to my virtual machine, to access
this ISO I will mount the image to /mnt
Do you know how to identify and access USB drives, ISO Images connected to a Linux server?
[root@centos-8 ~]# mount /dev/sr0 /mnt
mount: /mnt: WARNING: device write-protected, mounted read-only.
Copy all the files from the RHEL 8 ISO Image to /images directory
[root@centos-8 ~]# cp -apr /mnt/* /images/
Note that here copying of
hidden file will be ignored and .treeinfo file which is
required for a valid installation source so manually copy these
hidden files.
~8GB of free space to copy the complete RHEL 8 ISO image
[root@centos-8 ~]# cp -apr /mnt/.discinfo /mnt/.treeinfo /images/
Verify the repository content
[root@centos-8 ~]# ls -al /images/
total 92
drwxr-xr-x   7 root root  4096 Apr 19 20:33 .
dr-xr-xr-x. 33 root root  4096 Apr 19 19:57 ..
dr-xr-xr-x   4 root root  4096 Oct 15  2019 AppStream
dr-xr-xr-x   4 root root  4096 Oct 15  2019 BaseOS
-r--r--r--   1 root root    60 Apr 19 20:33 .discinfo
dr-xr-xr-x   3 root root  4096 Oct 15  2019 EFI
-r--r--r--   1 root root  8266 Oct 15  2019 EULA
-r--r--r--   1 root root  1455 Oct 15  2019 extra_files.json
-r--r--r--   1 root root 18092 Oct 15  2019 GPL
dr-xr-xr-x   3 root root  4096 Oct 15  2019 images
dr-xr-xr-x   2 root root  4096 Oct 15  2019 isolinux
-r--r--r--   1 root root   103 Oct 15  2019 media.repo
-r--r--r--   1 root root  1669 Oct 15  2019 RPM-GPG-KEY-redhat-beta
-r--r--r--   1 root root  5134 Oct 15  2019 RPM-GPG-KEY-redhat-release
-r--r--r--   1 root root  1796 Oct 15  2019 TRANS.TBL
-r--r--r--   1 root root  1566 Apr 19 20:33 .treeinfo
Step 2: Install and Configure TFTP Server
Next we will configure TFTP server to transfer PXE image files to the client for network based installation.
Install tftp-server and xinetd using dnf
[root@centos-8 ~]# dnf install tftp-server xinetd -y
Earlier with RHEL/CentOS 7, tftp service was managed by xinetd.
Although even with RHEL/CentOS 7 we had an option to disable xinetd
and fork TFTP process using systemd.
xinetd or by systemd but not
both. For more details
check:
TFTP
service is getting inactive automatically in RHEL7
In this example we will fork TFTP process using systemd.
The tftp-server rpm installation will create
/usr/lib/systemd/system/tftp.service unit file
Below is the content of this service unit file
[root@centos-8 pxelinux.cfg]# cat /usr/lib/systemd/system/tftp.service
[Unit]
Description=Tftp Server
Requires=tftp.socket
Documentation=man:in.tftpd

[Service]
ExecStart=/usr/sbin/in.tftpd -s /var/lib/tftpboot
StandardInput=socket

[Install]
Also=tftp.socket
- From
ExecStartwe can see that the default location for TFTP server is/var/lib/tftpboot. - So we must place all the PXE boot server files under this location
- You can also use any other directory but then you will have to modify
this service unit file to use the custom path for
tftpservice
Next start the tftp service and enable it to start automatically post
reboot
[root@centos-8 pxelinux.cfg]# systemctl enable tftp.service --now
Created symlink /etc/systemd/system/sockets.target.wants/tftp.socket → /usr/lib/systemd/system/tftp.socket.
- TFTP service uses to
tftp.socketto serve TFTP requests - So it is possible that if
there are no incoming TFTP requests then the
tftpservice will become inactive on it’s own - But as soon as a TFTP request goes to
tftp.socket, the socket will start tftp.serviceand serve the request
Check the status of tftp.socket
[root@centos-8 ~]# systemctl status tftp.socket
● tftp.socket - Tftp Server Activation Socket
   Loaded: loaded (/usr/lib/systemd/system/tftp.socket; enabled; vendor preset: disabled)
   Active: active (listening) since Sun 2020-04-19 19:32:40 IST; 7h ago
   Listen: [::]:69 (Datagram)
   CGroup: /system.slice/tftp.socket

Apr 19 19:32:40 centos-8.example.com systemd[1]: Listening on Tftp Server Activation Socket.
Step 3: Setup PXE boot server
- Next to perform PXE network based installation, we must configure PXE boot server.
- We will need Linux boot images to boot the RHEL 8 OS with minimal configuration
- This is performed using
initrdandvmlinuz. I hope you are familiar with the Linux boot process which covers this part - Before the actual kernel loads,
initrdandvmlinuzwill load the necessary drivers from the memory to boot up the server
We will create another directory “pxelinux” under /var/lib/tftpboot
to store PXE images
[root@centos-8 ~]# mkdir -p /var/lib/tftpboot/pxelinux
Step 3.1: Extract syslinux-tftpboot
With RHEL/CentOS 8, the pxelinux file is part of syslinux-tftpboot
rpm so we will copy this file from our RHEL 8 ISO to a temporary
location
[root@centos-8 ~]# cp /mnt/BaseOS/Packages/syslinux-tftpboot-6.04-4.el8.noarch.rpm /tmp/
Next extract the syslinux-tftpboot rpm. We will not use all the
contents of this rpm and only required files
[root@centos-8 ~]# cd /tmp/
[root@centos-8 tmp]# rpm2cpio syslinux-tftpboot-6.04-4.el8.noarch.rpm | cpio -idm
The above command will extract syslinux-tftpboot under /tmp.
Next we will copy pxelinux.0 and ldlinux.c32 to
/var/lib/tftpboot/pxelinux/ required to setup PXE boot server
/var/lib/tftpboot/pxelinux/
[root@centos-8 tmp]# cp /tmp/tftpboot/ldlinux.c32 /var/lib/tftpboot/pxelinux/
[root@centos-8 tmp]# cp /tmp/tftpboot/pxelinux.0 /var/lib/tftpboot/pxelinux/
Step 3.2: Copy initrd and vmlinuz
We also need other PXE boot images which will be under isolinux folder
of the RHEL/CentOS 8 Image.
Since we had copied the ISO content to /images, we will copy required
PXE boot images from /images/isolinux to /var/lib/tftpboot/pxelinux/
[root@centos-8 tmp]# cp /images/isolinux/initrd.img /var/lib/tftpboot/pxelinux/
[root@centos-8 tmp]# cp /images/isolinux/vmlinuz /var/lib/tftpboot/pxelinux/
List all the PXE boot image files:
[root@centos-8 tmp]# ls -l /var/lib/tftpboot/pxelinux/
total 58880
-r--r--r-- 1 root root 62248424 Apr 19 19:14 initrd.img
-rw-r--r-- 1 root root   116096 Apr 19 19:47 ldlinux.c32
-rw-r--r-- 1 root root    42821 Apr 19 19:01 pxelinux.0
-r-xr-xr-x 1 root root  8106848 Apr 19 19:14 vmlinuz
Next navigate to pxelinux folder
[root@centos-8 tmp]# cd /var/lib/tftpboot/pxelinux
Step 3.3: Create Boot Menu
- We will create PXE boot server which can be used to install multiple images so we will create a boot menu.
- This boot menu will be displayed to initiate the installation for user input.
- Create a new file
boot.msgunder/var/lib/tftpboot/pxelinux - You can use any name for this file as per your requirement.
Since I intent to configure Kickstart server only for single Image, I have only created two menu entries.
[root@centos-8 pxelinux]# cat boot.msg
Welcome to the installation of "My Linux Server" !
Red Hat Enterprise linux 8.1 (x86_64)
Version: 1.0
Architecture: x86_64

To start the installation enter :
    '1', '2' and press .

Available boot options:

  1 - Install Red Hat Enterprise Linux 8.1
  2 - Boot from Harddisk (this is default)

Have a lot of fun...
Step 3.4: Create PXE configuration file
Once the client retrieves and executes pxelinux.0, it is hard-coded to
look for a file from the pxelinux.cfg/ sub directory relative to where
pxelinux.0 was found. In large deployments
we create individual PXE
configuration file per node.
After attempting the file as specified in the DHCP or hardcoded options,
PXELINUX will probe the following paths, prefixed with
“pxelinux.cfg/”, under the initial Working Directory. The naming
syntax of these PXE configuration file is very important.
- First, it will look for file based on the client UUID, if provided by
the PXE stack.
Note that some BIOSes do not have a valid UUID, and it might end up reporting something like all 1’s.
This value is represented in the standard UUID format using lowercase hexadecimal digits,e.g. “b8945908-d6a6-41a9-611d-74a6ab80b83d”. - Next it will look for a file named after the MAC address (using
its ARP “htype” code), in the form
01-xx-xx-xx-xx-xx-xxall in lowercase hexadecimal with dash separators.
For example, in this example my client’s NIC MAC Address is08:00:27:83:1e:2aso my PXE configuration file will be01-08-00-27-83-1e-2a - Next, it will look for a file named by the IP address as provided
by the DHCP server in UPPERCASE letters.
The IP address is looked up in hexadecimal format.
You can useprintfto get the hexadecimal format of an IP Address, for example to get the hexadecimal value of10.10.10.12
# printf "%02x%02x%02x%02xn" 10 10 10 12
0a0a0a0cn
You can read more at PXELINUX
-
Syslinux Wiki
-
Since I am not assigning any static IP Address, I cannot use the hexadecimal format file. Although I can use MAC address based file.
-
If both MAC Address and hexadecimal format file are not found under
pxelinux.cfgthen the installer will look for “default” file -
In this example I will use
defaultfile but I have also verified the PXE network installation using MAC based file01-08-00-27-83-1e-2a
We will create a new directory pxelinux.cfg
[root@centos-8 ~]# mkdir /var/lib/tftpboot/pxelinux/pxelinux.cfg
Create the PXE configuration file
/var/lib/tftpboot/pxelinux/pxelinux.cfg/default
[root@centos-8 ~]# cat /var/lib/tftpboot/pxelinux/pxelinux.cfg/default
timeout 600
display boot.msg
default 1
prompt  1

label 1
  menu label ^Install Red Hat Enterprise Linux 8
  kernel vmlinuz
  append initrd=initrd.img showopts ks=nfs:10.10.10.12://ks/kickstart.conf ip=dhcp net.ifnames=0 biosdevname=0

label 2
  menu label Boot from ^local drive
  localboot 0x80

menu end
- I have created two labels based on our Boot Menu
-
- label 1: This will be used to install Red Hat Linux 8
- label 2: To continue booting from hard disk
- I have provided label 2 as
the
defaultoption. - So if a user input is not provided until the
timeoutvalue i.e. 600, the installer will choose label 2 and continue to boot from hard disk - I will use NFS server to configure kickstart server to perform network based installation.
- My kickstart file will be available under
/ksdirectory which we will create in next steps ip=dhcpis optional, as the client will anyhow get the IP address from the DHCP server.net.ifnamesandbiosdevnameare also optional, as I do not wish to use consistent network device naming scheme for my client node.
Make sure the PXE configuration files have read permission for “other”
users
[root@centos-8 ~]# ls -l /var/lib/tftpboot/pxelinux/
total 68880
-rw-r--r-- 1 root root      325 Apr 19 19:10 boot.msg
-r--r--r-- 1 root root 62248424 Apr 19 19:14 initrd.img
-rw-r--r-- 1 root root   116096 Apr 19 19:47 ldlinux.c32
-rw-r--r-- 1 root root    42821 Apr 19 19:01 pxelinux.0
drwxr-xr-x 2 root root     4096 Apr 20 01:47 pxelinux.cfg
-r-xr-xr-x 1 root root  8106848 Apr 19 19:14 vmlinuz

[root@centos-8 ~]# ls -l /var/lib/tftpboot/pxelinux/pxelinux.cfg/default
-rw-r--r-- 1 root root 307 Apr 20 01:47 /var/lib/tftpboot/pxelinux/pxelinux.cfg/default
Step 4: Install and Configure DHCP server
You can also use DNSMASQ server to assign IP address but we will use DHCP server in this example to perform network based installation in Linux.
[root@centos-8 pxelinux.cfg]# dnf install dhcp-server -y
Below is a very basic example of DHCP server configuration
- The PXE file name is defined with
filename. Since thetftpis configured to use/var/lib/tftpas default location we have providedpxelinux/pxelinux.0 next-serverdefines the IP address of the TFTP serverrangeis used to assign IP address for DHCP requests
dhcpd.conf
[root@centos-8 pxelinux.cfg]# cat /etc/dhcp/dhcpd.conf

allow bootp;
allow booting;
max-lease-time 1200;
default-lease-time 900;
log-facility local7;

option ip-forwarding    false;
option mask-supplier    false;

   subnet 10.10.10.0 netmask 255.255.255.0 {

       option  routers   10.10.10.1;
       option  domain-name-servers  127.0.0.1;
       range 10.10.10.100 10.10.10.140;
       next-server 10.10.10.12;
       filename "pxelinux/pxelinux.0";
   }
Enable and start the dhcpd service
[root@centos-8 pxelinux.cfg]# systemctl enable dhcpd --now
Created symlink /etc/systemd/system/multi-user.target.wants/dhcpd.service → /usr/lib/systemd/system/dhcpd.service.
Make sure the dhcpd service status is active and running
[root@centos-8 ~]# systemctl status dhcpd
● dhcpd.service - DHCPv4 Server Daemon
   Loaded: loaded (/usr/lib/systemd/system/dhcpd.service; enabled; vendor preset: disabled)
   Active: active (running) since Sun 2020-04-19 19:45:45 IST; 6h ago
     Docs: man:dhcpd(8)
           man:dhcpd.conf(5)
 Main PID: 30897 (dhcpd)
   Status: "Dispatching packets..."
    Tasks: 1 (limit: 26213)
   Memory: 5.1M
   CGroup: /system.slice/dhcpd.service
           └─30897 /usr/sbin/dhcpd -f -cf /etc/dhcp/dhcpd.conf -user dhcpd -group dhcpd --no-pid
Step 5: Configure kickstart server
- To configure kickstart server we would need a kickstart file to automate the installation.
- With every Red Hat and CentOS installation, a default kickstart file
is created under home folder of root user
i.e.
/root/anaconda-ks.cfg - This anaconda kickstart file contains the values used to install your server
- We can use this anaconda file to create our kickstart configuration file and configure kickstart server
- You can also use online kickstart generator tool provided by Red Hat. Although I am not very fond of this tool has very limited options while a kickstart supports many more features
- In this example I will use the default
anaconda.cfgtemplate to configure kickstart server
Create /ks directory where we will store our kickstart file
[root@centos-8 pxelinux.cfg]# mkdir /ks
Copy the content of anaconda-ks.cfg and rename to /ks/kickstart.conf
[root@centos-8 pxelinux.cfg]# cp /root/anaconda-ks.cfg /ks/kickstart.conf
Make sure the kickstart file is readable by other users while ks
directory has read and execute permission for others.
[root@centos-8 ~]# ls -l /ks/kickstart.conf
-rw-r--r-- 1 root root 1688 Apr 19 20:55 /ks/kickstart.conf
Step 5.1: Sample kickstart configuration file
Below is my sample kickstart configuration file. I prefer to perform text based network installation (Since the day I started using Linux, I sort of have got addicted to CLI rather than graphics)
I won’t be able to explain the entire content of kickstart file in this article as it would be too long, I will plan to write another article with detailed description of all the values from kickstart file.
[root@centos-8 pxelinux]# cat /ks/kickstart.conf

#version=RHEL8
ignoredisk --only-use=sda

# Partition clearing information
clearpart --all

# Use text install
text

# Create APPStream Repo
repo --name="AppStream" --baseurl=file:///run/install/repo/AppStream

# Use NFS Repo
nfs --server=10.10.10.12 --dir=/images/

# Keyboard layouts
keyboard --vckeymap=us --xlayouts='us'

# System language
lang en_US.UTF-8

# Network information
network  --bootproto=dhcp --device=eth0 --ipv6=ignore --activate
network  --bootproto=dhcp --device=eth1 --onboot=off --ipv6=ignore --activate
network  --hostname=centos8-4.example.com

# Root password
rootpw --iscrypted $6$w7El/FYx9mbTG6x9$Te.Yg6dq0TsQwGpdSjeDGSw4J9ZBAkLXzT9ODMV7I7lHvX3n5.9PCS4jIkS2GbVLZOpVRLvrua3wwbwA.cfWX.

# Run the Setup Agent on first boot
firstboot --enable

# Do not configure the X Window System
skipx

# System services
services --enabled="chronyd"

# System timezone
timezone Asia/Kolkata --isUtc

# Reboot after installation completes
reboot

# Disk partitioning information
autopart --type=plain --fstype=ext4

# Packages to be installed
%packages
@^virtualization-host-environment
kexec-tools

%end

%addon com_redhat_kdump --enable --reserve-mb='auto'
%end

%anaconda
pwpolicy root --minlen=6 --minquality=1 --notstrict --nochanges --notempty
pwpolicy user --minlen=6 --minquality=1 --notstrict --nochanges --emptyok
pwpolicy luks --minlen=6 --minquality=1 --notstrict --nochanges --notempty
%end
Step 6: Install and Configure NFS
I have already written a separate article with detailed description and steps to install and configure both NFSv4 and NFSv3 server. Hence I will be very brief here:
Install nfs-utils rpm required to configure NFS
[root@centos-8 ~]# dnf -y install nfs-utils
Below are the directories I plan to share for my Linux kickstart
server.
Here /ks contains the kickstart configuration file
and /images contains the RHEL 8 ISO content for installation
[root@centos-8 ~]# cat /etc/exports
/ks     *(ro,sync,no_root_squash)
/images *(ro,sync,no_root_squash)
Re-export the shares
[root@centos-8 ~]# exportfs -r
Print the available shares
[root@centos-8 ~]# exportfs -v
/ks             (sync,wdelay,hide,no_subtree_check,sec=sys,ro,secure,no_root_squash,no_all_squash)
/images         (sync,wdelay,hide,no_subtree_check,sec=sys,ro,secure,no_root_squash,no_all_squash)
Enable and start the nfs-server.service. Here since we are using
NFSV4, we have not started or installed rpcbind.
You can read more at: Step-by-Step
Guide to install and configure NFSv4 and NFSv3 server & client in
RHEL/CentOS 7/8
[root@centos-8 ~]# systemctl enable nfs-server --now
Make sure nfs-server service up and running
[root@centos-8 ~]# systemctl status nfs-server
● nfs-server.service - NFS server and services
   Loaded: loaded (/usr/lib/systemd/system/nfs-server.service; enabled; vendor preset: disabled)
  Drop-In: /run/systemd/generator/nfs-server.service.d
           └─order-with-mounts.conf
   Active: active (exited) since Sun 2020-04-19 19:49:17 IST; 6h ago
  Process: 31119 ExecStopPost=/usr/sbin/exportfs -f (code=exited, status=0/SUCCESS)
  Process: 31117 ExecStopPost=/usr/sbin/exportfs -au (code=exited, status=0/SUCCESS)
  Process: 31116 ExecStop=/usr/sbin/rpc.nfsd 0 (code=exited, status=0/SUCCESS)
  Process: 31144 ExecStart=/bin/sh -c if systemctl -q is-active gssproxy; then systemctl reload gssproxy ; fi (code=exited, status=0/SUCCESS)
  Process: 31132 ExecStart=/usr/sbin/rpc.nfsd (code=exited, status=0/SUCCESS)
  Process: 31131 ExecStartPre=/usr/sbin/exportfs -r (code=exited, status=0/SUCCESS)
 Main PID: 31144 (code=exited, status=0/SUCCESS)

Apr 19 19:49:17 centos-8.example.com systemd[1]: Starting NFS server and services...
Apr 19 19:49:17 centos-8.example.com systemd[1]: Started NFS server and services.
We are all done with the steps to setup PXE boot server to perform network based installation in Linux. Using kickstart as the mode of installation we also have configure kickstart server on the same node.
Next we will perform VirtualBox PXE Boot Installation on the Client Virtual Machine
Step 7: Perform VirtualBox PXE Boot Installation
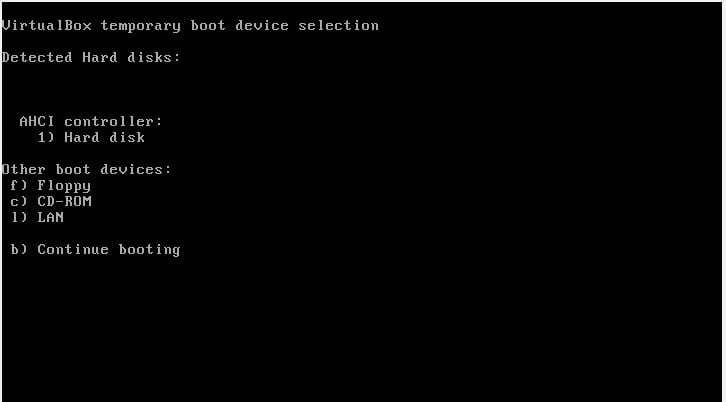
I will share the steps to perform VirtualBox PXE Boot installation as I am not using physical hardware here. “Power ON” the client virtual machine and press “F12” to select boot device
You will get a list of Boot device options to boot from, I will press ‘l’ to boot from LAN
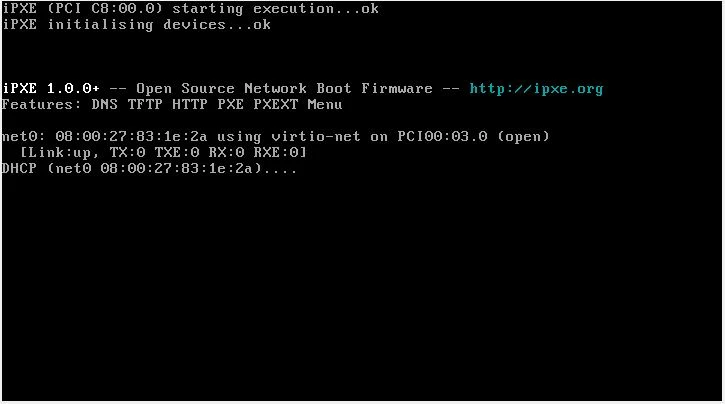
In the next screen, DHCP request is sent using the first NIC card. The
client will send a broadcast request to all the servers around in the
network looking for an IP Address.
As soon as the broadcast request reaches our PXE boot server (also
configured as DHCP server), it will release an IP address
You can see below set of messages on your PXE boot server. I
am using journalctl to view the system messages
Apr 20 01:49:14 centos-8.example.com dhcpd[30897]: DHCPOFFER on 10.10.10.100 to 08:00:27:83:1e:2a via eth1
Apr 20 01:49:15 centos-8.example.com dhcpd[30897]: DHCPDISCOVER from 08:00:27:83:1e:2a via eth1
Apr 20 01:49:15 centos-8.example.com dhcpd[30897]: DHCPOFFER on 10.10.10.100 to 08:00:27:83:1e:2a via eth1
Apr 20 01:49:17 centos-8.example.com dhcpd[30897]: Wrote 2 leases to leases file.
Apr 20 01:49:17 centos-8.example.com dhcpd[30897]: DHCPREQUEST for 10.10.10.100 (10.10.10.12) from 08:00:27:83:1e:2a via eth1
Apr 20 01:49:17 centos-8.example.com dhcpd[30897]: DHCPACK on 10.10.10.100 to 08:00:27:83:1e:2a via eth1
Once the client gets the IP Address, next it will search of PXE boot
files using TFTP.
At this stage you should see below logs in /var/log/messages on the
PXE boot Server (also used as TFTP boot server)
Apr 20 01:49:17 centos-8.example.com systemd[1]: Started Tftp Server.
Apr 20 01:49:17 centos-8.example.com in.tftpd[19710]: Client ::ffff:10.10.10.100 finished pxelinux/pxelinux.0
Apr 20 01:49:17 centos-8.example.com in.tftpd[19711]: Client ::ffff:10.10.10.100 finished pxelinux/ldlinux.c32
Apr 20 01:49:17 centos-8.example.com in.tftpd[19722]: Client ::ffff:10.10.10.100 finished pxelinux/pxelinux.cfg/default
Apr 20 01:49:17 centos-8.example.com in.tftpd[19723]: Client ::ffff:10.10.10.100 finished pxelinux/boot.msg
Apr 20 01:49:30 centos-8.example.com in.tftpd[19732]: Client ::ffff:10.10.10.100 finished pxelinux/vmlinuz
Apr 20 01:49:36 centos-8.example.com in.tftpd[19734]: Client ::ffff:10.10.10.100 finished pxelinux/initrd.img
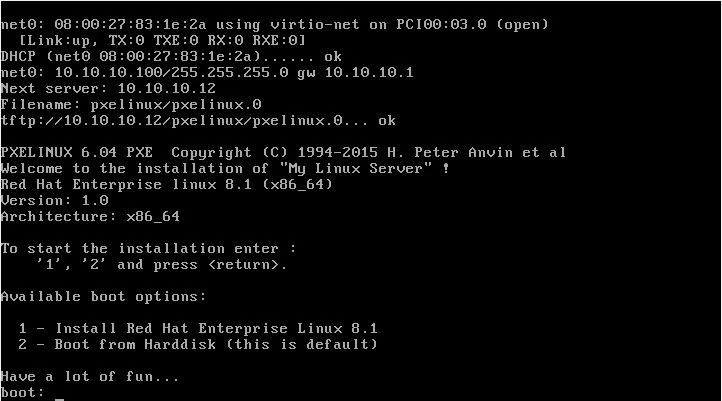
if everything is correct, you should get the BOOT MENU which you had
created using boot.msg file.
As soon as you press “1”, the network based installation would start using kickstart configuration file. Here is a screenshot of my client virtual machine after successful installation.

Lastly I hope the steps from the article to configure kickstart server and PXE boot server on Linux was helpful. So, let me know your suggestions and feedback using the comment section.
References:
Perform Network Based Installation using PXE Boot Server
Related Searches: network based installation of linux, configure kickstart server linux step step, centos netboot, kickstart installation linux, kickstart linux tutorial, fedora anaconda kickstart, red hat network install, virtualbox PXE boot installation
