
In my last article I shared the steps to configure LVM based HA cluster without GFS2 file system. Now let me share the steps to configure iSCSI target and initiator on RHEL/CentOS 7 and 8 Linux node. I am using Virtual Machines running on Oracle VirtualBox installed on my Linux Server
iscsi is an acronym for Internet Small Computer System Interface. We can consider iscsi as a block storage since storage is accessed at the block layer. So basically iSCSI is a block level protocol for sharing RAW storage devices over an IP network. We also call it a SAN technology i.e. iSCSI SAN. Since it operates over IP network, do not mix or confuse it with NAS technologies like NFS or SMB. They also work over IP Network but they operate on File System Layer. but in iSCSI we work on RAW blocks. In this article I will share the steps to configure iscsi target and initiator on RHEL/CentOS 7 and 8.

iSCSI SAN Architecture
When setting up an iSCSI SAN, you configure one server as the iSCSI target. This is the server that offers access to the shared storage devices. When you configure RHEL or CentOS 7 as an iSCSI target, the shared storage devices typically are LVM logical volumes, but they can be complete disks or partitions as well.
The other server is going to be used as the iSCSI initiator. This is the server that connects to the SAN. After connecting to the SAN, the iSCSI initiator sees an additional disk device.
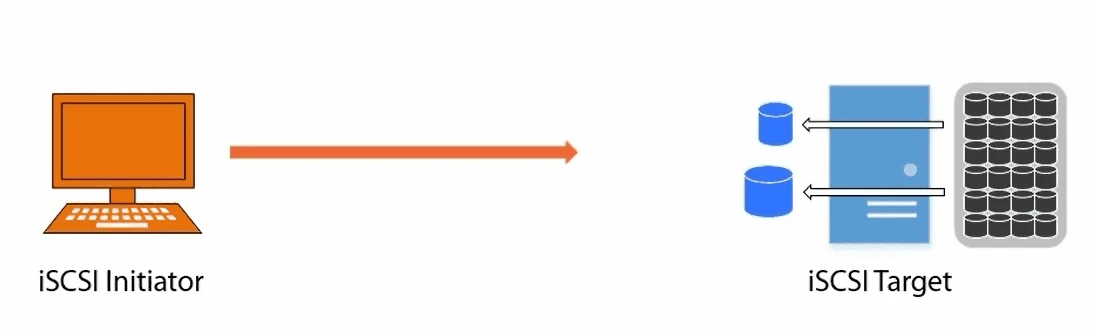
Now iSCSI initiator goes through the process of discovering targets on the network, authenticating and logging in. Eventually accessing these iSCSI LUNs on localhost.
[root@storage1 ~]# yum -y install targetcli
Once successfully installed proceed with the steps to configure iSCSI target on your RHEL or CentOS 7 Linux node.
3. Managing iSCSI targets with targetcli
The targetcli command is a shell to view, edit, save, and load the
iSCSI target configuration. When you look at the configuration, you will
see that targetcli provides a hierarchical structure in a similar way
to a filesystem.
To invoke the targetcli shell, we will run this command as root. You
will see that on the first run of the command, a preferences file is
created. This is illustrated in the following snippet
[root@storage1 ~]# targetcli
targetcli shell version 2.1.fb46
Copyright 2011-2013 by Datera, Inc and others.
For help on commands, type 'help'.

/>
As you can see in the preceding output, you can enter help to display a list of commands that can be entered. To view the available configuration objects, we can use the ls command. The output is shown in the following screenshot:
/> ls
o- / ...................................................................................................................... [...]
  o- backstores ........................................................................................................... [...]
  | o- block ............................................................................................... [Storage Objects: 0]
  | o- fileio .............................................................................................. [Storage Objects: 0]
  | o- pscsi ............................................................................................... [Storage Objects: 0]
  | o- ramdisk ............................................................................................. [Storage Objects: 0]
  o- iscsi ......................................................................................................... [Targets: 0]
We will work with backstores objects to start with so that we can add it to the LVM block device in the configuration in addition to the fileio backstore. As the name suggests, this will be a file within the filesystem; we can share this to a network as a virtual disk.
4. Create block backstores
We will work from the root of the targetcli configuration; this should
be exactly where we are, but we can always use the pwd command to
display our working directory. If required, we can change it to the root
of the configuration with cd /.
[root@node1 ~]# yum -y install iscsi-initiator-utils
1. Setting the iSCSI Initiatorname
For the purpose of this exercise, we will use a separate RHEL 7 & 8
system as our initiator and connect it to the existing target. We will
need to edit the /etc/iscsi/initiatorname.iscsi file on the new RHEL 7
& 8 system to ensure that the name is set to match the name we added to
the ACL in the earlier section of this article
[root@node1 ~]# vi /etc/iscsi/initiatorname.iscsi
[root@node1 ~]# cat /etc/iscsi/initiatorname.iscsi
InitiatorName=iqn.2018-12.com.example:node1
So here we have manually updated the file with the ACL name we used on the iSCSI target.
Next restart the iscsid daemon
[root@node1 ~]# systemctl restart iscsid
2. Discover the LUNs
When using iSCSI discovery, you need three different arguments:
- –type sendtargets: This tells the discovery mode how to find the iSCSI targets.
- –portal: This argument tells the
iscsiadmcommand which IP address and port to address to perform the discovery. You can use an IP address or node name as the argument, and optionally, you can specify a port as well. If no port is specified, the default port 3260 is used. - –discover: This argument tells the
iscsidservice to perform a discovery.
We will use the main client tool iscsiadm to discover the iSCSI LUNs
on the target.
[root@node1 ~]# iscsiadm --mode discovery --type sendtargets --portal 10.0.2.13 --discover
10.0.2.13:3260,1 iqn.2018-12.com.example:servers
After the discovery below database is updated
[root@node1 ~]# ls -l  /var/lib/iscsi/nodes
total 8
drw------- 3 root root 4096 Dec 29 19:56 iqn.2018-12.com.example:servers

[root@node1 ~]# ls -l /var/lib/iscsi/send_targets/10.0.2.13,3260/
total 12
lrwxrwxrwx 1 root root  69 Dec 29 19:56 iqn.2018-12.com.example:servers,10.0.2.13,3260,1,default -> /var/lib/iscsi/nodes/iqn.2018-12.com.example:servers/10.0.2.13,3260,1
-rw------- 1 root root 547 Dec 29 19:56 st_config
3. Making the connection
Now, we have seen that we can connect to the iSCSI target and have it sent us the configured LUNS. We should now connect to this LUN and use the same command with the following options:
[root@node1 ~]# iscsiadm --mode node --targetname iqn.2018-12.com.example:servers  --login
Logging in to [iface: default, target: iqn.2018-12.com.example:servers, portal: 10.0.2.13,3260] (multiple)
Login to [iface: default, target: iqn.2018-12.com.example:servers, portal: 10.0.2.13,3260] successful.
In this command, a few options are used:
- –mode node: This specifies iscsiadm to enter “
node” mode. This is the mode in which the actual connection with the target can be established. - –targetname: This specifies the name of the target as discovered when using the iSCSI discovery process.
- –portal: This is the IP address and port on which the target is listening.
- –login: This authenticates to the target and will store credentials as well to ensure that on reboot the connection can be reestablished again.
After logging in, a session with the iSCSI target is established. Both
the session and the node connection can be monitored, using the -P
option
[root@node1 ~]# iscsiadm --mode node -P 1
Target: iqn.2018-12.com.example:servers
        Portal: 10.0.2.13:3260,1
                Iface Name: default
After making the connection to the iSCSI target, you’ll see the new SCSI
devices as offered by the target. A convenient command to list these
commands is lsscsi
[root@node1 ~]# lsscsi
[1:0:0:0]    cd/dvd  VBOX     CD-ROM           1.0   /dev/sr0
[2:0:0:0]    disk    ATA      VBOX HARDDISK    1.0   /dev/sda
[3:0:0:0]    disk    ATA      VBOX HARDDISK    1.0   /dev/sdb
[11:0:0:0]   disk    LIO-ORG  sdc1             4.0   /dev/sdc
4. Managing iSCSI Connection Persistence
After logging in to an iSCSI target server, the connections are
persistent automatically. That means that on reboot, the iscsid and
iscsi services are started on the iSCSI client, and these services will
read the iSCSI configuration that is locally stored to automatically
reconnect.
Therefore, there is no need to put anything in configuration files if you have successfully connected once to the iSCSI server.
5. Removing the iSCSI connection
If you need an iSCSI connection not to be restored after reboot, you first have to log out to disconnect the actual session by using below command
[root@node1 ~]# iscsiadm --mode node --targetname iqn.2018-12.com.example:servers  --portal 10.0.2.13 -u
Logging out of session [sid: 1, target: iqn.2018-12.com.example:servers, portal: 10.0.2.13,3260]
Logout of [sid: 1, target: iqn.2018-12.com.example:servers, portal: 10.0.2.13,3260] successful.
Next you need to delete the corresponding IQN sub directory and all of its contents. You can do this with the below command
[root@node1 ~]# iscsiadm --mode node --targetname iqn.2018-12.com.example:servers --portal 10.0.2.13 -o delete
iscsi.service and remove all files under
/var/lib/iscsi/nodes to clean up all current configuration. After
doing that, restart the iscsi.service and start the discovery and
login again.
6. Mounting iSCSI Devices
To mount an iSCSI device, you need to take care of a few things. First,
the iSCSI disk that now appears as /dev/sdc might appear as a
different device name the next time it is connected due to a topology
change in your SAN configuration. For that reason, it is not a smart
idea to put a reference to /dev/sdc in the /etc/fstab file. You
should instead use a file system UUID. Every file system automatically
gets a UUID.
To request the value of that UUID, you can use the blkid command
[root@node1 ~]# blkid /dev/sdc
/dev/sdc: UUID="f87DLO-DXDO-jjJ5-3vgO-RfCE-oOCA-VGploa" TYPE="LVM2_member"
/etc/fstab file is processed before the network is
available. To make sure the iSCSI disk can be mounted, you need to use
the _netdev mount option in /etc/fstab.
So to ensure that an iSCSI mount is configured persistently, put an
entry in /etc/fstab that looks like this:
UUID-XXXXXXXX-XXXX-XXXX-XXXXXXXX /iscsi ext4 _netdev 0 2
Lastly I hope the steps from the article to configure iSCSI target and iSCSI initiator on RHEL / CentOS 7 and 8 Linux was helpful. So, let me know your suggestions and feedback using the comment section.
References:
Creating iSCSI target and
Initiator in RHEL 7
Creating iscsi traget and
initiator in RHEL 8
