
What are Ansible Playbooks
- Ansible playbooks are text files or configuration files that are written in particular format called YAML.
- These are expressed in the YAML format and have a minimum of syntax, which is not to be a programming language or script, but rather a model of a configuration.
- Each playbook includes one or more “plays” in a list.
- The goal of a play is to map a group of hosts to some well-defined roles and tasks.
- A
taskis nothing but a call or operation, which applies on group ofhosts.
Example-1: Your first playbook to install single package
Let us write a simple playbook to install wget rpm on all our managed
nodes.
So we will install wget on these 2 hosts. Below is our ansible
playbook. I have added comments for better understanding:
[ansible@controller ~]$ cat install_wget.yml
# --- represents this file as a playbook
---
# Use [space]play[space] where play is combination of hosts+tasks
 - hosts: all
   # Become root user
   become: yes
   # List of tasks to be executed
   tasks:
   - yum:
       name=wget
       state=absent
Our playbook contains one play. Each play consists of the following two important parts:
- What to configure: We need to configure a host or group of hosts to run the play against. Also, we need to include useful connection information, such as which user to connect as, whether to use sudo command, and so on.
- What to run: This includes the specification of tasks to be run, including which system components to modify and which state they should be in, for example, installed, started, or latest. This could be represented with tasks and later on, by roles.
Creating a host inventory
Before we even start writing our playbook with Ansible, we need to define an inventory of all hosts that need to be configured, and make it available for Ansible to use. You can also choose to use dynamic inventory which we have already learned in earlier chapter. Here I will keep it simple and stick to static inventory.
We will use the default inventory file /etc/ansible/hosts to define
our managed nodes under with following content
server1
server2
server3
Earlier I had deployed server3 without passphrase to understand how we
can work with managed nodes with password. Now I will re-deploy the
public key to server3 to have a password less communication between
controller and server3
[ansible@controller ~]$ ssh server3
Activate the web console with: systemctl enable --now cockpit.socket

Last login: Mon Sep 21 09:49:33 2020 from 172.31.7.253
[ansible@server3 ~]$ logout
Connection to server3 closed.
Our password less communication is working with server3
Using hosts pattern
We have used - hosts: all in our playbook which means that the
playbook will be executed for all the nodes found in the inventory. We
can also define patterns instead of “all” to match a selective set of
hosts or groups from the inventory file.
| Pattern Types | Examples |
|---|---|
| Group Name | app |
| Match all | all |
| Range | server[000:999] |
| Hostname/Hostname globs | *.example.com, host01.example.com |
| Exclusions | app:!server3 |
| Regular Expressions | ~(nn|zk).*\example\org |
We have already discussed about these individual patterns in “Working with Inventory Files”
Tasks
Plays map hosts to tasks. Tasks are a sequence of actions performed
against a group of hosts that match the pattern specified in a play.
Each play typically contains multiple tasks that are run serially on
each machine that matches the pattern.
For example, following snippet is from our playbook
   tasks:
   - yum:
       name=wget
       state=present
Under tasks we have defined the module which should be used to execute
the task i.e. “yum”. This module expects certain arguments to complete
the task such as name of the package, state which defines the action
present/latest/absent. We have defined these values under new line for
better readability.
Additionally since installing new rpm requires root privilege hence we
have also used become: yes in the playbook
Running the playbook
Ansible comes with the ansible-playbook command to launch a playbook
with. Let us execute this playbook
[ansible@controller ~]$ ansible-playbook install_wget.yml
Here is what happens when you run the preceding command:
- The
ansible-playbookparameter is the command that takes the playbook as an argument (install_wget.yml) and runs the plays against the hosts - The
install_wgetparameter contains the single play that we created i.e. to installwgetrpm - The
hosts: allparameter is our host’s inventory, which lets Ansible know which hosts, or groups of hosts, to call plays against
Launching the preceding command will start calling plays, orchestrating in the sequence that we described in the playbook. Here is the output of the preceding command:
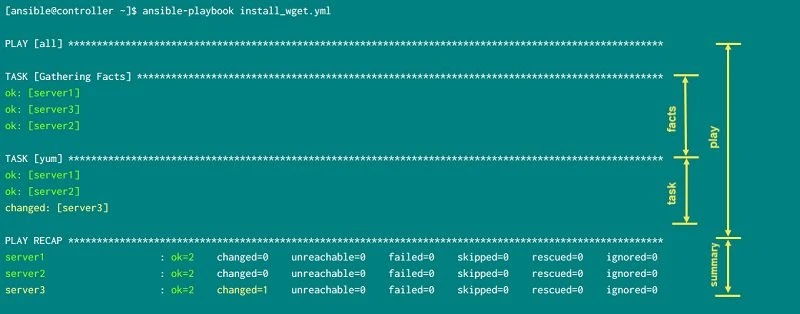
- Ansible reads the playbooks specified as an argument to the ansible-playbook command and starts executing plays in the serial order.
- Since we have declared single play, it runs against the “
all” hosts. Theallkeyword is a special pattern that will match all hosts. So, thetasksin the this play will be executed on all hosts in the inventory we passed as an argument. - Before running any of the tasks, Ansible will
gather information
about the systems that it is going to configure. This information is
collected in the form of facts. If you recall I had mentioned this
in “Ansible Facts” chapter. In the playbook we have not mentioned
anything about gathering facts and yet “
setup” module was called to collect the facts before executing the tasks - The next section is the output from tasks where
yummodule is used to install the packages. The output showsOKforserver1andserver2but forserver3it says changed. This would mean that onserver1andserver2the execution was successful but nothing was changed i.e. nothing was installed. It is possible thatwgetwas already in installed state on these servers hence ansible skipped any changes. While onserver3we have the output as “changed” which means thatwgetwas successfully installed - Finally, Ansible prints the summary of the playbook run in the
“
PLAY RECAP” section. It indicates how many modifications were made, if any of the hosts were unreachable, or execution failed on any of the systems.
Let us use “state=absent” instead of “present” with yum module
inside the playbook to remove the wget rpm from all our managed nodes:
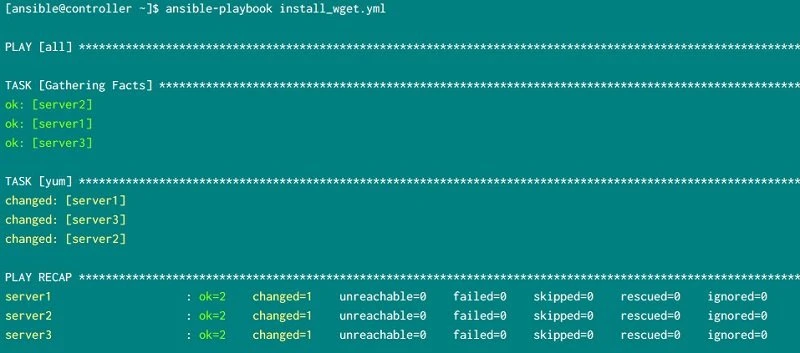
Now we re-ran the playbook by use “<strong>state=absent</strong>” and
we see that “changed=1” so this means the execution has successfully
changed one data where wget was removed from the managed nodes.
Example-2: Install multiple packages on different managed nodes
Now let us take things forward and in this example we will install multiple packages using single playbook file. I have modified my inventory file
[ansible@controller ~]$ cat /etc/ansible/hosts
[web]
server1
server2

[app]
server3
So as you see now I have divided my managed nodes into two groups where
server1 and server2 are part of web group while server3 is part
of app group. We will install httpd rpm on the web group while on
app group we will install wget and vim rpm.
Following is our second_playbook.yml
---
 - hosts: app
   become: yes
   tasks:
   - yum: name=wget state=latest
   - yum: name=vim state=latest

 - hosts: web
   become: yes
   tasks:
   - yum: name=httpd state=latest
I have removed the comments from this YAML file as now you should be
familiar with the flow. We have created two play in a single playbook.
Here in the first play
we will install wget and vim on hosts part of “app” group. In the
second play we will
install httpd on the hosts part of “web” group.
Let us execute the playbook:
[ansible@controller ~]$ ansible-playbook second_playbook.yml

PLAY [app] **************************************************************************************************

TASK [Gathering Facts] **************************************************************************************
ok: [server3]

TASK [yum] **************************************************************************************************
changed: [server3]

TASK [yum] **************************************************************************************************
changed: [server3]

PLAY [web] **************************************************************************************************

TASK [Gathering Facts] **************************************************************************************
ok: [server2]
ok: [server1]

TASK [yum] **************************************************************************************************
changed: [server2]
changed: [server1]

PLAY RECAP **************************************************************************************************
server1                    : ok=2    changed=1    unreachable=0    failed=0    skipped=0    rescued=0    ignored=0
server2                    : ok=2    changed=1    unreachable=0    failed=0    skipped=0    rescued=0    ignored=0
server3                    : ok=3    changed=2    unreachable=0    failed=0    skipped=0    rescued=0    ignored=0
The output should be pretty clear now:
- The first play i.e “
PLAY [app]” was executed as part of which the first step was to gather facts on all the servers part of “app” group. Then the tasks were expected onappgroup i.e. installing two rpms - In the second play i.e. “
PLAY [web]” againsetupmodule was called to gather all the facts from all the hosts part of “web” group. Next the tasks are executed i.e. installingwgetandvimrpm on the respective managed nodes PLAY_RECAPrefers to the final result. Onserver3we have changed=2 which means 2 rpms were installed while onserver1andserver2we have changed=1 because singlehttpdpackage was installed using this playbook.
Example-3: Disable gathering facts module
We know that by default ansible-playbook will execute setup module to
gather facts from the respective managed nodes. We also have an option
to disable this feature if we feel this is not required using
“gather_facts: false”
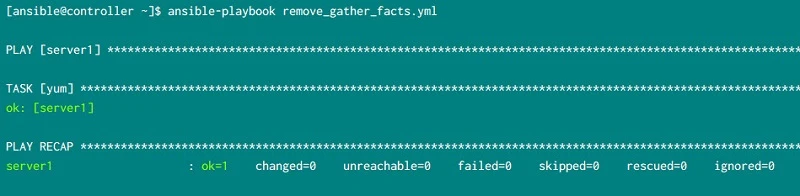
Let us use this in our playbook, remove_gather_facts.yml with following content:
---
 - hosts: server1
   become: yes
   gather_facts: false
   tasks:
   - yum: name=wget state=absent
In this playbook we will remove wget rpm as root user and additionally we have also disabled “ansible facts”.
Following the the output from the execution of this playbook. This time
the output is must shorter because ansible didn’t collected any facts
from server3
Example-4: Assign custom name to the play and tasks
In all the examples above if you observe the output of ansible-playbook,
the name of the play is based on the value of “hosts”, similarly the
name of the TASK is based on the module used. Now this may seem
confusing when we have a single playbook with multiple plays so we would
like to give a custom name to individual play and tasks by using
name=<NAME>.
For example here we have a playbook where I have a single PLAY which will perform two tasks.
- Copy
/tmp/demo.txtfrom the ansible engine to the hosts part ofwebgroup in my inventory - Create an empty file again on the hosts part of
webgroup in my inventory
Sample assign_custom_name.yml
---
 - name: Hello World
   hosts: web
   gather_facts: false
   tasks:
   - name: Copy file to web group
     copy: src=/tmp/demo.txt dest=~/
   - name: Create an empty file on web group
     file: path=/tmp/src_file.txt state=touch
Here since we have two tasks we have used hyphen twice. A “name=”
is defined for the PLAY and both the tasks. So now let us execute this
playbook:
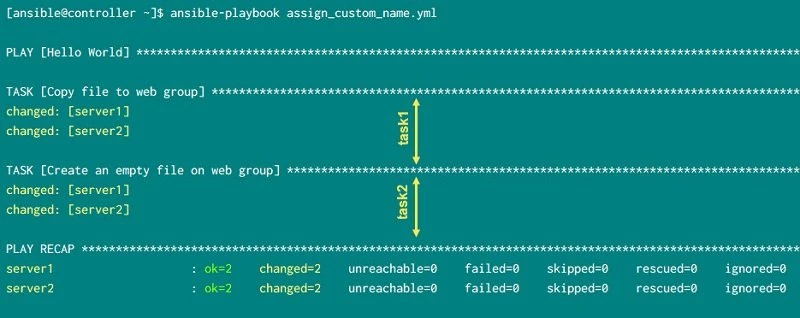
You can check the output and now we have proper name visible for PLAY
and both the TASK.
Example-5: Execute playbook as shell scripts
We also have an option to call the playbook as we would call a shell
script. To achieve this we must replace the first line with three dash
“---” to the path of ansible-playbook binary
“/usr/bin/ansible-playbook” with she-bang character as we would do
for shell script.
You can get the path of ansible-playbook binary using which command:
~]$ which ansible-playbook
/usr/bin/ansible-playbook
We will use our last example script assign_custom_name.yml to replace
the first line with this binary path in the playbook as shown below
#!/usr/bin/ansible-playbook
 - name: Hello World
   hosts: web
   gather_facts: false
   tasks:
   - name: Copy file to web group
     copy: src=/tmp/demo.txt dest=~/
   - name: Create an empty file on web group
     file: path=/tmp/src_file.txt state=touch
Provide executable permission to the playbook:
[ansible@controller ~]$ chmod u+x assign_custom_name.yml
Let’s run our playbook as we would execute a shell script:
[ansible@controller ~]$ ./assign_custom_name.yml

PLAY [Hello World] ************************************************************************************************************************

TASK [Copy file to web group] *************************************************************************************************************
ok: [server1]
ok: [server2]

TASK [Create an empty file on web group] **************************************************************************************************
changed: [server1]
changed: [server2]

PLAY RECAP ********************************************************************************************************************************
server1                    : ok=2    changed=1    unreachable=0    failed=0    skipped=0    rescued=0    ignored=0
server2                    : ok=2    changed=1    unreachable=0    failed=0    skipped=0    rescued=0    ignored=0
Example-6: Print debug message with playbooks
In all the examples till now we are performing tasks but printing
nothing on the console. We did changed the name of the play and tasks
but those are different use case. In all other scripts and code we have
an option to print text on the console while performing any tasks such
as by using echo, print, printf etc. Similarly in ansible we have
debug module which is nothing but Ansible’s version of a print
statement.
You can use debug module within tasks section to print messages which
can help you debug the playbook.
I have written a small playbook print-message.yml which just prints a
message “Hello World” at the tasks section:
---
 - hosts: server2
   tasks:
   - debug: msg="Hello World"
Let us execute this playbook:
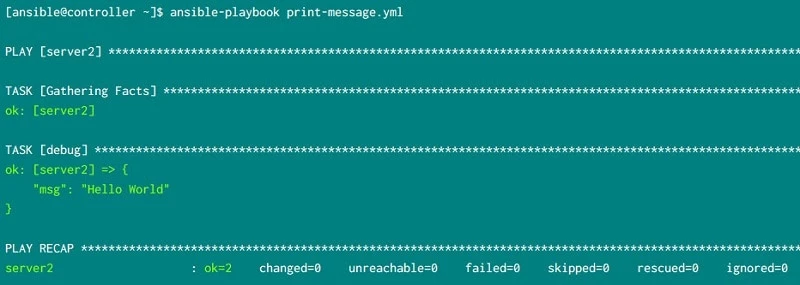
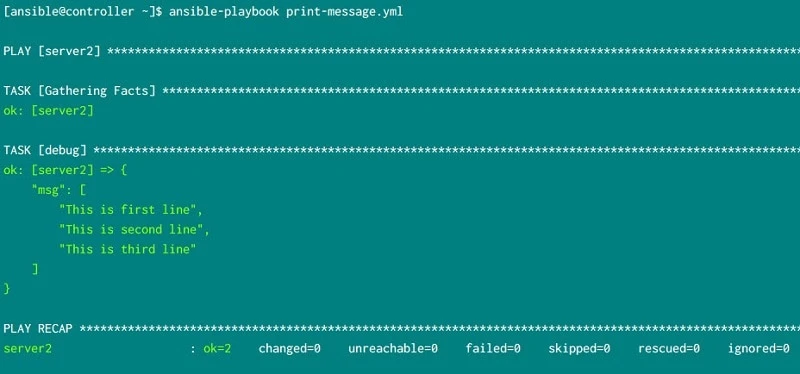
So we have an output on the console as expected. If you have to print
multi-line text then you have to place the msg in the next line:
---
 - hosts: server2
   tasks:
   - debug:
       msg:
        - "This is first line"
        - "This is second line"
        - "This is third line"
Observe the indentation. I have placed msg in the next line and added
some extra whitespace. All the text messages are again added on
individual lines starting with - (dash) with some additional
whitespace.
Let us check the output from the playbook when executed:
Example-7: Increase verbosity level of playbook
We can add debug message which is easy to debug individual tasks but to debug the entire playbook we also have an option to print verbose message and increase verbosity level to get more detailed output of activity performed in the backend.
In this sample yml “increase-verbosity.yml” file I have created two
tasks where in the first task I will print a message without any
verbosity while in the second task I am printing a message with
increased verbosity.
---
 - hosts: server2
   tasks:
   - name: default verbose
     debug:
       msg:
        - This is a test message without verbosity
   - name: verbosity level 2
     debug:
       msg:
        - This is a test message with verbosity level 2
       verbosity: 2
Let us execute this playbook:
[ansible@controller ~]$ ansible-playbook increase-verbosity.yml

PLAY [server2] *******************************************************************************************************

TASK [Gathering Facts] ***********************************************************************************************
ok: [server2]

TASK [default verbose] ***********************************************************************************************
ok: [server2] => {
    "msg": [
        "This is a test message without verbosity"
    ]
}

TASK [verbosity level 2] *********************************************************************************************
skipping: [server2]

PLAY RECAP ***********************************************************************************************************
server2                    : ok=2    changed=0    unreachable=0    failed=0    skipped=1    rescued=0    ignored=0
From the output we see that our message with no verbosity was printed but the one with verbose level 2 was skipped.
The message with verbosity was skipped because in such case ansible
expects the playbook to be executed with verbose input, so we will
re-run the playbook with “-vv” argument:
[ansible@controller ~]$ ansible-playbook increase-verbosity.yml -vv
ansible-playbook 2.9.13
  config file = /etc/ansible/ansible.cfg
  configured module search path = ['/home/ansible/.ansible/plugins/modules', '/usr/share/ansible/plugins/modules']
  ansible python module location = /usr/lib/python3.6/site-packages/ansible
  executable location = /usr/bin/ansible-playbook
  python version = 3.6.8 (default, Apr 16 2020, 01:36:27) [GCC 8.3.1 20191121 (Red Hat 8.3.1-5)]
Using /etc/ansible/ansible.cfg as config file

PLAYBOOK: increase-verbosity.yml *************************************************************************************
1 plays in increase-verbosity.yml

PLAY [server2] *******************************************************************************************************

TASK [Gathering Facts] ***********************************************************************************************
task path: /home/ansible/increase-verbosity.yml:2
ok: [server2]
META: ran handlers

TASK [default verbose] ***********************************************************************************************
task path: /home/ansible/increase-verbosity.yml:4
ok: [server2] => {
    "msg": [
        "This is a test message without verbosity"
    ]
}

TASK [verbosity level 2] *********************************************************************************************
task path: /home/ansible/increase-verbosity.yml:8
ok: [server2] => {
    "msg": [
        "This is a test message with verbosity level 2"
    ]
}
META: ran handlers
META: ran handlers

PLAY RECAP ***********************************************************************************************************
server2                    : ok=3    changed=0    unreachable=0    failed=0    skipped=0    rescued=0    ignored=0
Now we see a more detailed output on the console. You may increase the
count of “-v” to get much more detail which can fill up your console.
Example-8: Perform syntax check
Defining whether a file has the right syntax or not is fairly easy for a machine, but might be more complex for humans. This does not mean that machines are able to fix the code for you, but they can quickly identify whether a problem is present or not.
When we execute a playbook, ansible will any how perform a syntax check but then they may break the functionality by partially performing the tasks. So before actually executing the playbook we can perform a syntax check
I have created a new yaml file syntax_check.yml and I have
intentionally added extra whitespace at “- debug”. Due to which both
msg and - debug are starting at the same line. I should have also
add some extra whitespace for line with “msg:”
---
 - hosts: all
   tasks:
      - debug:
       msg: "Hello World"
Let us execute the script using --syntax-check to check the syntax of
the playbook:
[ansible@controller ~]$ ansible-playbook syntax_check.yml --syntax-check
ERROR! We were unable to read either as JSON nor YAML, these are the errors we got from each:
JSON: Expecting value: line 1 column 1 (char 0)

Syntax Error while loading YAML.
  did not find expected '-' indicator

The error appears to be in '/home/ansible/syntax_check.yml': line 5, column 8, but may
be elsewhere in the file depending on the exact syntax problem.

The offending line appears to be:

      - debug:
       msg: "Hello World"
       ^ here
Now I will fix the indentation and re-execute the --syntax-check:
[ansible@controller ~]$ ansible-playbook syntax_check.yml --syntax-check

playbook: syntax_check.yml
When the syntax check doesn’t find any errors, the output will resemble the previous one, where it listed the files that were analysed without listing any errors.
Since Ansible knows all the supported options in all the supported modules, it can quickly read your code and validate whether the YAML you provided contains all the required fields and that it does not contain any unsupported fields.
Example-9: Perform dry run of playbooks
Although you might be confident in the code you have written, it still pays to test it before running it for real in a production environment. In such cases, it is a good idea to be able to run your code, but with a safety net in place. This is what check mode is for:
Let’s create a playbook called check-mode.yml that contains the
following content:
---
- hosts: server2
  tasks:
  - name: Install nano
    yum: name=nano  state=latest
This playbook is expected to install nano rpm on server2. You may
have already realised what is wrong here? Installing an rpm requires
root level privilege which is missing in this playbook.
But let us execute this playbook in dry mode using --check and verify
the output:
[ansible@controller ~]$ ansible-playbook --check check-mode.yml

PLAY [server2] ****************************************************************************************************************************

TASK [Gathering Facts] ********************************************************************************************************************
ok: [server2]

TASK [Install nano] ***********************************************************************************************************************
fatal: [server2]: FAILED! => {"changed": false, "msg": "This command has to be run under the root user.", "results": []}

PLAY RECAP ********************************************************************************************************************************
server2                    : ok=1    changed=0    unreachable=0    failed=1    skipped=0    rescued=0    ignored=0
As expected the dry run has told us the problem i.e. missing root level privilege. The idea is that the run won’t change the state of the machine and will only highlight the differences between the current status and the status declared in the playbook.
Not all modules support check mode, but all major modules do, and more
and more modules are being added at every release. In particular, note
that the command and shell modules do not support it because it is
impossible for the module to tell what commands will result in a change,
and what won’t. Therefore, these modules will always return changed when
they’re run outside of check mode because they assume a change has been
made
I personally also didn’t had success with “file” module with dry mode
but it is possible in future we will have better results but dry mode
can help you with a bunch of other ansible modules so you should
definitely use it before executing a playbook in production environment.
What’s Next
Next in our Ansible Tutorial we will use Microsoft Visual Studio Code Editor to write playbooks using GUI
